Tailgate tribulations - Can anyone help please?

I need to gain access to the VW online system this weekend (rear discs / torque settings / lift pump priming cycle) so will take a look at the trim arrangement.

I've popped enough trim on my Landrover but have the benefit of an workshop manual.
 
The reason I’m an expert in getting the door trim off is because I had to replace the high level brake light a number of times.
Whilst you may be able to prise the lens off from the outside, once off it won’t refix properly & you have to replace the whole light unit & you can’t do that without removing the trim.
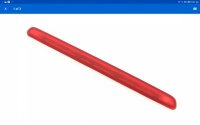
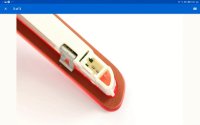
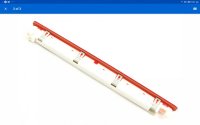
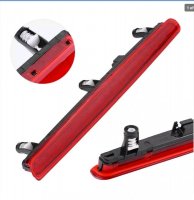
Thanks Andy. I'm sure that you are correct re the T5. However, could the T6 high level light be a different design? The security fittings in these Ebay photos seem to suggest it's just a push fit with a gasket to maintain a waterproof seal?
Screenshot_20191210-222722_eBay.jpgScreenshot_20191210-222716_eBay.jpgScreenshot_20191210-222705_eBay.jpg
Anyway the trim is going to have to come off regardless of how the light fits. I'll grit my teeth and have another more concerted attempt when the weather clears up a bit. :thumb

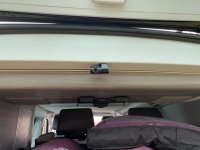
Is this the T5 version?
20191211_000800.jpg
 
Last edited:
I need to gain access to the VW online system this weekend (rear discs / torque settings / lift pump priming cycle) so will take a look at the trim arrangement.

I've popped enough trim on my Landrover but have the benefit of an workshop manual.
Thanks pjm-84, You are a star.

I think it's going to have to be as @andyinluton has already said, I'm just going to have to be more manly with it and show it whose the boss.
 
May not be any use here but whilst you're on the subject,
you can buy a rear brake light with a camera fitted.
Yes, I saw those advertised on Ebay. They would save a lot of work for those fitting a rear reversing camera. No need for all that work stripping out the lower door card. Just run the cable through the rubber umbilical tube and along inside the tunnel formed in the upper tailgate pressings to the existing upper brake light and hey presto. I suspect that's why they've manufactured that item.

I'm sure someone handy in the techy department could adapt that camera to work with a front dash cam however I'm afraid that person isn't me. So I'm just going to have to persevere and resolve this issue using the camera provided. It's just finding the time to give it my full attention.

Thanks :thumb
 
Last edited:
Can the camera not mount on the internal trim inside the opening of the rear door and not be on the door at all, the center top part of the rear screen is wiped by the rear wiper so that area of the screen is kept clean, anywhere else is just going to be covered with spray?
 
Can the camera not mount on the internal trim inside the opening of the rear door and not be on the door at all, the center top part of the rear screen is wiped by the rear wiper so that area of the screen is kept clean, anywhere else is just going to be covered with spray?
We have a camera fitted there, it does make closing the blind from inside a bit tricky, but a much easier install
 
Can the camera not mount on the internal trim inside the opening of the rear door and not be on the door at all, the center top part of the rear screen is wiped by the rear wiper so that area of the screen is kept clean, anywhere else is just going to be covered with spray?
Yes it could and it would be an easy install however being a Beach there is no airline locker to offer protection. It could be rather vunerable in that location. The other possibility is to mount it on the vertical face of that trim but that might interfere with the rear blind. If I can't fit it to the tailgate I will revert to doing something along those lines.

However, if I can remove the trim and the rear upper brake light then I think it's just a question of drilling one hole, feeding the cable through a grommet fitted in said hole, sticking down the cable with a spot of Gaffer tape to stop rattles and hold the camera cable in the correct position and finally refitting the trim and rear brake light. Sounds easy when said quickly. We shall see!
 
Another update:
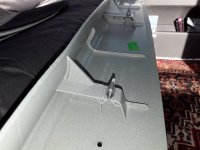
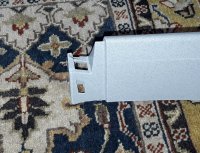
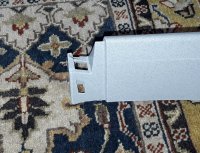
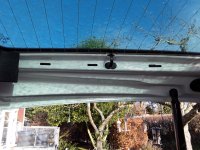
I had an hour to spare this morning so I had another play with that upper tailgate trim. Despite what I had understood, it actually comes away relatively easily. The reason being that VW appear to have changed the fixing system on the T6. So no need for pry bars or dynamite. The whole thing is held in place by twelve simple metal spring clips. Here is the upturned trim with said clips clearly visible.
20191211_122104.jpg
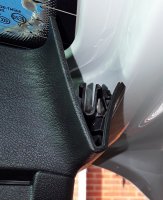
This is the type of clip used.
20191211_122950.jpg
20191211_122315.jpg
20191211_122240.jpg
So first remove the rear window blind hook/bracket.
20191211_125850.jpg
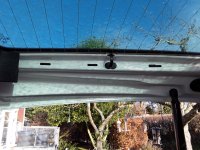
Then prize the clips out in the opposite direction to the way they go in, starting with the legs and then the top. Be sure to avoid causing any damage by using proper trim tools. They aren't expensive and do the job well. Once they have all been snapped free then drop the top and with a little bit of jiggling the fixings on the end of each leg will come free from the lower door card. The lower door card can be prized away from the tailgate a little to help release the fixings in the feet of the upper trim. Here's a couple of snaps of these fixings.
20191211_121711.jpg
20191211_182135.jpg

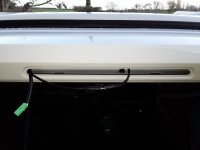
Now I have the trim off its now just a question of popping out the rear high level brake light and then I can drill a hole and finish the cable run to the camera.
20191211_125321.jpg
Behind where the hole will be is the cavity containing the camera cable and the rear upper brake light. Once the cable is grommeted, connected up and gaffer taped to the above panel the trim can be re-fitted. Hopefully this won't prove to be too much of an issue.

The rest of the fit was straight forward enough. There appears to be only one way to get the cable to the front of the vehicle from the rubber umbilical. You have to remove the trim above the tailgate opening. In order to do that you will need to remove the trim on both upper rear pillars. None if this us difficult with trim tools. Then you need to route the cable along the inside of the lower edge of the upper nearside trim. If you push your fingers up between the trim and pulled blinds you will feel a little the channel behind the lower edge. Run the cable along this channel. It isn't possible to work it through any other longitudinal void as they are all impassable. The vertical trim panel on the pillar half way along the side must be removed to route the cable as well as the B post trim. Neither posed a problem when I did them. Once at the B pillar, peel back the top of the passenger door seal and route the cable through the void above the head lining and then via the top of the A post to the windscreen. Tuck the cable up behind the headlining above the windscreen.

If anyone is thinking of fitting a rear camera to their dash cam then I hope this missive helps.

20191211_121711.jpg
 
Last edited:
Well done @Borris

As I suspected, it looks like all 3 sides need to pulled in a direction parallel to plane of the window. The trouble with Oceans is that the inner edge of the trim is caught in a gap between the thicker double glazed glass and the tailgate, which means it can’t easily be pulled in that direction. I may give ours another go.
Hi Wiggly Woo,
I'd start by making some enquiries with your dealer. The workshop bods may have done this job and may be able to offer some advise. Failing that try an approved VW body shop. AB Crush at Dover would be a very good start. They specialise in VW Audi group accident repairs and also do a lot of the roof corrosion work for VW. They have been very helpful to me in the past and will probably have done this job before.

20191211_122315.jpg

It's difficult for me to comment without seeing the issue. However, if you fancy having a go then why not try gently prizing up the window edge on the trim to above the level of the glass whilst levering the other side away from the metal frame. From memory of when I fitted Dubflectas to my SE, I don't think the double glazed glass is that much thicker than the standard offering. Make sure you use plastic trim tools though and avoid any contact with the rear heated window filaments. I'd treat this as a last resort though as the thought of levering against the glass is quite worrying. Having said that it doesnt take much pressure to prize up and you do have a stronger double glazed unit.
Having done it now my feeling is that it probably won't be as difficult as you imagine. Best to start in the middle of the legs avoiding the heated rear window electrical feeds.


Good luck.
 
Last edited:
Yes, make sure you pull the rubber cable grommet out of the hole in the door frame.

I had removed the lower camping chair trim beforehand. There is also a hardboard panel covering the wiper motor and reg plate cables, But this has holes already that you can use to pull the cable though. It is the fixings that hold this hardboard panel in place that can get corroded, and cause a lot of riv-nut issues. But being hardboard only you can easily cut an extra access hole if needed.

Be warned that the lower trim panel is rather awkward to handle, so have an extra pair of hands.

I then used a piece of fairly stiff but flexible cable to push through the cavity first. Then used some duct tape to secure the camera cable and simply pulled through.

I routed past the wiper motor then 13mm hole in the lower trim, to exit the cable to the camera.

View attachment 53262
Hi Alan,
Just wondering, does the rear blind clear a camera mounted in this position?
 
Another update:
I had an hour to spare this morning so I had another play with that upper tailgate trim. Despite what I had understood, it actually comes away relatively easily. The reason being that VW appear to have changed the fixing system on the T6. So no need for pry bars or dynamite. The whole thing is held in place by twelve simple metal spring clips. Here is the upturned trim with said clips clearly visible.
View attachment 53322
This is the type of clip used.
View attachment 53323
View attachment 53325
View attachment 53326
So first remove the rear window blind hook/bracket.
View attachment 53324
Then prize the clips out in the opposite direction to the way they go in, starting with the legs and then the top. Be sure to avoid causing any damage by using proper trim tools. They aren't expensive and do the job well. Once they have all been snapped free then drop the top and with a little be of jiggling the fixings on the end of each leg will come free from the lower door card. The lower door card can be prized away from the tailgate a little to help release the fixings in the feet of the upper trim. Here's a couple of snaps of these fixings.
View attachment 53328
View attachment 53329

Now I have the trim off its now just a question of popping out the rear high level brake light and then I can drill a hole and finish the cable run to the camera.
View attachment 53330
Behind where the hole will be is the cavity containing the camera cable and the rear upper brake light. Once the cable is grommeted, connected up and gaffer taped to the above panel the trim can be re-fitted. Hopefully this won't prove to be too much of an issue.

The rest of the fit was straight forward enough. There appears to be only one way to get the cable to the front of the vehicle from the rubber umbilical. You have to remove the trim above the tailgate opening. In order to do that you will need to remove the trim on both upper rear pillars. None if this us difficult with trim tools. Then you need to route the cable along the inside of the lower edge of the upper nearside trim. If you push your fingers up between the trim and pulled blinds you will feel a little the channel behind the lower edge. Run the cable along this channel. It isn't possible to work it through any other longitudinal void as they are all impassable. The vertical trim panel on the pillar half way along the side must be removed to route the cable as well as the B post trim. Neither posed a problem when I did them. Once at the B pillar, peel back the top of the passenger door seal and route the cable through the void above the head lining and then via the top of the A post to the windscreen. Tuck the cable up behind the headlining above the windscreen.

If anyone is thinking of fitting a rear camera to their dash cam then I hope this missive helps.

View attachment 53327
Glad you have this done now.

However, I have placed my rear view camera adjacent the bottom edge of the rear screen.

I think this is a better option if you use or intend to use a bike rack, as the camera will be obscured in your location.
 
Glad you have this done now.

However, I have placed my rear view camera adjacent the bottom edge of the rear screen.

I think this is a better option if you use or intend to use a bike rack, as the camera will be obscured in your location.
Thanks Alan,
We have no current intentions to have a bike rack. However, I can certainly see the advantage for those that do.
 
Yet another update:
Between downpours, I had the chance today to finish this long winded rear camera extension fit to to my dash cam. Well almost.

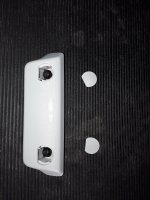
It seems that removing the upper rear brake light intact is rather difficult if not impossible. I carefully studied photos of this light fitting and watched a video clip posted on another thread, yet despite all of this I still managed to break off the über fragile red plastic brake light cover. As soon as the trim tool was lightly inserted to depress the spring clips, crack! I have read that this is a fit once only item that will self destruct if attempts are made to remove it. If this is true then what a bl@@dy stupid design! I actually think it's probably more a case of something being made down to a cost. Still I would like to know if anyone has managed to remove one intact and if so how?
20191215_125756.jpg
I thought that this light fitting had to be removed due to the rigidity of the rear camera cable. I couldn't have any sharp kinks for the following reason:
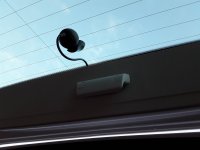
The Nextbase rear camera is designed like a magnetic eye ball that attaches to a cupped bracket which is itself stuck to the rear screen. The cable exits the rear of the camera and acts upon it a bit like a stiff tail wagging a dog. Being rather inflexible, the angle of the cable dictates where the camera points so it must be very carefully fixed in place to ensure the eyeball sees the correct rear view. IMO it's not a good design and whilst it works well now that it's fixed in place I wouldn't recommend this rear camera purely due to it's fixing method.

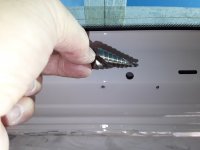
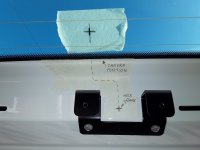
Having routed the cable from the main dash cam to the inside of the tailgate I needed to drill a hole to take the cable out from inside of the void between the inner and outer pressings to beneath the upper tailgate trim.
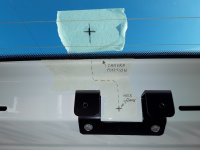
20191211_125321.jpg
20191215_133037.jpg
20191215_145333.jpg
The brake light fitting was removed to ensure that I could route the cable, fix it down properly for the reason already mentioned but mainly to avoid drilling a nasty big hole in it. Actually, drilling the hole would probably have missed the light fitting but I couldn't be sure of that before drilling. :headbang I decided not drill the hole nearer to the rubber umbilical tube and then to run the cable under the trim due to complications caused by the said inflexible cable issue and the obstructions caused by the strengthening webbs on the underside of the the upper trim moulding.
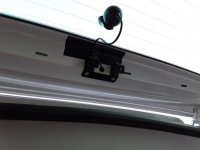
20191215_151104.jpg
20191215_153107.jpg
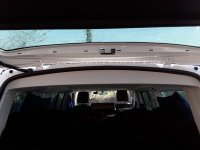
Note: the camera is fitted in the middle of the rear screen. For some reason the rear blind bracket is mounted off centre.
Question: :Nailbiting I'm afraid I cannot remember which way round the rear window blind bracket was before I removed it. Not that it really matters but which way round should it be?

Tomorrow I must source a new upper brake light. They are £35 on Fleebay so they must be at least £400 from VW! :thumb

So, with the benefit of total ignorance and a smattering of incompetance this whole job has taken me, on and off, about a day. However, if I were to do it again tomorrow I could probably do the whole front and rear camera installation in about 2 hours and I definitely wouldn't remove that fragile brake light.

Thanks to all for all the help and advice.
 
Last edited:
Well done for perseverance & bravery! I'm sure you have the bracket correct, facing inwards.

Not worth a try to glue the red / white parts back together first? Something like plastic model solvent or superglue...
 
Last edited:
Well done for perseverance & bravery! I'm sure you have the bracket correct, facing inwards.

Not worth a try to glue the red / white parts back together first? Something like plastic model solvent or superglue...
Well I could try that but because it's a brand new van I think I'd prefer to just get a new one and return it the show room condition. It's a shame because I mananged the whole job without damaging anything until I met my brake light nemesis. But hey ho omelettes and eggs etc.
 
Should have Gone to Halfords ! Hehe :Iamsorry
Yes, I don't what I was thinking of expecting them to do it. However, I didn't know what the rear camera fit involved then and to be fair to Halfords they have fitted three front dash cams for me in the past. Their fitter was then an ex VW Commercial vehicle mechanic so really knew his onions. Unfortunately, this time my appointment was with a young person who gave up when she couldn't locate the fuse board.
 
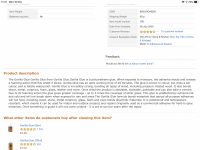
If you did want to try and glue the front lens to the back plate, this waterproof Gorilla Glue would be a good choice.
2898F5B7-C03F-4C12-A061-A0774D85B523.png IMO the OEM part is glued with a very similar product. Particularly as the OEM glue is brown !
 
If you did want to try and glue the front lens to the back plate, this waterproof Gorilla Glue would be a good choice.
View attachment 53421 IMO the OEM part is glued with a very similar product. Particularly as the OEM glue is brown !
That's not a bad idea. I'm waiting to see if it moves much in transit and when the tailgate is opened and closed. If it does then I will use some of your glue. :thumb
 
Back
Top