92 California Battery Replacement advice

Thermo valve on a fuel filter? Eh?

More Intel please?
 
Ah yes. I was under the impression that was a non return valve to maintain the head of fuel.

Everyday is a school day.
 
I have non-return valve on the inlet side, because I can't find the leak :)

dan
CEO of Cowboy's R Us Mechanics
 
I didn't manage to get out last night to check the DIP switches and charger, but I'm guessing everything will be Ok (I have the charging icon / I can change the DIPs), so I should get on and order the batteries. I've been phoning around this morning as most of the suppliers have price promises the best price so far is £260 for two Exide ES 950 GEL Batteries inc vat and delivery. I think this is really good, and will give me more funds for camping! :thumb
 
Interesting read this thread and has got me wondering something. If i'm understanding it correctly Gell (and AGM?) batteries require a different charging cycle to flooded types?
The DIP switches are presumably used to set this correct charge cycle (lower float voltage to maintain charge from what I read).
So do the DIP settings apply a different cycle both when on 240V hookup and while charging via the alternator?
 
I don't think so. When charging via alternator the charger unit isn't involved, the 12v (or 14.3 etc) is derived directly from the alternator.
 
As Pod says, the charger isn't involved, it's just a voltage sensing relay. Which is why you never get a full charge off the alternator. If you want to rely only on charging from the alternator, swap to a Alternator to Battery, or Battery to Battery charger. Something like the Stirlings.

Or install a Solar setup and move to the south of France :)
 
Thanks :thumb I use a Ctek charger when on hookup and that has a Gell / AGM mode but was worried that if I replaced the leisure battery (currently a 'normal' vented lead acid flooded) with a gell/AGM it would be damaged by alternator charging.
This is on a pre hookup 2012 Beach so sorry for hijacking the thread.
 
I managed to access the charging unit beneath the fridge and it looks original. I've added an image, if someone could confirm.20160115_140250.jpg
I've failed to remove the control panel after trying to release the side clips unsuccessfully. Would anyone have any tips on this please?
 
Yes, think that looks original.

Sorry, never removed my control panel, so can't offer any tips.
 
Can't see the output for the starter battery charge?
Should be a small two pin plug above the multi pin orange one. (assuming your charger has this function)

Does the control panel not have a couple of holes through which you poke two ends of a metal coat hanger to release the clips?
 
Very early vans don't seem to have this function. Mine doesn't.
 
Can't see the output for the starter battery charge?
Should be a small two pin plug above the multi pin orange one. (assuming your charger has this function)

Does the control panel not have a couple of holes through which you poke two ends of a metal coat hanger to release the clips?

I'll try the coat hanger trick, thanks.
 
I have been thinking of adding an extra battery looks like it's not as straight forward as I thought? Or is it!
If I link two batteries together what's all the switching about.... (Switch 1,2,3)?
 
I have been thinking of adding an extra battery looks like it's not as straight forward as I thought? Or is it!
If I link two batteries together what's all the switching about.... (Switch 1,2,3)?

It's related to the DIP switches on the rear of the over head control panel.
You need to tell the controller (and hence the charger) how many and of what type your batteries are.

Plenty on intel if you search here. :thumb

Pod
 
Nothing. Once the control panel is set, it will take care of the charger.

P.
 
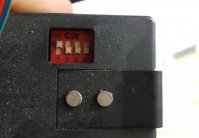
I managed to remove the control panel today. Although not but by inserting something into the holes in the front plate but by removing the interior cab light and compressing the retaining clips from the inside.

It looks like the DIP switches had not been changed by whoever had fitted the lead-acid batteries as they were still set for gel.
20160122_112912.jpg

To check the DIP switches I had a German colleague translate page 10 from the control panel manual linked below.
http://westfaliat4.info/WestfaliaT4CentralElectronicUnit.pdf

<<<<Translated Text>>>>
It is necessary to adjust the parameters using the DIP switches. The switches are located at the back of the device.

DIP-switch Nr. Setting "OFF" Setting "ON"
1 one additional battery two additional batteries
2 battery type "GEL" battery type "Lead-Acid"
3 cold box / freezer cabinet fridge
4 degree Celsius degree Fahrenheit
<<<<<end>>>>

I hope this is useful to others and thanks to everyone for your help to improve my van.
 
Fitted the new leisures this evening. Everything seems Ok, heater working but interior florescent lighting have stopped working. Would anyone know the fuse to check please?
 
I believe the fuse is down by the RCD trip switch, behind the drivers seat above the seat belt anchor point.

Without looking I've no idea which fuse you need. There are only a few so check them all.
 
Just checked fuses and they are all OK. Fridge, heater, water pump working, just florescent lights are not. Maybe a loose wire at the battery?
 
I'll dig out the wiring diagram. Just in the middle of prepping roast lamb !
 
image.jpeg image.jpeg


So your rear cabin lights are W8 and W25, both fed via fuse S3. If the fuse is ok and all other services fed from the same fuse panel are ok then I would check the Earth on each light.

Fuse S3 also feeds W28 which I think is the bendy light in the roof.

Hope this helps..

Pod.
 
Back
Top