Cali technical tips&tricks

  • Thread starter Hotel California
  • Start date
I was cleaning the area that is normally covered when the roof is closed today, I could see the rear drain hole that drain down the back of the body that the tailgate covers but I couldn't see any drain holes at the front.
Could someone put a picture up, pretty please.

I know it's a long topic , but on page one almost below i already pointed it out in detail with pics.

Do take the time to read thru the whole topic instead responding on recent added comments!
;)
 
Sorry, I'll get in the corner on the Naughty Chair with a Dunces Cap on and write out a 100 times "I must read threads from the beginning"
yellow-dunce-hat-stool-6041019.jpg


Didn't think to look under the plastic cover, Cheers:thumb
 
Could you tell us where that pic. is taken....? It does seem the rubber hose end does not exit the vehicle?
Hello,
The picture was taken on the driver's side (LHD). Cover next to the pedals (to the left - A-bar) is removed. The hose end does exit the vehicle (even in this faulty position) but are removed (and replaced) by me.
 
Regulary check the holes that drains the water from the roof
Frontside the drainhole is underneeth this plastic cap
View attachment 7277
Remove it by holding it like this , sqeeze with your hand and pull towarts you at same time...like this .
Try to do it two handed but i had to hold my phone taking the pics..'
View attachment 7278
Clean underneeth and check te drainopening
Attention , don't push any sharp pin's ( like i do here with a nail) to deep in the hole , the rubber hose takes a direct turn and it will puncture the drain!
Use a ....how you call it ....thing to claen your ears stick:D
View attachment 7279

Backside is easyer and if you look good one can see light thru the drain if its open
View attachment 7280


About the same category :
Cleaning the rubbers of the sliding window(s) with a toothbruch specialy below, preventing dirt to get stuck and resulting in waterinfiltration.

As for doorrubbers in general use talkpowder no vasline or greasy stuff

View attachment 7281
Great post Hotel, but I don't get the talc idea for the window rubbers , surely talc would mix with water to form a grinding,polishing paste, that will remove the paint?wouldnt a rubber friendly grease be better, like we use on the bushes of suspension forks?
 
Should have taken more pictures , next time i'l be wearing a go-pro mounted on a helmet:bananadance

But i did wrote some things on a note...
During bad weather with thunder&lightning , if on hook-up best to unplug it from the Cali as the cable on the ground is a potencial risk of catching lightning .
Also good to unplug it at the donorside at the same time
The roof itself is aluminium and they say it can take pretty stormy winds ( forgot howmuch speed ) but i wil be closing mine if possible.
Oh , always have the engine running while opening/ closing the roof , it's deadly for the battery if you don't have the engine running.

The 220/12v inverter is sensitive to heat , it can switch itself off if themps underneeth the wardrobe goes above 60degrees celcius
In hot country' s or very hot Brittisch summers , try to cool the left side of the Cali by providing shade to that side ...how you do it is up to you , under trees , attatch a tarp to the side, whatever is in reach.
Leave the sliding doors under the sink a bit open and take out the plastic round caps inside the wardrobe and under the cooker . They sell a fan to put in place of the cap under the coocker but for me thats overkill...
On recent models the inverter sits above the lesure bat in the booth opening the inspection door can help also , i'm thinking of placing a vent in that little door
Other earlyer Cali's have the inverter under the fridge

That fridge also has to suffer the heat and the same precautions might help here to.
Also useful to clean out dust underneeth the fridge around the fridge motor , vaccum or by compressor -air- pressure

If somehow the bech drawer is stuck , impossible to open.
Check if not the seatbelts are pushed the whole way in the seat when using the benchseat as bed...and pull them back up

The pump in the fresh watertank can come lose of the rubber hose , due to pressure by the pump ....best is when taking water at the tap , to open it in one time fully and than bringing it back to the position you want . That way the beginpressure floads away and less risk of disconecting the rubber hose .
Now you say if it happens , open the watertank and put a strap on it , good , but then the problem moves to the other side of the rubber hose in the tank and the risk of popping of on that side ....and it's nearly impossible to reach in the tank to fiks that!

Driving the Cali generates power thru the dynamo to charge the battery , as the Cali has three bats the dynamo is not powerfull enough to 100% load the lesure bats
Is therefore its best to plug your Cali in to 220v mains at least every month for 12h in a row.
It should extend the life of the bats.

Sparewheel is hard to reach , specialy when towbar is mounted .
Jack-up the Cali first or place it on your levelling ramps to higher it up.
Use a small wooden plank (say 20x20cm)to larger the groundsurface of the original VW jack and dropping the risk of jackfailure on lose ground/gravel

Clean both the watertanks once a year using hot water and some cheap tablets people use to clean theire fake theet in a glas water (don't know how you guys call this)

.....
Now some of you think i wrote a lot of bulls:mutet , but do with it whatever you want...
If you read it up to here , you wil remember some things in the near future and i hope at that moment this tips might have helpt you!

It's mostley just rational thinking but one is better at it then the other...:veryfunny
If something pops up i'l be adding it here.:kiss
More great stuff...., I thaught the roof ran off the leisure batteries, so no point in having the engine on??
 
Don't know or others had the rear headrests from the benchseat removed , but i had mine removed by VW dealer . Could be done DIY but was at dealer last time and asked them to do it , so the worst case senario of me breaking or damaging something would be excluded.
But them i came up with the problem of not beeing able to attach the table to and above the benchseat with the original VW strap , wich somtimes can be handy doing dishes or while cooking in the Cali.
Headrests can be put back in place and lifted out without any problem but as we always travel just the two and our doggy , the headrests are more trouble than fun reaching over the seat to the booth or making the dowstaires bed nothing can be stored undet the folded seat as the headresta are in the way....
So no headrest to attatch the tablestrap:mad:
View attachment 8382
So searched for a solution......
View attachment 8383
Does the job , table in place:thumb
View attachment 8384
Cheers ,
Hotel California :cool:
More questions hotel, when you have removed the headrests, can you just slip them back in ,,,,and out....as we are sometimes 2 but sometimes 3, or is it a big job each time??
 
Yes they do but need to be an expert in origami :D not worth the hassle. I've stuck them inside one of the seats in the tailgate instead.

The only thing I could find for the table space was a roll of large bin bags I've been cursing for not fitting neatly anywhere else ... walking poles should fit in too when I find them :)
If you just fold the front blind in half, place sides in top , and roll starting with the padded bit,.....simple, and just the right width
 
More questions hotel, when you have removed the headrests, can you just slip them back in ,,,,and out....as we are sometimes 2 but sometimes 3, or is it a big job each time??

@CYCLOPATH
There are sprays for rubber seals also ,
Once the pins have been removed the headrests can be pulled out and back in within 2 sec. , do mind that if you push the button to fold them backwarts to put the backrest down ( folding down the downstaires bed ) they fall out.
We just leave the headrests home , as we just travel with the 2 of us.

About the roof opertation yes or no uses the lesure batts or the starter bat .....
I have been told by my dealer (witch i 100%trust ) it is better to operate the roof with engine running , better for your batteries they say.
There are on here people telling it runs on the lesure batts ( witch i not know for sure)
I think it runs on starter bat. as the pump is located in front on the cabin behind the control panel.
OK , say it runs on the lesure batts , it is still wise to have the engine running when operating the roof ....
Say you arrive at site , engine off .
Done a decent distance so batts say 100%
Your fridge is running ( food and booze in) allready taking power .
Your planning to stay put few days .
Open the roof.
Batts maybe go down 5 -10% just to open the roof? just guessing...even it is not noticeable on the % it does take away power you need for the days later.
Bad start imo.
If you open the roof while your engine is still running afther positioning on the site it is wiser to open the roof before putting engine off .
 
Last edited:
great post. Well done!!!!:thanks

Good to see some people are still discovering my tread , as it was one of my early informative posts , i think i can't top thisone ....although i tried in other posts;)
 
Just to let you know that I have found this post extremely useful and informative. Many Thanks.
 
Here is a tip I use to give more flexibility in the Cali, it needs a mod which costs nothing and takes about five minutes to do.

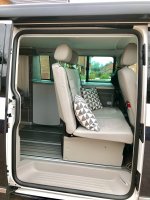
The picture below shows the rear seat slid right forward, giving access to the rear. This is handy to use the loo when travelling, just slide it forward from under the rear shelf, drop the blinds, and thro a blanket over the headrests.

It’s also useful to carry furniture etc around! Also gives easy access to the tool kit when the boot is full of stuff.

3665AEFC-D098-436A-BDCE-16F4D62F9514.jpeg

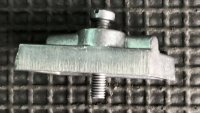
To enable the seat to be slid this far forward the stop (below) has to be removed. This is located in the rail nearest the kitchen, about 30 cms from the front. Slide a screwdriver along to locate it, then unscrew it.

ADD4D74F-EB91-467F-8857-F5190D164D2F.jpeg

To remove the stop after it has been unscrewed, you have to remove the plastic trim at the front of the rail, then slide the stop forward. The plastic trim can be removed by levering carefully up at the front.

150F4C9E-D046-4642-BA0C-826B77F355EA.jpeg

Keep the stop somewhere safe in case it’s needed, pop the trim back rear end first and tap down at the front. That’s it, now you can use the loo :thumb
 
There are on here people telling it runs on the lesure batts ( witch i not know for sure)
I think it runs on starter bat. as the pump is located in front on the cabin behind the control panel.
OK , say it runs on the lesure batts , it is still wise to have the engine running when operating the roof ..
It definitely runs off the leisure batteries. As I mentioned in another thread, the leisure batteries in mine were totally flat* when I collected it. I wanted to check the roof but the only way it would go up was to let the engine idle for a few minutes and leave it running while the roof went up.

* been in the shoroom with something left turned on. The vehicle battery was connected to a trickle charger so that was fine.
 
Here is a tip I use to give more flexibility in the Cali, it needs a mod which costs nothing and takes about five minutes to do.

The picture below shows the rear seat slid right forward, giving access to the rear. This is handy to use the loo when travelling, just slide it forward from under the rear shelf, drop the blinds, and thro a blanket over the headrests.

It’s also useful to carry furniture etc around! Also gives easy access to the tool kit when the boot is full of stuff.

View attachment 31934

To enable the seat to be slid this far forward the stop (below) has to be removed. This is located in the rail nearest the kitchen, about 30 cms from the front. Slide a screwdriver along to locate it, then unscrew it.

View attachment 31935

To remove the stop after it has been unscrewed, you have to remove the plastic trim at the front of the rail, then slide the stop forward. The plastic trim can be removed by levering carefully up at the front.

View attachment 31936

Keep the stop somewhere safe in case it’s needed, pop the trim back rear end first and tap down at the front. That’s it, now you can use the loo :thumb
I have taken out the front and the rear one out, so now can push bench seat all the way back for more space if the rear self is not needed.
 
To enable the seat to be slid this far forward the stop (below) has to be removed. This is located in the rail nearest the kitchen, about 30 cms from the front. Slide a screwdriver along to locate it, then unscrew it.

Would this have any sort of detrimental effect in the event of a smash with respect to the seat moving forward?
 
Would this have any sort of detrimental effect in the event of a smash with respect to the seat moving forward?
No. It is not the thing that securely locks the seat in place. It's merely the limit stop when you slide the seat forward
 
...... in which case, I wonder why one is fitted in the first instance?
 
...... in which case, I wonder why one is fitted in the first instance?
Maybe it is to prevent it being to close to the seats in front if someone is sitting in the back? For comfort and/or safety?
 
...... in which case, I wonder why one is fitted in the first instance?
The stops mark are how far the seat needs to go forward to allow the back to be folded down to form the bed.

If you plan to take the stops out, it's wise to first mark the rails where the front of the seat needs to slide to. I did this with a couple of small lines using indelible pen.

At times when camping it is very convenient being able to slide the seat right forward because you can then access any stuff you have in the under-bed area at the back without having to unload everything from the tailgate.

The stop marks are not to set the bed/fold down the rear seat .
At least not from factory new ....could be yours is set so later but the stop is way much to the front than the bed position.
The main reason for the stop imo . is to prevent the seat to lift out of the rails. The position where the seat needs to be in to take it out is behind the stop , so one should remove the stop if the seat wants to be taken out
 
.... curiosity got the better of me. I just popped out to look and, @Tactical is indeed correct. Ours is brand new and I'm the only owner. Moving the seat forward until it hits the stop provides the correct position to make the bed.
 

VW California Club

Back
Top