- Home
- Forums
- VW California T5 T6 & T6.1 Specific Sections
- VW California T5,T6 & T6.1 Specific Sections
- Wind-out Awning
You are using an out of date browser. It may not display this or other websites correctly.
You should upgrade or use an alternative browser.
You should upgrade or use an alternative browser.
BeagleMum
Super Poster
VIP Member
Tanks, Will phone MondayThanks for the great feedback folks, with regards the emails I've not seen them tbh (perhaps they've been spammed?), we're making a sent of infills up for a chap this week but just as a catch all can you drop the office a call please and they'll capture your details. 01246 912712. Cheers
T
The Poets
We have made a lot of use of our Comfortz awning room over the 4 years we have had it in various ways. We tried putting two of them together to make a bigger dining area.
View attachment 52588
This worked very well except when it rained as the rain would come through the join between the awnings.
@Borris designed some panels to join the awnings with Velcro on the join. This provided a wind and watertight join and made it a very comfortable space.
View attachment 52589
View attachment 52590
Comfortz made the join in the same material so it matched in very well. The roof join was made with a gutter like join to run the water away. We had a lot of meals in this awning configuration which worked well.
It is important to secure the awning very well and tie down kits are available from the shop.
View attachment 52591
This is one of the strongest ones but you can also get 2 shorter ones that fit into the Kador strip.
We used 2 sets of tie down straps at Highlands End on the recent very windy Club Meet. You can see them both in this picture, as well as get some idea about the strength of the wind from the hedge in the background.
View attachment 52592
You mentioned the gap between the wall at each end and the roof. If you get a pair of plastic clips like these, they grip the awning firmly and can be pulled with a bungee cord and fixed to a peg so that the gap is closed.
View attachment 52594
I don't have a picture of them in place at present, but I'll try to take one next time we use them.
The sum up I think this awning room is very useful. It folds into a very small bag which can be easily carried, in with the folding seats, for example. It is quick and easy to put up. It will act as a place to put the items you don't need in the Cali when you are on site and need the space inside for sleeping. It is also very good value.
Being able to close the gap between roof and side panels would be a big plus....ours has been great but I’m always conscious of draught and/or rain coming in. The gap is quite big on a windy day.
I’d be very keen to know more about these clips and how it looks!
SimonB
Staff member
Top Poster
Lifetime VIP Member
They seem to be called Ground Sheet clips or Tarpaulin Clips here is a link to an Amazon selectionBeing able to close the gap between roof and side panels would be a big plus....ours has been great but I’m always conscious of draught and/or rain coming in. The gap is quite big on a windy day.
I’d be very keen to know more about these clips and how it looks!
https://www.amazon.co.uk/s?k=ground...nique09f-21&tag=unique09f-21&tag=unique09f-21 They basically act like a Bulldog clip would for paper, but they grip Tarpaulins. You fix it with a bungee to put some tension on it so it grips even more. Clip them onto the roll out awning and pull downwards to cover the gap between the wall and the roof, then put a bungee cord in the handle of the clip and peg it to the floor.
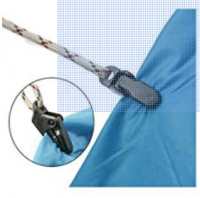
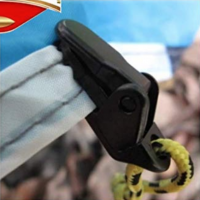
I'm off to Snowdonia in a couple of weeks, I'll try to get some actual pictures then. These are a couple of publicity shots which hopefully gives a good idea.
Simon
SailSki
VIP Member
Hi, I think that the fill-in side panels that Comfortz refer to above are being made for me - Comfortz have been very responsive and great customer service so far.
They are making them to fit Kampa Limpets which they are also supplying and should enable the panels to be attached directly to the side of the van.
I should be able to give some feedback on the fit in a few days once I get home to pick them up.
Cheers. Mike
They are making them to fit Kampa Limpets which they are also supplying and should enable the panels to be attached directly to the side of the van.
I should be able to give some feedback on the fit in a few days once I get home to pick them up.
Cheers. Mike
SimonB
Staff member
Top Poster
Lifetime VIP Member
If you look at post #20 at the end of the first page of this thread there are pictures of the panels there as made for the black awning room that Comfortz make. I would think as they are not a regular item the cost would probably need to be agreed with the shop.Has anyone got a picture of the fill-in panels please? How much did they cost?
We found them very useful, the only problem was finding places you could use them. Some sites decided that with the awnings joined you weren't able to comply with the 6 metre rule so wouldn't allow them. You do need some serious tie-down straps to hold the joined panels as they present a large area for the wind to catch.
JAPRACER
£35/40 from memory, haven’t used them yet and you will still need limpetsif you don’t want your paint damagedHas anyone got a picture of the fill-in panels please? How much did they cost?
S
Scanacali
What is the best way to secure the comfort awning room fill-in additional side panels to the van without causing any damage to the paintwork? I have read about the limpet suction cups, or just plain suction cups. Do these cause marks on the paintwork?
Has anyone managed to use a telescopic awning pole or are there any other alternative suggested methods that work?
Has anyone managed to use a telescopic awning pole or are there any other alternative suggested methods that work?
Denzilgts
VIP Member
at First I used some paranoid, then realised I could use some of the bobble elastics that come with the awning at the top to the awning rail. Same on the bottom but to some ground pegs
G
GrumpyGranddad
Guest User
We have the Comfortz Awning Room from the Club Shop and it fits our T6.1Hi. Does anybody know if the latest version works with T6.1? It only says t5 and t6. Thanks
On first use we found we needed to buy the Infills to close the gap between the awning room and van.
Mark Ch
VIP Member
Thank you. I’ll get it ordered today.We have the Comfortz Awning Room from the Club Shop and it fits our T6.1
On first use we found we needed to buy the Infills to close the gap between the awning room and van.
R
Resfeber
VIP Member
I made side connectors for about £40 using the following.What would be the best way to attach the side fill-in to the van? I've seen limpets and magnets mentioned.
1) https://www.justkampers.com/ac0308-...ubNcT0a8q6gMKMCKrKotcqKl2QehtsRIaAlwBEALw_wcB
This came as a 3 metre length and can be split at 2 metre and 1 metre, 2 metre at the rear corner and 1 metre at the top of the drivers door.
To join to the awning room material I used the following tape and the correct Velcro tape attached to the flap.
2) https://www.ebay.co.uk/itm/322253640829
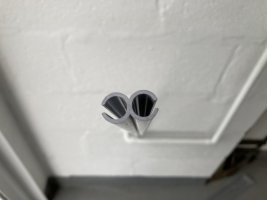
The combination extends the side panels and the figure of 8 kader joint slips in and joins the tape to the magnetic kampa awning adapter.
At the rear corner of the van the adapter runs full height.
At the front, the adapter is at the top of the door.
Lower down, I stuck a 0.75 metre Velcro strip on the inside edge of the door.
This allows the comfort awning Velcro edge to be attached to the lower section of the door.
All comfort sides attached and gaps closed
For a complete seal there is the Fiamma skirt
3)
http://www.fiammastore.com/Fiamma-Accessories-for-Zip-F45-F65/Fiamma-Vehicle-Side-Skirting
Happy to post some pics tomorrow of set up
Mark Ch
VIP Member
Me too please.Thanks. Interested to see some pics
R
Resfeber
VIP Member
Here you go Rams66, Marks, Shuftie any anyone interested in the DIY attachment for the Comfortz side panel to the van.Can I add to the me too's too?
Firstly, I would say that the optional bespoke extension panels made by Comfortz would be an added benefit to use with this fixing method.
Even better if these were fitted at the van contact side with the Keder tape I mentioned in my post.
All the additional kit apart from the figure of 8 joining pieces will fold and fit in the Comfortz bag (inc the Fiamma skirt)
Mine lives on the back shelf
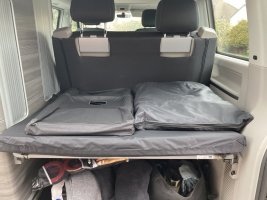
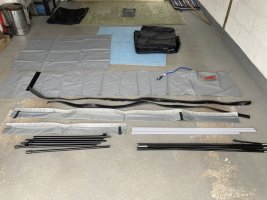
So to the fitting
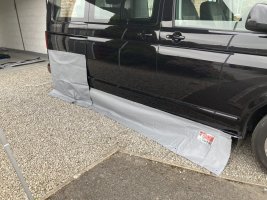
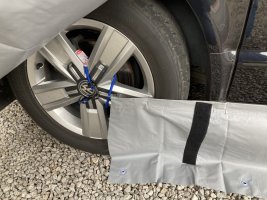
Firstly the Fiamma skirt. Note the blue bungee to the rear wheel. The Fiamma hook would destroy the Davenport alloy if hooked on to it.
I also added a Velcro pad to each section to allow the rear wheel cover to lie flush with the skirt to prevent the power door catching it.
starting at the rear, the black keder tape with Velcro add (I stapled mine as well as the glue, the ideal would be to have it stitched in but I don’t have a machine) is fitted to the room Velcro.
Then a 2 metre section of the kampa magnetic awning adapter is placed on the van side. NB magnets are much stronger on one face than other due to padding.
The two are then joined with 2 sections of Keder figure of 8 connector
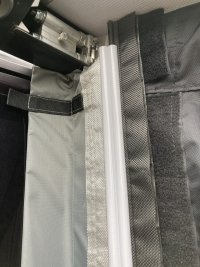
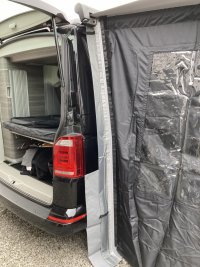
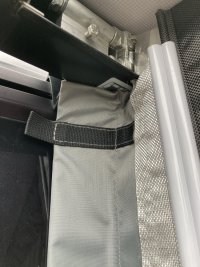
The next shot shows the join from inside the room
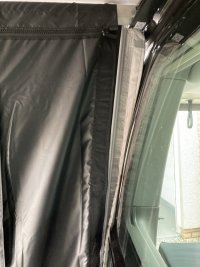
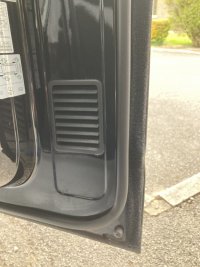
The front side panel fitting is similar apart from being reluctant to buy a second adapter I stuck a piece of Velcro on the inner face of the lower section of the drivers door and split the Keder tape below the Keder 1 metre figure of 8 connector to allow the lower edge of the Keder tape to be attached to the door.
With a second Kampa adapter you could omit this and run it full length on the drivers door.
Due to attachment restricts will have to post
Further the mages in a new post
R
Resfeber
VIP Member
FurtherHere you go Rams66, Marks, Shuftie any anyone interested in the DIY attachment for the Comfortz side panel to the van.
Firstly, I would say that the optional bespoke extension panels made by Comfortz would be an added benefit to use with this fixing method.
Even better if these were fitted at the van contact side with the Keder tape I mentioned in my post.
All the additional kit apart from the figure of 8 joining pieces will fold and fit in the Comfortz bag (inc the Fiamma skirt)
Mine lives on the back shelf
View attachment 77432View attachment 77433
So to the fitting
Firstly the Fiamma skirt. Note the blue bungee to the rear wheel. The Fiamma hook would destroy the Davenport alloy if hooked on to it.
I also added a Velcro pad to each section to allow the rear wheel cover to lie flush with the skirt to prevent the power door catching it.
View attachment 77434
View attachment 77435
starting at the rear, the black keder tape with Velcro add (I stapled mine as well as the glue, the ideal would be to have it stitched in but I don’t have a machine) is fitted to the room Velcro.
Then a 2 metre section of the kampa magnetic awning adapter is placed on the van side. NB magnets are much stronger on one face than other due to padding.
The two are then joined with 2 sections of Keder figure of 8 connector
View attachment 77439
View attachment 77436View attachment 77437View attachment 77438
The next shot shows the join from inside the room
View attachment 77440
The front side panel fitting is similar apart from being reluctant to buy a second adapter I stuck a piece of Velcro on the inner face of the lower section of the drivers door and split the Keder tape below the Keder 1 metre figure of 8 connector to allow the lower edge of the Keder tape to be attached to the door.
With a second Kampa adapter you could omit this and run it full length on the drivers door.
View attachment 77441
Due to attachment restricts will have to post
Further the mages in a new post
images
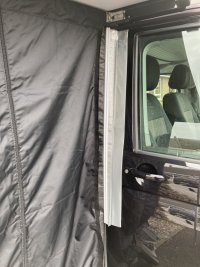
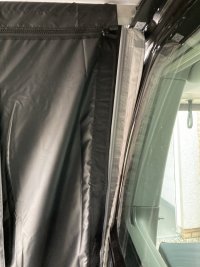
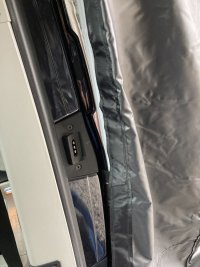
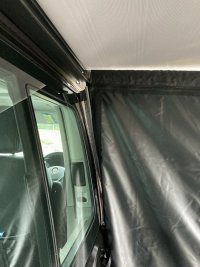
The power door opens and closes fine but the top rear corner when fully open can push the Kampa adapter off the van side.
If you had the Comfortz additional side pieces then these would follow the door and not pull the adaptor with them.
Finally, a couple of general issues with the awning room.
I was particularly concerned at rain ponding on roof so made 2 bracing poles.
Unfortunately, I cannot find where I ordered these from (think it was Amazon but not showing in my order history) They were good value and two in a pack, each pole is 3 section and adjustable to the awning whiccan then tension the roof on to them
For added support I also have fibreglass tent canes that run from each corner of the roof and force a slope dome which shed water really well and no sagging even in a downpour.
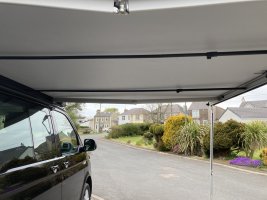
Lastly, I think that the gap between the roof and the sides attached to the arm could be easily closed with a piece of foam pipe insulation (probably 22 or 28 mm pipe size) slit open and pushed over the arm .
Hope the images help.
Amarillo
Tom
Super Poster
VIP Member
Wow seems more effort than a lot of blow-up drive-away awnings by the time you add and fit all the bits !
Yes. It seems that way. We have a G3 residence:
A lot of faff to put up, but does have fringe benefits over our Hexaway, including the possibility of being heated by the parking heater.
R
Resfeber
VIP Member
I would agree but depends on the amount of use one will have for an awning.Wow seems more effort than a lot of blow-up drive-away awnings by the time you add and fit all the bits !
The space occupied by the Comfortz and the extras is minimal. Would a full blow up drive away stow on the rear shelf at no more than 75mm high?
Outs is used occasionally when we have a few days on a pitch or our children (with partners) want to camp out for a day or 2.
So largely down to personal preference and use that you make of it v amount of space it takes up.
The original members asked for images of a method of closing the space between the Comfortz room and the van sides.
The merits of a Comfortz v other awnings may be for another thread/ new post
Yes. It seems that way. We have a G3 residence:
A lot of faff to put up, but does have fringe benefits over our Hexaway, including the possibility of being heated by the parking heater.
Similar threads
- Replies
- 7
- Views
- 3K
- Home
- Forums
- VW California T5 T6 & T6.1 Specific Sections
- VW California T5,T6 & T6.1 Specific Sections
- Wind-out Awning

About us
The VW California Club is the worlds largest resource for all owners and enthusiasts of VW California campervans.


