Heating upstairs

Camperfamily

Camperfamily

VIP Member
Messages
971
Location
Edinburgh
Vehicle
T5 SE 180
Toppers are great for improving the heat loss upstairs. We have a Pucer cover and love it in winter, having used below zero Celsius. Nevertheless, there can still be quite a significant heat imbalance between upstairs and downstairs when running the overnight heater. This only matters if you’re using both upstairs and downstairs beds. Similarly, it is not a significant issue, but rather something that benefits from improvement, or some ‘finer tuning’, so why not...

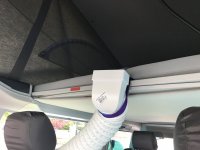
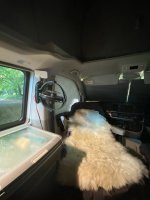
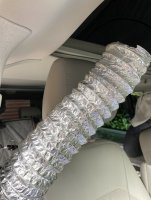
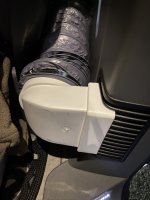
Having taken some inspiration from a similar German made, but expensive contraption, I made the attached. Ducting and two ducting ends bought from Screwfix for just under £10.

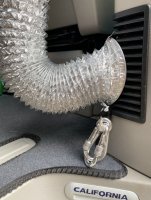
I cut one of the ducting ends to sit perfectly into the Cali’s B pillar vent, requiring no modification to the Cali or any additional attachment. It also leaves half of that vent uncovered to continue heating the downstairs.

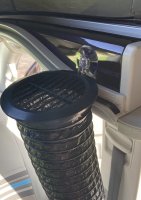
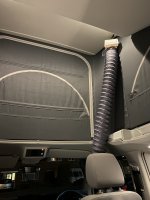
I will either attach the upstairs end of the ducting with the help of the Velcro strap on the upper mattress (as pictured), or get a removable suction cup (such as this) and tie to hold it at the front of the cab.

Not bad for £10 and 15 minutes effort in my humble view. Hope helpful.

A5BA6CC5-EF3C-4B17-B130-B31F0EEBE737.jpeg

1EEC3764-6EE8-4085-A01C-192B2BE34F84.jpeg

DF5881B2-5E35-4D8D-94C6-8A33DCD8608A.jpeg

0578E96F-9CA5-4EF2-AA40-A26C04F16A3E.jpeg
 
Nice. The suction cup idea works well for me.IMG_0584.jpg

Some more ideas here:


Nice. The suction cup idea works well for me.View attachment 66292

Some more ideas here:


Thanks. Is that insulated ducting you’ve got? Looks a bit nicer in black too
 
It is insulated, simply because that was the only black stuff I could find. And it's only black because I'm too anal about making everything look nice, even if it's something that no-one else is ever going to see. :oops:

(I'm still a bit annoyed I couldn't find a black corner duct for the other end, but I guess you have to make compromises in life!)
This sounds like me to be honest - I prefer to think it means we’ve got high standards.

I really like the German version as it’s all black, but the cost is prohibitive
 
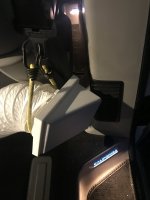
I did very similar set up last week, suspended the hose via a bungee cord from the seatbelt buckle and then a cable tie on to the Velcro tab at front of roof liner

E31F0007-7714-4549-A721-6D5AA357ED49.jpeg
 
I did very similar set up last week, suspended the hose via a bungee cord from the seatbelt buckle and then a cable tie on to the Velcro tab at front of roof liner

View attachment 67267
Good job. You will get better flow to upstairs if you can connect the duct end to/ into the vent. Your current setup looks like it will reflect airflow into cab, which isn’t necessarily bad if it then rises to upstairs, but a bit indirect
 
This Sirocco II fan works well to heat upstairs, just direct the airflow from downstairs to upstairs as an alternative to the heating duct method. It’s silent and also works well for cooling when it’s hot.

It’s silent, very low power and it can be pointed in any direction, or folded out of the way to open the sink cover. I’ve attached it using 3M dual lock reclosable tape and it stays there securely while driving.

85204D9E-C30E-41B1-8B71-AF665C83790E.jpeg
 
This Sirocco II fan works well to heat upstairs, just direct the airflow from downstairs to upstairs as an alternative to the heating duct method. It’s silent and also works well for cooling when it’s hot.

It’s silent, very low power and it can be pointed in any direction, or folded out of the way to open the sink cover. I’ve attached it using 3M dual lock reclosable tape and it stays there securely while driving.

View attachment 67848
Good tip, however an open fan is not an option for me with small and curious kids
 
Our £8 solution transfers about 30% of the heat upstairs which makes a big difference as the volume is less up top. (The entire build consists of a small bulldog clip on the seatbelt clip, a paper clip, a hair scrunchie and a couple of small weights).
We have a dog who sleeps downstairs and doesn’t like the heat, so will post the updated version as soon as I come across just the right piece of cardboard. Likely as not my Wife finishes the box of Special K thinking about it.
B2082FBE-BF5B-47D9-A0EB-73D08C73ABE5.jpeg
93B5C750-FF94-456C-A3B9-0548D02A0351.jpeg
 
Did anyone see a post on the club Facebook page showing (well promising) a UK made version of the Cali-heat? Only theirs took "100% of the heat upstairs" and boasted it left the "other heating" vents to warm downstairs. I pointed out I was pretty sure there was only the one heating vent, but didn't get a reply.
 
Did anyone see a post on the club Facebook page showing (well promising) a UK made version of the Cali-heat? Only theirs took "100% of the heat upstairs" and boasted it left the "other heating" vents to warm downstairs. I pointed out I was pretty sure there was only the one heating vent, but didn't get a reply.
I didn’t see that, but sounds like a fail from someone who doesn’t understand basics of the heater.

I recently discovered (via this forum) that there are 2 output vents on the b pillar - one is hiding on the flat section pointing toward the seat.
 
Did anyone see a post on the club Facebook page showing (well promising) a UK made version of the Cali-heat? Only theirs took "100% of the heat upstairs" and boasted it left the "other heating" vents to warm downstairs. I pointed out I was pretty sure there was only the one heating vent, but didn't get a reply.
They posted on here recently asking if anyone would
be interested in being a Guinea pig, you had to email them
for details.

I would rather use the flat square one for the upstairs sauna than
the corner one.
 
@Camperfamily would you be able to share the dimensions of the ducting end that you used to connect the hose to the B-pillar vent?

Im considering building something similair and your project seems the best looking I have found on the forums. Do I understand correctly that you slightly cut the duct end to size? The one that attaches to the B-pillar vent?
 
Our £8 solution transfers about 30% of the heat upstairs which makes a big difference as the volume is less up top. (The entire build consists of a small bulldog clip on the seatbelt clip, a paper clip, a hair scrunchie and a couple of small weights).
We have a dog who sleeps downstairs and doesn’t like the heat, so will post the updated version as soon as I come across just the right piece of cardboard. Likely as not my Wife finishes the box of Special K thinking about it.
View attachment 67857
View attachment 67859
haha thats hideous

in our van the warm air rises on its own - we have a warm duvet and very rarely need the heating on during the night - bit of an odd one this
 
Thank you @Camperfamily :cheers
It was you who’s post I saw and created the same.
I did try to go big, 8 inch, but sent it all back and got 6 inch as it fits the night heater slot perfectly.
And yes @ThomasHJ you have to cut a slot out of the 6inch round to rectangular end.
just the bit that stops it going into the vents.
Mine works an absolute treat !
EDDC7D5F-F7BE-4491-985F-D4C80C850E4A.jpeg
F4A64715-6205-40CA-9D70-898CE8C340AF.jpeg
 
@Camperfamily would you be able to share the dimensions of the ducting end that you used to connect the hose to the B-pillar vent?

Im considering building something similair and your project seems the best looking I have found on the forums. Do I understand correctly that you slightly cut the duct end to size? The one that attaches to the B-pillar vent?
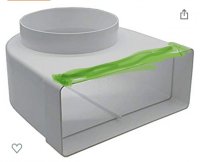
Something like this.
Cut away the green shaded area.
21776A43-54A1-4E58-B879-4154D195678B.jpeg
 
It would be great is...
1) someone, or the shop would start selling complete kits, ready to assemble and fit, or
2) we could get a shopping list of part numbers and supplier details, so we could buy the bits ourselves. This was done for the bike rack security and similar projects.

Here's hoping!
 
It would be great is...
1) someone, or the shop would start selling complete kits, ready to assemble and fit, or
2) we could get a shopping list of part numbers and supplier details, so we could buy the bits ourselves. This was done for the bike rack security and similar projects.

Here's hoping!
2719E92E-FAFD-4B41-AE86-C81AB0E00AF3.jpeg
 
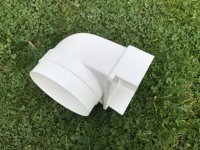
So here’s the shopping list of parts required - all for under £10 from Screwfix:

1 x 100mm ducting

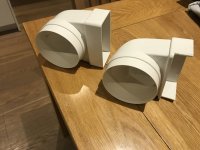
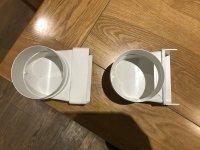
2 x round to rectangular connector 90 degrees elbow bend:


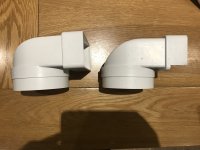
Modify one of the elbow bends by cutting a section out of it, and file the edges for a nice finish, per following photos. Standard elbow (no cutting) on the left of each photo, modified elbow (after cutting) on right hand side of each photo.

Hopefully helpful

.0D1FA759-8CFE-440D-8E08-D99FE958A0F0.jpeg49E64851-9326-43AF-8BF8-7F0F953971BF.jpeg6D08849C-FD6B-4189-87F5-96DFB411DD87.jpeg
 
If you wish, you can add hose/ duct clamps or similar to keep the duct firmly attached to the elbows. The ducting is a neat fit over the elbow, so I’ve not bothered and instead prefer the storage flexibility of being able to easily remove the elbows when packing up and reattach when next setting up. It takes <10 seconds to slip the ducting onto the elbow.

Another tip - if you use the kids net on the upstairs bed, you only need to use one elbow (the modified one, attached to the B pillar) and simply use a clothes peg to attach the ‘free’ end of the ducting to the bed net. This works really well and allows you to position the duct outlet in the middle of the van and at a decent height.
 

VW California Club

Back
Top