Old Sid
- Messages
- 162
- Vehicle
- T6 Ocean 204
This looks really good. How have you fastened it to the floor?The way forward...
Think mine cost about £200, but had it powder coated too.
View attachment 64199
View attachment 64200
View attachment 64201
This looks really good. How have you fastened it to the floor?The way forward...
Think mine cost about £200, but had it powder coated too.
View attachment 64199
View attachment 64200
View attachment 64201
This looks really good. How have you fastened it to the floor?
Hi. I have the same. Great bit of kit. Where are your boxes from - look like a perfect fit for the BeachI have Calicap one and it’s probably the best thing I have purchased for the van.
View attachment 64008
Thanks. I looked at the sliding tray on the California shop. I saw they use ‘T’ shaped things that fit into the slider grooves on the floor but that method appears to prevent the tray occupying the full width of the rear floor which renders it pretty useless. I could overcome this on the right side by placing the fixing under the tray but there’s no slider on the left.You can buy the sliding rail floor mounts off eBay.
The software disables typed email addresses as a safety feature. You could post a photo of your email address.+++++++
Thanks. I looked at the sliding tray on the California shop. I saw they use ‘T’ shaped things that fit into the slider grooves on the floor but that method appears to prevent the tray occupying the full width of the rear floor which renders it pretty useless. I could overcome this on the right side by placing the fixing under the tray but there’s no slider on the left.
My WIFE and have been considering a sliding tray for our T6. Apart from the obvious utility there are other considerations.What's the forums view on the rear boot tray sliders? I am looking at one for my T6.1 on order, but its about £550 or so from Calicap.de for the specific lounge bed function version...
Is it a nice to have or an essential?
Hello do you have any plans please and or details of the runnersI’m in the process of making my own following Tim’s posting about making his. Two 80cm pull out runners some aluminium angle a few rail fittings and a tray should be around £150ish by the time I’m done

Nice, I like your set up. What do people mean by "lounge function"?I have Calicap one and it’s probably the best thing I have purchased for the van.
View attachment 64008
Depends how much you like bending and poking around in the back. We have one and for us its the best add on we have I think. Makes getting at stuff so much easier. The other must have for us (less agile folk) is the small foldable kampa step - so useful and also doubles as a mini table for balancing the coffee cups on grass when you dont want to get the table out. Third most useful extra is the shelf over the kitchen unit - so much stuff goes on there while parked up. Makes cooking a lot easier too - keep your kitchen roll, salt, and all manner of bits and pieces up there while cooking. Number 4 is the pockets that attach to the back of the passenger seat - so convenient for all manner of stuff, and the one we have includes a pouch that has insulation. I realise you only asked about the rear boot slider - but thought I'd throw this lot in! Enjoy.What's the forums view on the rear boot tray sliders? I am looking at one for my T6.1 on order, but its about £550 or so from Calicap.de for the specific lounge bed function version...
Is it a nice to have or an essential?
My own drawings were rudimentary.
I got my inspiration from a Dutch forum member who had a webpage In English devoted to their build. However I have just checked the page and in the last month it appears the domain has expired. This is the link in case they renew it:
http://www.knusineenvolkswagenbus.n...out-drawer-for-the-vw-t5-t6-california-ocean/
I’m sorry I can’t recall which member it was.
Essentially, I bought about 5m of 50x50mm aluminium angle and a couple of metres of 50mm flat bar from Aluminium Warehouse:
.Aluminium Warehouse > Aluminium Angle
Buy Aluminium Angle online now or call 0800 520 0729 FREE. Order Cut to Size. Earn Trade Points with every order. Top rated supplier to Trade and DIY.www.aluminiumwarehouse.co.uk
These drawer slides, I think 850mm, from Amazon:
https://www.amazon.co.uk/dp/B0859B1RC1/?tag=unique09f-21
And rather than go hunting for specialist T bolts, I used M8 threaded dowels and threaded rod to make the securing bolts to the van’s rails.
Fabricate the tray out of angle with a simple overlapping joint pop riveted together. Then make an open-ended frame wider than the box and secure its open width with the flat bar to provide support across the open end and to supply a fourth hold down point. The frame has to be 38mm wider internally than the tray. I used 13mm ply for the base.
I made mine wide enough to take 2 x 600x400 and 2 400x300 Eurocrates. They fit snugly in the tray.
At the dimensions I made the tray the bench seat has to be about 5cm further forward than its usual position. this has had no adverse effect on our set up, but others made need that space.
All in all, it works beautifully and is not beyond the average DIYer’s ability. It has vastly improved our arrival and departure experiences on sites and generally made everything more accessible. Another benefit I hadn’t considered but has become apparent is that you don’t have to put anything down on wet grass to access what’s behind or below it anymore, thereby keeping the boot and its contents cleaner.
The finished product minus a couple of 600x400 crates in the front corner:
View attachment 64146
Here's another example of DIY slide tray. All parts are obtainable; TUMA sliders, Alloy Angle, Alloy Profiles (KJN) and fixings plus a base, I used 3mm alloy sheet for the base. Overall I did spend around £350 all in but for that have a 914mm tray that maximised space beneath the seat when deployed as a bed and still retains easy full depth access. I also only used the two side rails for mounting and incorporated the MFB lock using bespoke alloy angle brackets and still retain access to the 12v socket (Beach). T-bars etc can be obtained through Amazon. There is a trade off to consider; commercially available trays are often 720mm deep to allow the seat to still be pushed back against the MFB. Every additional 100mm of tray depth reduces the position of bench seat hence reduces 'living' space. Notes: Shorter sliders may not need to be as substantial so would cost less to make (but still ensure they can take enough weight)Made your own ?
Now that does sound appealing
Are there plans available?
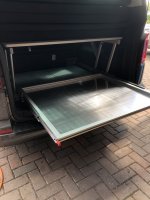
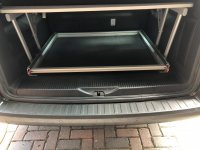
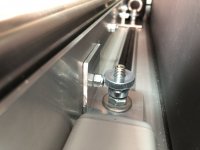
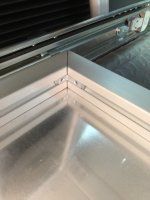
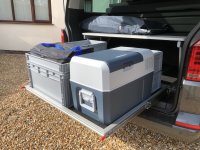
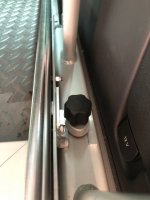 . Some of the newer fridge freezers are now deeper than the MFB so may interfere with the bench sets when in bed mode. A mixture of Euro-crates provide great storage options. Ensure there is a pad/bumper behind the slides to prevent damage to the bench seat when pushed back. Overall a definite bonus with tremendous flexibility. If I made another I'd probably go more in the 800-850mm range to just give a little more living area space.
Also try Solent Plastics to compare: https://www.solentplastics.co.uk/stacking-plastic-containers-boxes/They’re known as Eurocrates or Euro containers and widely available. Big Dug is where I got mine I think:
https://www.bigdug.co.uk/storage-bo...ro-containers-c418/euro-stacking-boxes-p16602
Brilliant. Very useful. Thanks.Here's another example of DIY slide tray. All parts are obtainable; TUMA sliders, Alloy Angle, Alloy Profiles (KJN) and fixings plus a base, I used 3mm alloy sheet for the base. Overall I did spend around £350 all in but for that have a 914mm tray that maximised space beneath the seat when deployed as a bed and still retains easy full depth access. I also only used the two side rails for mounting and incorporated the MFB lock using bespoke alloy angle brackets and still retain access to the 12v socket (Beach). T-bars etc can be obtained through Amazon. There is a trade off to consider; commercially available trays are often 720mm deep to allow the seat to still be pushed back against the MFB. Every additional 100mm of tray depth reduces the position of bench seat hence reduces 'living' space. Notes: Shorter sliders may not need to be as substantial so would cost less to make (but still ensure they can take enough weight)View attachment 64226View attachment 64227View attachment 64229View attachment 64230View attachment 64231View attachment 64232. Some of the newer fridge freezers are now deeper than the MFB so may interfere with the bench sets when in bed mode. A mixture of Euro-crates provide great storage options. Ensure there is a pad/bumper behind the slides to prevent damage to the bench seat when pushed back. Overall a definite bonus with tremendous flexibility. If I made another I'd probably go more in the 800-850mm range to just give a little more living area space.
@ScottedogYour profile says you’re on The Wirral, we have one in our Beach, you’re welcome to have a look at it.
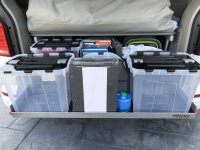
Hiya. A little question before I take the plunge. I have a T6. I'm just about to buy the 810mm Calicap sliding tray because I want to take advantage of using Eurocrates. I see from the Calicap website that it means the rear seat must be pushed a little forward. Do you find that obstructs access to the rear cupboard or cool box much? Thanks.I have Calicap one and it’s probably the best thing I have purchased for the van.
View attachment 64008
Nope. It's only a few cm - hardly noticeable.Hiya. A little question before I take the plunge. I have a T6. I'm just about to buy the 810mm Calicap sliding tray because I want to take advantage of using Eurocrates. I see from the Calicap website that it means the rear seat must be pushed a little forward. Do you find that obstructs access to the rear cupboard or cool box much? Thanks.
Hi Howie dog, Look ideal, but if looked at the website and can see it’s your storage boxes that make it work so, quick q where did you get he boxes and what sizes are you using. Cheers AndyI have Calicap one and it’s probably the best thing I have purchased for the van.
View attachment 64008
Very interesting—- a good project for this autumn- thanks for all the infoHere's another example of DIY slide tray. All parts are obtainable; TUMA sliders, Alloy Angle, Alloy Profiles (KJN) and fixings plus a base, I used 3mm alloy sheet for the base. Overall I did spend around £350 all in but for that have a 914mm tray that maximised space beneath the seat when deployed as a bed and still retains easy full depth access. I also only used the two side rails for mounting and incorporated the MFB lock using bespoke alloy angle brackets and still retain access to the 12v socket (Beach). T-bars etc can be obtained through Amazon. There is a trade off to consider; commercially available trays are often 720mm deep to allow the seat to still be pushed back against the MFB. Every additional 100mm of tray depth reduces the position of bench seat hence reduces 'living' space. Notes: Shorter sliders may not need to be as substantial so would cost less to make (but still ensure they can take enough weight)View attachment 64226View attachment 64227View attachment 64229View attachment 64230View attachment 64231View attachment 64232. Some of the newer fridge freezers are now deeper than the MFB so may interfere with the bench sets when in bed mode. A mixture of Euro-crates provide great storage options. Ensure there is a pad/bumper behind the slides to prevent damage to the bench seat when pushed back. Overall a definite bonus with tremendous flexibility. If I made another I'd probably go more in the 800-850mm range to just give a little more living area space.
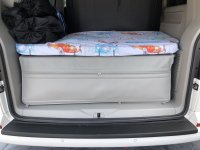
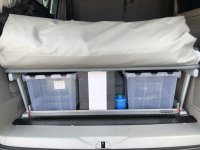
As always it’s expensive but it is good quality. As with the Vanessa bags it swallows massive of stuff. To access the sliding drawer we just flip the flexibag up Out of the way, it won’t suit everyone but we are very happy with itBeagleMum,
How do you find the flexbag? Just recently sorted a sliding tray and eurocrates out but haven’t seen anyone with the bag to ask before.
Thanks Dave

The VW California Club is the worlds largest resource for all owners and enthusiasts of VW California campervans.

