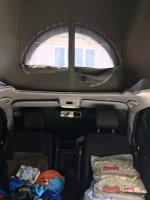
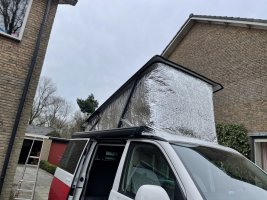
Roof Canvas Insulation

Thanks Westfalia! Actually I think it might be easier to put the cover on & get the roof right up, then lift the sides of the cover up & slip the wraparound in underneath it. It could be put outside the struts as the cover would keep it held in place (& it's fastened at the back). Hmm, worth a try-out.
Yes, thats what i meant, weather depending, it could be a 4 hand job.
 
Right! I'd misinterpreted what you said. Yes, two people and a couple of things to stand on.
 
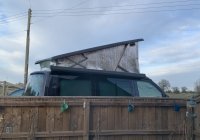
I have just returned from Scotland and was asked by 2 separate California owners about the foil insulation I put around the Canvas roof if its cold or is likely to rain.

I am not claiming the idea as mine,:stop I think there is a company that sells them, others on this forum have made them themselves already.
But with the interest I thought I would post a picture and plan in case anyone else wants to make one for themselves as I think it works very well ;)

View attachment 33707

View attachment 33706
Check dimensions yourselves before cutting!!! (don't blame me :headbang :talktothehand)

It is just double bubble foil insulation cut to shape and the edges sealed with Duck tape from Screwfix with a velcro closure.

You need:
1 roll Double Aluminium Double Layer Bubble Wrap Foil Insulation 1.2m x 10m approx £35
1 roll Duck Original Cloth Tape 50 Mesh Silver 50mm x 25m approx £6
1 roll Velcro Brand Stick-On Tape White 20mm x 2.5m approx £4
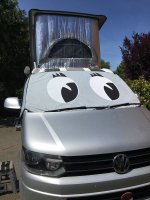
( with the excess foil I made a front screen and side window screens for use inside under the Cali blinds)

Advantages:
Relatively quick to fit under the struts and velcro to itself at the back (it is an advantage to be tall)..easier to fit than a Cali-cover but probably not as good in more extreme weather.
Largely stops the Canvas from getting wet in the rain.
Keeps the van dark inside in the morning when its sunny.
Warmer.
Lightweight.

Disadvantages:
It takes a couple of hours to make and costs just over £40
You can't use the windows in the canvas so the van is darker inside during the day.
When rolled up for transit its still about 300mm diameter and 1.02m long.

Hope this helps anyone interested :)

Excellent work

I have been dithering about buying the internal version at £300+. But I will have a go at your version. Nothing ventured... etc. Is it really 300mm rolled up or 300cm?

Well done indeed.
 
300cm diameter would be 3 metres, which would be an inconveniently large diameter for packing into the van, so I suppose 300mm is correct
 
Yes about 300mm in diameter. It ends up being a matching buddy for our Rainbow front screen. Either fits under rear shelf into ‘long load slot’ to left of rear seat, Or transversely on rear shelf.
 
300cm diameter would be 3 metres, which would be an inconveniently large diameter for packing into the van, so I suppose 300mm is correct
Sorry, I'm still mainly imperial, old and easily confused. I was looking at 300mm and thinking it was 300cm.
 
Just to say a huge thank you for this template. It worked a treat and my other half was so impressed, he didn’t believe I’d made it (he took the kids to see a show whilst I was workinb).

I used the 10 x 1.05m insulation role from Screwfix for £29.99 and the Velcro and duck tape from them too.

I folded my foil down the middle and usefolding clips to hold it in place so there was no movement. I measured the different length/depths and used a long 3m length piece of wood to mark my diagonal cut.

The duck tape edging looks great and will definitely protect the edge but is definitely the bit that takes the most time. My top tip is to do it in short sections and I also reinforced the corner points.

Having struggled to get to the centre even on my stool, I moved the overlap to the rear corner on the advice in a previous post. This also worked a treat.

I’ve elected to put the ventilation holes in places because we use the heater a lot and I was worried about ventilation without.

This has been a fantastic first DIY project and is definitely something anyone can manage, just take your time and check your measurements.

EF92EA9D-5EAA-4DBC-882E-5DDF29F9E65D.jpeg
Thank you
 
Just to say a huge thank you for this template. It worked a treat and my other half was so impressed, he didn’t believe I’d made it (he took the kids to see a show whilst I was workinb).

I used the 10 x 1.05m insulation role from Screwfix for £29.99 and the Velcro and duck tape from them too.

I folded my foil down the middle and usefolding clips to hold it in place so there was no movement. I measured the different length/depths and used a long 3m length piece of wood to mark my diagonal cut.

The duck tape edging looks great and will definitely protect the edge but is definitely the bit that takes the most time. My top tip is to do it in short sections and I also reinforced the corner points.

Having struggled to get to the centre even on my stool, I moved the overlap to the rear corner on the advice in a previous post. This also worked a treat.

I’ve elected to put the ventilation holes in places because we use the heater a lot and I was worried about ventilation without.

This has been a fantastic first DIY project and is definitely something anyone can manage, just take your time and check your measurements.

View attachment 53806
Thank you


Wow, looks like you have done a neat job there, well done, its good for wet days too to keep the canvas dry.
 
That's very neat, and the ventilation holes look pretty sophisticated!
 
View attachment 39128 Success. Probably needs a light height trim on the front panel. @Radio-active I tweaked your measurements on the template based on the size of my canvas which was a fraction taller and longer. We have used it for the last 2 nights in the Lakes and didn't need the heater top or bottom down to about 2 degrees, or rather the children didn't complain. Really windy the second night and a significant reduction in noise and draught. I haven't cut the vent holes yet.

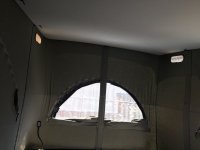
I also bought some clear tent window material to make a window for the front canvas to slot behind the mesh so you can have light when raining which worked really well before I put on the topper! I am now thinking of adding a front window pane to the thermal cover.

Well I have finally put in the front window and edged the whole topper with Duct tape. Window definitely helps with light inside. I bought some crystal clear tent window sheeting and cut to size.
Duct tape makes it easier to thread the topper and slightly stiffer but also doesn’t allow as much stretch of the whole so it now has a slightly shorter overlap at the back. need to add a bit more velcro at the join.
At the same time I have kept the insulation in-fill cut out for the front window but it is still fairly dark up top without it when the window is closed so not sure i will use it.

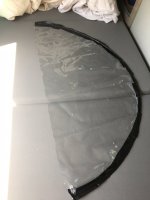
For the times without the topper, I have also made from the same material a clear plastic front ‘window pane’ stiffened with the outer from a bike brake cable so you can have the canvas window ‘open’ in the rain or when it is windy. It will also roll up easily for storage.

Both only tested on the drive during a half term campout, although the clear window pre-production prototype was in use for the last year or so waiting for inspiration for a suitable material to stiffen the edge.D7EE091D-4B4D-443E-B6B2-5C5E57CBE036.jpeg
Window pane in place

78B602EB-AA22-45AF-977D-803272F5A8C5.jpeg

The window pane

7A3BAFE2-BBBE-40EF-A445-380A937687DF.jpeg

Topper with window

C339DC19-197E-4B9B-A2F1-2E750574E0E0.jpeg
Inside with the window open. Much lighter and Very nearly lines up!
 
Well I have finally put in the front window and edged the whole topper with Duct tape. Window definitely helps with light inside. I bought some crystal clear tent window sheeting and cut to size.
Duct tape makes it easier to thread the topper and slightly stiffer but also doesn’t allow as much stretch of the whole so it now has a slightly shorter overlap at the back. need to add a bit more velcro at the join.
At the same time I have kept the insulation in-fill cut out for the front window but it is still fairly dark up top without it when the window is closed so not sure i will use it.

For the times without the topper, I have also made from the same material a clear plastic front ‘window pane’ stiffened with the outer from a bike brake cable so you can have the canvas window ‘open’ in the rain or when it is windy. It will also roll up easily for storage.

Both only tested on the drive during a half term campout, although the clear window pre-production prototype was in use for the last year or so waiting for inspiration for a suitable material to stiffen the edge.View attachment 59947
Window pane in place

View attachment 59948

The window pane

View attachment 59949

Topper with window

View attachment 59950
Inside with the window open. Much lighter and Very nearly lines up!
Excellent job, I haven't bothered with the window as we don't sleep in the roof but it looks impressive.
 
View attachment 39128 Success. Probably needs a light height trim on the front panel. @Radio-active I tweaked your measurements on the template based on the size of my canvas which was a fraction taller and longer. We have used it for the last 2 nights in the Lakes and didn't need the heater top or bottom down to about 2 degrees, or rather the children didn't complain. Really windy the second night and a significant reduction in noise and draught. I haven't cut the vent holes yet.

I also bought some clear tent window material to make a window for the front canvas to slot behind the mesh so you can have light when raining which worked really well before I put on the topper! I am now thinking of adding a front window pane to the thermal cover.

Hi thanks for the topic. I want to do the same for my t6 ocean. I was wondering if it's necessary to put in the vent holes. Won't the 'wrap' catch wind through the vent holes if there's a strong wind?
 
Hi thanks for the topic. I want to do the same for my t6 ocean. I was wondering if it's necessary to put in the vent holes. Won't the 'wrap' catch wind through the vent holes if there's a strong wind?
It is a balance. The vents won’t change whether it catches the wind to any great extent. They will vent into van rather than around the wrap if they are over the canvas vents. The Velcro at the black holds it very securely and it is snug top and bottom. It if it that windy you probably need the roof down!

I didn’t originally put the vent holes in and didn’t have front window wind deflectors, so in the cold with the heating on and 4 in the van there was a fair bit of condensation. The wrap makes a big difference to the temperature and the draught up top but doesn’t breathe.
I am going to put the vents holes in probably with some fine mesh to minimise the draught and rain ingress when windy as I do think they are necessary.

I also now have front wind deflectors. I use an external thermal windscreen cover so not too much air flow through those when it is on but they alone make quite a difference so you could try without first of all.
Overall the roof wrap has been great and still in one piece after 2 years. It was a fun DIY project. The front window addition was worth doing.
I have a T5.1 which has the original type canvas roof which is very breathable and weatherproof in most conditions but not with sustained horizontal rain which is where the wrap is useful.
 
thanks, I will go for the vent holes. I'll post some pictures when done!
 
Just to say a huge thank you for this template. It worked a treat and my other half was so impressed, he didn’t believe I’d made it (he took the kids to see a show whilst I was workinb).

I used the 10 x 1.05m insulation role from Screwfix for £29.99 and the Velcro and duck tape from them too.

I folded my foil down the middle and usefolding clips to hold it in place so there was no movement. I measured the different length/depths and used a long 3m length piece of wood to mark my diagonal cut.

The duck tape edging looks great and will definitely protect the edge but is definitely the bit that takes the most time. My top tip is to do it in short sections and I also reinforced the corner points.

Having struggled to get to the centre even on my stool, I moved the overlap to the rear corner on the advice in a previous post. This also worked a treat.

I’ve elected to put the ventilation holes in places because we use the heater a lot and I was worried about ventilation without.

This has been a fantastic first DIY project and is definitely something anyone can manage, just take your time and check your measurements.

View attachment 53806
Thank you
Hi I own a t6 ocean as well and want to do the same. I measured the canvas but I'm a bit lost. It seems that at both sides the top of the roof it's 5 cm longer than the bottom, which makes sense looking at the overall shape. But now i don't really know how to cut the insolation. Hope you have some tips? Thanks
 
I have just returned from Scotland and was asked by 2 separate California owners about the foil insulation I put around the Canvas roof if its cold or is likely to rain.

I am not claiming the idea as mine,:stop I think there is a company that sells them, others on this forum have made them themselves already.
But with the interest I thought I would post a picture and plan in case anyone else wants to make one for themselves as I think it works very well ;)

View attachment 33707

View attachment 33706
Check dimensions yourselves before cutting!!! (don't blame me :headbang :talktothehand)

It is just double bubble foil insulation cut to shape and the edges sealed with Duck tape from Screwfix with a velcro closure.

You need:
1 roll Double Aluminium Double Layer Bubble Wrap Foil Insulation 1.2m x 10m approx £35
1 roll Duck Original Cloth Tape 50 Mesh Silver 50mm x 25m approx £6
1 roll Velcro Brand Stick-On Tape White 20mm x 2.5m approx £4
( with the excess foil I made a front screen and side window screens for use inside under the Cali blinds)

Advantages:
Relatively quick to fit under the struts and velcro to itself at the back (it is an advantage to be tall)..easier to fit than a Cali-cover but probably not as good in more extreme weather.
Largely stops the Canvas from getting wet in the rain.
Keeps the van dark inside in the morning when its sunny.
Warmer.
Lightweight.

Disadvantages:
It takes a couple of hours to make and costs just over £40
You can't use the windows in the canvas so the van is darker inside during the day.
When rolled up for transit its still about 300mm diameter and 1.02m long.

Hope this helps anyone interested :)

Hi, It looks great, Im planning the same. but I can't seem to get why you cut out the insulation the way you drew the dimensions. The bottom side's left and right are straight, but you drew them slightly in an angle, and if I try that on a piece of paper and try to fold it, it overlaps and doesn't fold nicely. Please can you help me understand why you did it this way? I'm really struggling here. :oops: thanks a lot!
 
Hi, It looks great, Im planning the same. but I can't seem to get why you cut out the insulation the way you drew the dimensions. The bottom side's left and right are straight, but you drew them slightly in an angle, and if I try that on a piece of paper and try to fold it, it overlaps and doesn't fold nicely. Please can you help me understand why you did it this way? I'm really struggling here. :oops: thanks a lot!
The front part of the roof canvas is not perpendicular.
 
The front part of the roof canvas is not perpendicular.
Thanks, I get what you mean now. I have done the measurements, and the T6 Ocean poptop is a few cm larger. but overall shape is pretty much the same. I'll post the pictures when done.
 
Hi, It looks great, Im planning the same. but I can't seem to get why you cut out the insulation the way you drew the dimensions. The bottom side's left and right are straight, but you drew them slightly in an angle, and if I try that on a piece of paper and try to fold it, it overlaps and doesn't fold nicely. Please can you help me understand why you did it this way? I'm really struggling here. :oops: thanks a lot!
Hi, the template does work, (DRPPS made a few dimensional adjustments) but because the cover wraps around the canvas roof, there is enough overlap at the back to take up any length dimensional difference, concentrate on the width (height) dimension being accurate.
This insulation project has been one of the single best additions to my Cali both from a warmth as well as a waterproof point of view and only takes a couple of minutes to fit.
 
I have just returned from Scotland and was asked by 2 separate California owners about the foil insulation I put around the Canvas roof if its cold or is likely to rain.

I am not claiming the idea as mine,:stop I think there is a company that sells them, others on this forum have made them themselves already.
But with the interest I thought I would post a picture and plan in case anyone else wants to make one for themselves as I think it works very well ;)

View attachment 33707

View attachment 33706
Check dimensions yourselves before cutting!!! (don't blame me :headbang :talktothehand)

It is just double bubble foil insulation cut to shape and the edges sealed with Duck tape from Screwfix with a velcro closure.

You need:
1 roll Double Aluminium Double Layer Bubble Wrap Foil Insulation 1.2m x 10m approx £35
1 roll Duck Original Cloth Tape 50 Mesh Silver 50mm x 25m approx £6
1 roll Velcro Brand Stick-On Tape White 20mm x 2.5m approx £4
( with the excess foil I made a front screen and side window screens for use inside under the Cali blinds)

Advantages:
Relatively quick to fit under the struts and velcro to itself at the back (it is an advantage to be tall)..easier to fit than a Cali-cover but probably not as good in more extreme weather.
Largely stops the Canvas from getting wet in the rain.
Keeps the van dark inside in the morning when its sunny.
Warmer.
Lightweight.

Disadvantages:
It takes a couple of hours to make and costs just over £40
You can't use the windows in the canvas so the van is darker inside during the day.
When rolled up for transit its still about 300mm diameter and 1.02m long.

Hope this helps anyone interested :)

Hope this is not a dumb question but keen to try this DIY project and not waste material unnecessarily. My question is how come the design narrows from both top and bottom? When I look at the picture where it is fitted it would seem the bottom edge should be straight and the top edge follow the slope of the roof?
 
Hope this is not a dumb question but keen to try this DIY project and not waste material unnecessarily. My question is how come the design narrows from both top and bottom? When I look at the picture where it is fitted it would seem the bottom edge should be straight and the top edge follow the slope of the roof?
I know what you mean but the front canvas isn't perpendicular to the roof line, so the bottom edge actually mirrors the top edge.

I followed the template, adjusting by a couple of cm after measuring the roof on my T6, and it fits perfectly.
 

VW California Club

Back
Top