3 way coolbox query / Hard wiring fridge to leisure battery

Nice one.

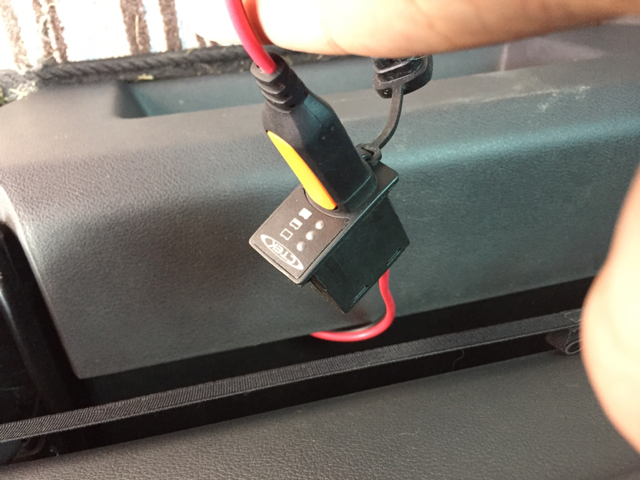
So if I understand that correctly you've kept the original fridge cigar plug & instead of sticking it into the VW wall socket you're now plugging into a new CTEK socket connected directly to the leisure battery?

If that works then I'll be doing the same. Until I read-up here I wasn't aware of either the limitations of the onboard charger vs CTEK, or of the voltage drop issue via the wall socket, so thanks all for sharing.
 
Nice one.

So if I understand that correctly you've kept the original fridge cigar plug & instead of sticking it into the VW wall socket you're now plugging into a new CTEK socket connected directly to the leisure battery.


Yeah that's it.
 
Hi James, well done for having a go and if it works better than the stock set up that's a result. Will just say it's one way of doing it but maybe a bit of a halfway house and I'd always avoid multiple connectors like this if possible. It's very easy just to wire direct to the terminals within the Waeco cig plug as per earlier posts and easily reversible, always solder though rather than crimp.

You don't need the extra fuse in your set up (if that's what it is?) as the Waeco has one in the plug, again see pic in earlier post.
 
I'm quite liking the CTEK adapters, very compact and clean. I already have a comfort indicator it's just not installed, pondering wiring up a CTEK plug on the fridge, would be a lot cleaner and very small and easy to hide when not in use.
 
Hi James, well done for having a go and if it works better than the stock set up that's a result. Will just say it's one way of doing it but maybe a bit of a halfway house and I'd always avoid multiple connectors like this if possible. It's very easy just to wire direct to the terminals within the Waeco cig plug as per earlier posts and easily reversible, always solder though rather than crimp.

You don't need the extra fuse in your set up (if that's what it is?) as the Waeco has one in the plug, again see pic in earlier post.

Thanks Max, I agree that it's a bit of a compromise and would have liked to have avoided the cigarette lighter socket. I'm hoping though that it will be 90% as good as a direct link though. It pretty clear when looking at all the wires under the passenger seat that the various connections in the Cali go through a lot of junctions before they get to the cigarette socket. So with my limited experience with auto electrics it feels like a better solution for me. I'm just to nervous about letting my boys sleep in a van that has my dodgy home made electrics in it! :)

I wasn't sure I needed an inline fuse on the home made rig as the Webasto I have has a 15amp fuse next to the plug socket. I think I misunderstood one of your previous posts and included an inline fuse anyway. The Ctek cigarette lighter cable comes with a 5amp inline fuse. It makes sense having that as if I ever want to connect anything else like a mobile charger into it then it will be fused. Thanks again for all your help by the way.

I'm quite liking the CTEK adapters, very compact and clean. I already have a comfort indicator it's just not installed, pondering wiring up a CTEK plug on the fridge, would be a lot cleaner and very small and easy to hide when not in use.

If you have the CTEK already then I reckon it's worth a go. The fridge is still running at 2 degrees 22hrs after the VW socket behind the passenger seat resulted in a low voltage cut out.
 
@James B 2016 how did you get at the battery by the way to fit that, did you have to take the seat partially off?
I took off the back 2 bolts with a 13mm socket and loosened the front ones so I could angle the seat forward. I then wedged a folded bike tyre on either side of the seat rails to hold it in place whilst I did the work.

That allowed me to get the batteries rubber cover off. Attach the CTEK connector. Cut a small cross hole in the battery cover and feed the CTEK comfort connector through.

It was quick to unbolt the seat and made access so much easier.
 
When I did mine you can just about get the battery cover off without removing the seat but it's mildly frustrating!

I have no Beach at present (2 months to find one before planned summer trip :eek: ) but when I get one again and the fridge I will do a step by step photo guide to hardwiring/soldering the cable if it helps anyone in the future.

I like the idea of the Ctek adaptors - the cable is a good cross section and the ring terminals are pre-made, all you need to do is splice in an inline fuse holder (see pic) into the + side.

I would connect two up though (luckily on my last Beach the previous owner left his attached so with my Ctek 5 I have a spare) so you can charge and run the fridge together.
 
So - use the (female socket/ring terminal) Ctek lead you get with the charger and leave in place on the leisure battery (for your charger).

Then buy one of these:

https://www.amazon.co.uk/d/Automoti...ion-Cable-2-5/B00ADIHUVG/?tag=vwcalifornia-21

Chop it in half and using the female end splice in a fuse holder into the positive side, solder on 8mm ring terminals and leave this connected to the battery too next to the charger one as above.

Then simply splice the other end into suitable cable (see earlier links) of whatever length you need and from there solder this to the terminals within the dismantled Waeco/Webasto/Dometic whatever cig plug.

Bingo - all hardwired and ready to go. And if you wanted you could piggy back out of the original cig plug terminals so you had both connectors always available.

Or buy another Ctek female lead and splice this back into the original Waeco cig plug - this can then be connected if desired for other vehicles.

Hope that makes sense - will put some pics up one day.
 
Last edited:
What size rings do you need on there? 10mm?

Doh ignore me you already answered as I was posting this..
 
Hi Matt,

8mm (blue or yell):

http://www.ebay.co.uk/itm/30-Red-Bl...590609?hash=item43fd3f43d1:g:bTUAAOxydlFS9QAi

I use this type but remove the plastic cover, solder rather than crimp and heatshrink over the top. Or crimp and solder then heatshrink. Heatshrink on the cable before connecting to the terminal of course. :)

Thin heatshrink on each cable (yellow on left) and thicker heatshrink (black on right) then covers the two thinner cables, nice and neat and insulated:

img_3539-jpg.15427
 
In the end I've opted for a couple of ctek connectors one with a comfort indicator to be used for fridge and solar. I may cut some holes and mount them flush in the cover at some point to make them look smart.

Using a ctek fused cable with one end with bare wires upto the suitcase solar panel I can now plug and play and also use extra cables to extend if needed.


Sent from my iPhone using Tapatalk
 
Hi all just to say I've had chance to test the Ctek properly over the last week. We're in Provence and I'm really pleased with the CTEK connectors. It allows us to leave the fridge in the awning as the cable is longer. Plus we've just done 72 hrs without hookup and the fridge is still going strong despite mid 30's during the day.
 
I hardwired my new Webasto / IndelB TB31 to my leisure battery in my Beach last night. It more or less worked, but due to not following the "measure twice, cut once" maxim it's not yet quite right, but I thought I'd post it as work-in-progress anyway for your continued amusement ...

Intrigued by @MattBW link to the German video for the magnetic connectors further up the thread I thought I'd fit a socket to the base of the passenger / nearside seat and get two plugs - one for the fridge & another to fit to my (older) CTEK I used to trickle charge my motorbike with, as an easy safe quick direct connection to the battery is always going to be handy. An extravagance though at ÂŁ55 :D

Magcode Power Port socket 12 Volt 15 Amps
Magcode Power Clip plug 12 Volt 15 Amps
http://www.mobilecentre.co.uk/index.php?main_page=index&cPath=302

I also bought a CTEK lead from Amazon to connect the Magcode socket to the battery as it was fused, already had ring terminals on it & it was going to be good quality even though it was ÂŁ4-odd. The leaflet that came with it describes a CTEK socket panel, so in hindsight that would probably have been a better idea.

"Any road up":

This is the cigar lighter lead that came with my fridge. The plug will be cut off & swapped for a Magcode plug:
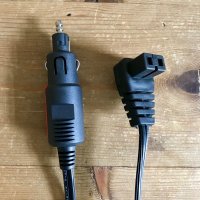
IMG_4903.jpg


This is the CTEK lead for connecting the Magcode socket to the leisure battery, so the 'CTEK' part is surplus & gets cut off. Ideally this should've been a bit longer, but it's usable as-is.
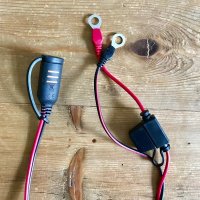
IMG_4904.jpg


Back of Magcode socket with the connectors to be soldered onto the CTEK battery lead:
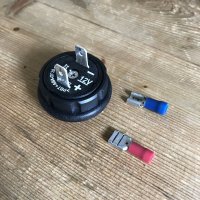
IMG_4908.JPG


Inside of Magcode plug showing where the fridge lead connects to the terminals:
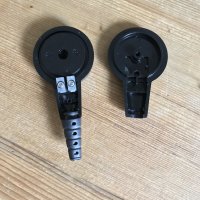
IMG_4909.JPG


CTEK lead modified & ready to connect to Magcode socket:
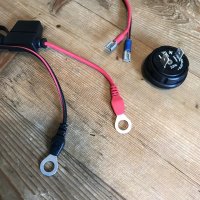
IMG_4910.JPG


Fridge lead modified & end swapped from cigar lighter plug to Magcode plug:
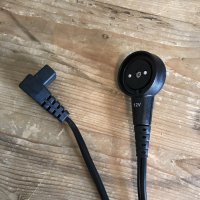
IMG_4911.JPG


Rear protective panel from base of Beach passenger seat, now with added 29mm hole:
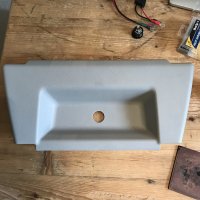
IMG_4912.JPG


Magcode socket rear attached to seat base panel (this is the problem, too deep).
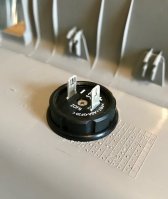
IMG_4914.jpg


View in-situ - Magcode socket rear attached to seat base panel (this is the problem, too deep).
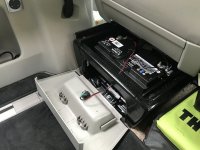
IMG_4917.JPG


Socket & panel with passenger seat pushed all the way forward:
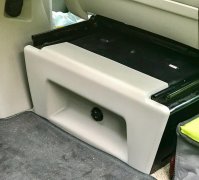
IMG_4918.jpg


Learning points:

1/ Unfortunately the combined depth of the back of the Magcode socket, plus it's terminals, plus the push-on connectors attached to the back are a bit longer than I'd expected & it fouls the battery itself. My (lovingly soldered) terminals are splayed out a bit, so I'll have to find somewhere better for it to sit instead, but it's working fine and all intact-ish.

2/ The ideal spot for the socket would be in the B-pillar side panel above or below the existing 12v & 3-pin sockets, but I can't be *rsed taking the interior side of the van off again specially.

3/ I didn't take into account refitting the rubber cover for the battery, which means the lead needs to be a bit longer to follow the line of the battery down to the floor. For now I've got a sheet of very similar rubber in the cellar that I'll cut to shape & substitute temporarily.

4/ The Magcode system itself is brilliant, if a little overpriced, and really easy to click to connect, particularly out of the way & it snaps to itself brilliantly - I'd be very happy to use these again for regular on/off 12V connections. I took a video showing it repelling the plug unless it was the right way around & will try again to upload.

5/ I had some trouble initially getting power down the combined line to the fridge lead terminals until I took it all apart & refitted, and also reversed the polarity / swapped over connections inside the Magcode plug. It's now reading 12.725V (?) vs the 12.2V showing at the socket on my cheapo LED socket meter.

6/ Glad I chose a battery lead with a fuse in it, very useful to be able to pull it out to avoid sparks (;)) whilst faffing around.

7/ If I were starting from scratch now I'd use a CTEK socket instead, assuming there's somewhere to fit it ref: #1 and one is also able to fit a corresponding CTEK plug to the end of the fridge lead. This looks great: https://www.amazon.co.uk/dp/B002OHXX60/?tag=vwcalifornia-21


PS: Many thanks to @Max-Felix @James B 2016 @MattBW & others for their info in the thread above.
 
Last edited:
Great post Hirsty!

Here's a bit more on voltage drop and why it's so critical with low voltage as in campers, ie 12v:


IMG_9125.JPG
 
Thanks for sharing those, that is very interesting. Those magcode connectors look very smart though, nice clean look. Interesting that they make contact with the battery as they look very slim compared to many other solutions out there. Makes me think most other solutions wouldnt work?
 
p.s. that is the comfort indicator I have, if the magcode is tight I imagine that would be too deep?

I have it loose at the moment tucked under the seat.
 
I think you may have the same problem I've come up against @MattBW - the recessed part behind the grey plastic panel is quite close to the leisure battery & it's going to take a little bit more thinking about.

Yours looks good though - did you buy a spare CTEK plug and splice it onto your snipped Waeco fridge lead? I've been onto Webasto today to find out if their "kettle-type-but-not-a-kettle-lead" is proprietary or generic before hacking mine about further, but of course all they have is a part number ...

I'm away in the van on Saturday so will likely experience a eureka moment whilst away without tools ;)
 
I followed your lead (Im here all week) and got the CTEK 12v socket adapter for now. I have the comfort indicator and a second fused basic ctek connector

At the moment I am just using the waeco with the ctek 12v socket plugged in and all my issues have gone. I may try and source a second lead for the waeco so I can make a much shorter one to connect directly.

I also bought a ctek replacement cable which had one end with wires and the other with the male connector. This was easily attached to my solar charge controller. I also find a ctek extension lead works a treat to give me a bit more range if I need it. My solar panel is only 50w so about 3amps max.

Could have saved myself a lot of money just wiring myself but its a very tidy and easy to use setup.
 
I think you may have the same problem I've come up against @MattBW - the recessed part behind the grey plastic panel is quite close to the leisure battery & it's going to take a little bit more thinking about.

Yours looks good though - did you buy a spare CTEK plug and splice it onto your snipped Waeco fridge lead? I've been onto Webasto today to find out if their "kettle-type-but-not-a-kettle-lead" is proprietary or generic before hacking mine about further, but of course all they have is a part number ...

I'm away in the van on Saturday so will likely experience a eureka moment whilst away without tools ;)
Could a Right Angle Spade Connector help?

https://www.ebay.co.uk/sch/i.html?_...RS0&_nkw=right+angle+spade+connector&_sacat=0
 
Or a spacer ring so the connector sits a bit less flush to the seat base plastic?
On a sort of related point I was once told not to tin (cover with solder) the wires going into crimped or compression connectors. Issue being that over time the solder could migrate and lead to a loose joint. Anyone else heard this advice?
 
Yes, don't tin cable before crimping BUT best way is remove the plastic part if using the insulated type crimps then crimp, then solder the cable to the metal crimp. Finish with heat shrink.

Can't remember if the kettle type is generic, very likely though so any cheap printer cable etc can be used. When I got mine it came with a UK and an EU one so I had a spare.
 
I followed your lead (Im here all week) and got the CTEK 12v socket adapter for now. I have the comfort indicator and a second fused basic ctek connector

At the moment I am just using the waeco with the ctek 12v socket plugged in and all my issues have gone. I may try and source a second lead for the waeco so I can make a much shorter one to connect directly.

I also bought a ctek replacement cable which had one end with wires and the other with the male connector. This was easily attached to my solar charge controller. I also find a ctek extension lead works a treat to give me a bit more range if I need it. My solar panel is only 50w so about 3amps max.

Could have saved myself a lot of money just wiring myself but its a very tidy and easy to use setup.
Matt, sounds like your set up is like mine. I've pretty sure that I'm not getting any material voltage drop with it so hope it works the same for you. Also like you the fact it allows me to put the fridge in the awning is a big bonus.
We've been away for a week now and it's saved us 35 euros in electric hook up costs. Happy days!
 

VW California Club

Back
Top