Charging E bike batteries

If the current draw is really 330w then you need the 500VA. If its just on start up then the 375 VA is fine. The 375 VA is rated at 300w continuous at 25c and 260w at 40c. I suspect as others have said the actual will be lower.
 
I've just received this from the scooter manufacturer
"Although we can not guarantee proper functionality while using an inverter, and are not liable for damage caused to the charger, scooter, inverter, or power source, I would recommend a pure sine wave inverter

An MSW inverter may work temporarily, but will generate more heat and possibly cause risk of fire or damage to the charger and scooter. The max draw from the ZERO charger is 330W.
We do not currently offer a DC to DC option, and I do not know of a working option at this time. I hope this help
s"

As the Victron Energy I've just ordered is a pure sine inverter does it meet that full criteria? Again, thanks for the help and guidance
Yes
 
"Phew" That's lucky. I thought I'd have had to order the 500 instead. It's considerably dearer too so glad the 375 will be up to the job
@Skewif & @Legin thanks for your guidance. It's greatly appreciated
 
@Legin have you simply attached the positive from the inverter to the +ve on the battery under the passengers seat and same for -ve?
 
Basically yes. Some pointers.

Do not turn the ignition on when removing the seat or until its reinstalled and connected.

There is a positive junction/collection point near to the battery so I connected to that - follow from the battery and you will find it
Drill the seat frame and bolt the negative to it - you can just see this on the left hand top rail of the seat frame in my photo - 8mm bolt.
Remove one seat to floor nut and remove paint to get good continuity between the seat frame and stud
Jump leads are a source of heavy duty cable or just buy what you need off ebay - keep the runs as short as possible (underseat helps with this) and observe at least the minimum wire mm2 requirements in your instructions, big is best.
You will need need a tool to crimp the connections or buy your leads already made off with eyes on one end and 50A Anderson on the other. If DIY buy a cheap tool and some eyes to suit your cable size, some 6mm and 8mm.


.
 
buy your leads already made off with eyes on one end and 50A Anderson on the other. If DIY buy a cheap tool and some eyes to suit your cable size, some 6mm and 8mm..
Struggling to find anyone that can do this so thought I'll go for the "easy" option and get jump leads. Who knew they came in such an array of ampage? 400A, 800A, 1000A, 1500A, 2000A
 
You still need to crimp the eyelets on. Jump leads is just to get the cable, look at the mm2 not the amps, dont use the clamps under your seat if thats what your thinking.
 
You still need to crimp the eyelets on. Jump leads is just to get the cable, look at the mm2 not the amps, dont use the clamps under your seat if thats what your thinking.
LOl, I wasn't thinking of using clamps under the seat just thought using jump leads could be an easy/ cheaper option to get my hands on the cable
 
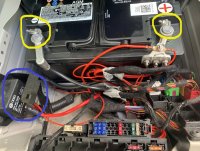
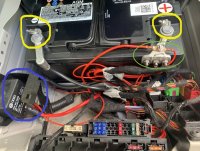
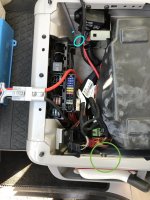
@Legin I've got the front seat out, Am I correct in thinking the "positive junction/collection point near to the battery" you refer to is on the left with a blue circle around it? If so, why did you choose that rather than wire it direct to the battery [yellow circles] shown in the image below? I assume you wired the negative from the Anderson to the -ve of the battery?
image0.jpeg


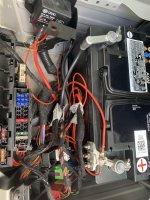
With respect to the "positive junction/collection point near to the battery", which terminal did you wire it to: The middle one or the one on the right hand side in the image below?

image1.jpeg

Thanks
 
Hi, You can in theory connect where you have indicated BUT the threads are staked so you cant easily screw a nut on and cant take the nut off. So the earth was earthed through the seat frame ie from Anderson to seat frame to seat frame mounting nut. The positive was connected to one of that collection of 4 posts on the casting you have circled in red not the one circled in blue .
 
Correction the positives you circled in yellow not red as there is no red circle. Red on the brain
 
@Legin I was slightly unsure previously, now I'm confused as hell :D

Previously I had two yellow circles on the battery but one +ve & the other one -ve
Additionally, I had circled the positive junction/collection point near to the battery in blue not red

I don't know what you mean by "the threads are staked "

I've inserted another image below for clarity

Are you saying the following:
  1. Attach +ve from Anderson to one of the 3 connection points [circled in red below]. Any one will suffice
  2. Attach -ve from Anderson to the seat frame attachment. [circled in yellow below].This is the easiest one for me to get access too without undoing further brackets.
Inverter Mounting.jpg
 
OK, Connect positive to one of these i have circled in Green. I will do negative in next post.fullsizeoutput_1172.jpeg
 
Drill and bolt earth to seat frame circled green. Clean paint of any of the 4 seat nuts to give good bonding to the chassis - circled turquoise. fullsizeoutput_1174.jpeg
 
Staked means the nut wont come off the thread, the end is deformed . Try it you will see the nut starts to hang up. If it wasnt for this connecting to the battery clamp would indeed be easiest
 
@Legin Thanks. we got there eventually. Just need to measure the cables, source some eyelets and get the Anderson
:thanks
 
There is a positive junction/collection point near to the battery so I connected to that - follow from the battery and you will find it.

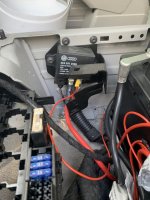
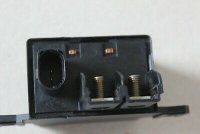
I'm not sure if it is wise to connect an inverter directly without fuses to the "collection point" at the image above. It is not just a collection point. The black little box shown at the upper left side in the drivers console is the Battery Relay (VW part 2D0 951 253B, only in an Ocean, I believe), which is meant to separate the Household Batteries from the Starter Battery/Generator, when not driving.
This relay shuts down the power from the Generator/Starter Battery when the ignition key is off. This is to protect the starter battery from being emptied by the leisure batteries when not driving.
When you start the motor with the ignition key, the relay "closes΅, which means that a current is starting to flow from the Generator/Starter battery in the direction of the leisure batteries.
So the leisure batteries are only drinking power from the generator/starter battery, when driving.
The currents that flow from starter battery to leisure battery can be rather huge when the household batteries are almost empty. I would recommend to place a fuse very near to the Relay, to protect the Plus cable. Cables can overheat and eventually burn down your van. Furthermore, in a bumpy car the insulation layer of cables that are lingering around could be 'sanded' by hitting the car body during travel, resulting in a short.

Regards from Amsterdam,

Marc.

12V-2Pin-2D0951253B-V23132-A2001-X16-TESTED-RELAY-_2.jpg
Relay 2D0 951 253B
 
Its how it should be wired according to the manufacturer. Almost every positive cable form a car battery has a length that is not fuse protected

I quote from the Victron instructions

"The inverters are fitted with an internal DC fuse (see table above for rating). If the DC cable length is increased to more than 1,5m, an additional fuse or DC circuit breaker must be inserted close to the battery. "

I understand the workings of the relay. The collection point is merely an extension of the battery positive. The total length in this install is much less than 1.5m.
Proper wire sizing, careful running of cable, Anderson connector to ensure no polarity or shorts and high standard of installation are of course paramount.
 
Thanks for your reply, Legend. I hope I didn't sound too pedantic or teaching...

As for the 1,5m in the Victron manual: even a length of 1,5 inch could get rubbed or sanded on the sharp metal edges of the chair console.

Regards,

Marc.
 
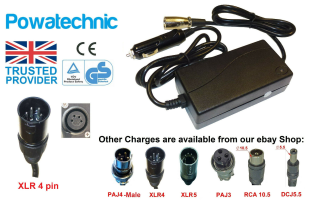
An old thread - new update. This Leeds based company makes 12v cig socket eBike charges drawing low amps: https://powatechnic.com/brand/e-bike/?b=e-bike
Have been told that they are very helpful on the phone to supply the bike charger and plug adapter you require. Friend has one and it works well in his Fiat based camper with solar panels - ie no ehu.
1653252249743.png
 

Similar threads

VW California Club

Back
Top