Buy all your VW California Accessories at the Club Shop Visit Shop

Fix your Control Panel Display Problem?

Hi All,
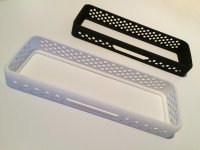
Here it is! I just received the new version of the console protection and it fits just perfectly.
You can order it trough the 3D printing company Shapeways: https://www.shapeways.com/designer/pulsart
You can select the color too.image.jpg
By the way, I have also designed a shelve for the side shutter that you can order too. The red elastics are not included. The plastic shelves are sticked with double sided tape but the elastics are fixed by drilling the side shutter.
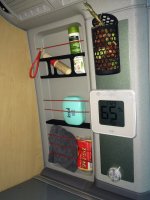
image.jpg

Cheers,
Pulsart


Yes, I have designed this protection myself :)and printed it in 3D through a professional company. It is in black coloured plastic, but can be printed in white, blue, red, yellow, green, purple and orange :).
This protection is a very good way to protect the knob...
I was in Sardinia for two weeks and it saved the life of my control panel twice of my girlfriend's head...

It is still a prototype, but fits perfectly the control panel. It is stuck to it using a very strong double sided tape and does not move at all.
If enough people are interested, I may produce a small batch. As it is 3D printed, it is not possible to produce lots of pieces and I have not planed yet to do this commercially...

I have the control panel protector which looks superb, but can you suggest where to get the strong double sided tape from. No one seems to have it in small lengths - any shops in GB that spring to mind? Many thanks. Simon
 
I have the control panel protector which looks superb, but can you suggest where to get the strong double sided tape from. No one seems to have it in small lengths - any shops in GB that spring to mind? Many thanks. Simon

I got some at Halfords, it's used for attaching exterior trim etc. Pretty good stuff.

Rgds
M
 
Great idea pulsart.
I love the use of small spaces like that.
I think I will make one for mine
I saw a similar idea for the dent behind the seat
And ...I have always wondered how to use the dent in the moulding on the rear bench back.
My seat covers have a zip to acess it
 
After winter storage found my display was completely blank.

Thank you Pulsart for your post it was really helpful.

First I would like to say VW shame on you. The way the ribbon cable is attached to the PCB (printed circuit board) is appalling. A much more robust way should have been used.

Unfortunately in my case I could not get a good connection using heat with a heat gun and holding the ribbon cable against the PCB using the edge of a metal ruler. Even wedging the cable in place, under the metal display cover, with foam and a small silicon tube did not restore my display.

In the end my fix was more crude. I removed the ribbon cable from the board completely. I then cleaned the contacts on the PCB with alcohol and then cut about 5 mm of the end of the ribbon cable to get a good contact.

Using some very thin white foam, the type used in packing, I wedged the ribbon cable to the PCB under the side edge of the metal chrome display cover . Amazingly the cable lined up with the contacts on the PCB and all is good. :embarrased

However, a word of caution only use my method as a last resort. Once you have removed the ribbon cable from the PCB you are committed and I cannot guarantee it will work for you.

One final idea would be to modify the chrome metal cover. If a small L shape metal strip was attached on the inside of the left side it would act as a clamp to hold the ribbon cable against the PCB. I would also use a small strip of the thin white foam, like I used, to cushion the bracket against the ribbon cable. Worth a try and you would not need to remove the ribbon cable from the PCB like I did.

JT
 
Last edited:
Recently, I fixed my control panel display because some horizontal lines disappeared...

I have translated this tutorial with my poor English skills....

Excellent DIY description. Did mine a year ago, still works 100% with the rubber band inside.
Now I promised to help av friend with this. He has sent his control panel by mail to me. Can I plug his control panel in to my car to try it out? His California is model year 2008 and mine are 2006. Will this make my auxiliary heater go into locked mode and not work any more?
According to these details - same part number.
2006
http://www.oemepc.com/vw/part_singl...919/subcategory/919010/part_id/3707214/lang/e

2008
http://www.oemepc.com/vw/part_singl...919/subcategory/919010/part_id/3707214/lang/e
 
Can I plug his control panel in to my car to try it out? His California is model year 2008 and mine are 2006. Will this make my auxiliary heater go into locked mode and not work any more?

I've just replaced my 2008 control panel with one I bought on eBay, which has an earlier software version (SW 0700, from memory - the previous, broken, one has SW 0800).

I can't be sure that it's a 2006 panel, but it's certainly an earlier version, and works perfectly, without any problem. So I doubt that there would be an issue with compatibility here.

Hope this helps!
 
I tried the solution and did not work for me. The pixel lines were only visible better when car was very hot.
I have send it to Verotronics and now works fine. They also didnt want to tell me what they did in the unit.

cheers
 
Fantastic! ..I followed the pictorial instructions for fixing the missing lines on display problem which was quite bad on my, otherwise immaculate.11 year old T5. The display is now perfect. I did have to buy a pair of Japanese PZ-57 Engineer pliers (about £17) from ebay to remove the small screws and it did take me quite a while to actually remove and open the box. The rubber bands and the wire (using masking tape to make correct diameter) had to be quite carefully prepared to make them fit back under the metal case, the ends of which I eased out a tiny bit with pliers to allow it all to go back together. I also put an extra length of plastic wire behind the suggested bit to prevent it rolling back when fitting back the metal case. I didn't use any heat but did carefully and evenly press down on the strip connections before putting in the bands and wire. In all it probably took all afternoon rather than 30 mins but well worth it and very satisfying!
 
Last edited:
Hi guys. I can't see the pictures? Is it just me?


Sent from my iPhone using Tapatalk
 
Hi guys. I can't see the pictures? Is it just me?


Sent from my iPhone using Tapatalk
Try scrolling down the page further.... pictures are underneath for some reason ..good luck it worked well for my control panel ..but take your time.
 
Try scrolling down the page further.... pictures are underneath for some reason ..good luck it worked well for my control panel ..but take your time.

Will do,
The roof is up now, need it down, but can't see the display...

anyone know how I can turn the knob to
Find the right place?


Sent from my iPhone using Tapatalk
 
Will do,
The roof is up now, need it down, but can't see the display...

anyone know how I can turn the knob to
Find the right place?


Sent from my iPhone using Tapatalk

Will do,
The roof is up now, need it down, but can't see the display...

anyone know how I can turn the knob to
Find the right place?


Sent from my iPhone using Tapatalk
Did you sort that out ? You can bring down the roof manually see manual.
 
Did you sort that out ? You can bring down the roof manually see manual.

Hi.
Yeah, did found a YouTube video so I could get a fresh idea how to push and turn, and think I got lucky


Sent from my iPhone using Tapatalk
 
What about the possibility of an exchange service?


OK, we are currently working out an exchange service on these , what we will possibly do is buy back the faulty unit once you have received your new one to save you being without a control panel.

Please call us for more information if you wish to take us up on this.
 
OK, we are currently working out an exchange service on these , what we will possibly do is buy back the faulty unit once you have received your new one to save you being without a control panel.

Please call us for more information if you wish to take us up on this.
Excellent news as there can only be, I suppose, a limited supply of broken units on the open market that can be purchased for repair/refurbishment and then re-sale. Every little bit helps as they say.:thumb
 
OK, we are currently working out an exchange service on these , what we will possibly do is buy back the faulty unit once you have received your new one to save you being without a control panel.

Please call us for more information if you wish to take us up on this.
Hi brought one from the shop last week so I have a unreadable one laying around please contact me if interested in it.
 
OK, we are currently working out an exchange service on these , what we will possibly do is buy back the faulty unit once you have received your new one to save you being without a control panel.

Please call us for more information if you wish to take us up on this.
This is excellent news bearing in mind that the one we had fitted by our VW dealer about 4 years ago has got the dreaded lines appearing again.
When you've got the exchange service up and running will you let us all know?
I'll even renew my VIP membership if it means not being without a panel!

Sent from my SM-G950F using Tapatalk
 
Thanks to Pulsart for the detailed explanation of how to fix the control panel screen. I used both heating and the pressure on the connection using rubber spacers. I recovered about 20% of the missing lines but still have only about 40-50% of the screen. I tried this procedure 3 times but became concerned about the 3 connectors to the control which are difficult to remove, so have decided to go for a refurbished unit. Fingers crossed for a good outcome.
 
Having watched the display reduce on our '09 SE to just a few lines there was nothing for it. Massive thanks to Pulsart for coming up with this. Quite nerve racking, but at this stage I had nothing to loose.

I'd picked up a replacement face and knob from SMG, who did me a good price, and having followed the instructions I've got about 95% of the screen back... and a working control knob.

I would add to remove the purple connector you have to press in the central black tab to release the leaver. Also when putting it back make sure the connectors are secured properly.

Reconnecting the two ribbon cables was a fiddle too, but persistence prevailed. I initially got some odd errors, but once re-connected properly turning it off and on again cleared the errors....
 
Back
Top