Grand California 600 solar panel retrofit

Also watching with interest. I have the Knaus 600XL and the dealer fitted me a 120w fixed solar panel to a 90aH LiFePO4 battery but lacking a little on solar power and considering overlaying the SP104 over the graphics. Keen to know where the cable comes into the roof space though?
The interior layout of the Knaus is quite different from the GC600 so it could be the habitation wiring loom is different. An easy check to see if you have the same wiring to the solar panel area that is present on all GC600s even when no factory solar is fitted is to pull the headlining slightly away from the front skylight and look forward between the trim and roof GFRP. If the wiring is there you will see it stuck to the roof in the middle of the raised section over the cab.
 
Th
The interior layout of the Knaus is quite different from the GC600 so it could be the habitation wiring loom is different. An easy check to see if you have the same wiring to the solar panel area that is present on all GC600s even when no factory solar is fitted is to pull the headlining slightly away from the front skylight and look forward between the trim and roof GFRP. If the wiring is there you will see it stuck to the roof in the middle of the raised section over the cab.
Thank you, I’ll take a look
 
Hello @Nico Peschier,

Apologies, I was traveling and didn’t check here for a while.

The front panel is 104W, and the other two panels on the roof are 72W and 62W, making 238W in total.

The roof panels are pretty effective during the summer months, but the front panel feeds the system more when the sun is not as high.
Can You please give a ballpark figure of what was the cost of SP72 and SP62 odd shaped panels? Thank You
 
The interior layout of the Knaus is quite different from the GC600 so it could be the habitation wiring loom is different. An easy check to see if you have the same wiring to the solar panel area that is present on all GC600s even when no factory solar is fitted is to pull the headlining slightly away from the front skylight and look forward between the trim and roof GFRP. If the wiring is there you will see it stuck to the roof in the middle of the raised section over the cab.
We are prepping for solar retrofit and we have the cable running along the roofline above the window next to the bench- but what we can't see is where it ends or goes to after that towards the front of the van for when we drill the holes for the panel cables.
Are we reading the above correctly to look towards the center of the van in our bubble (GC600)?
Thanks in advance!

Also if anyone has a photo that would be great! We are trying not to take apart the entire inside to find the end of the cables to connect to the panel!
 
Another question from us as we prepare for the 104W retrofit. We have the GC600 without a second bed, so above the cab is the storage space with the cabinetry trim....curious if anyone has retrofitted this before and how much of the interior we need to dismantle to access the wires for the actual install. We know we will need to drill the hole in the roof for the actual panel, but assume we need to access the wires from the inside to connect the panel to the existing wiring.

Thank you in advance! We don't want to dismantle more than we have to. Without removing anything we can see the wires above the window by the bench running along the roof line to the bubble area, but we can not see where they end- and they are attached to the side of the van, so can't really pull them away.
 
We are all sorted now. We found a GC owner on Instagram who had a helpful video posted on Instagram- it is in Italian but you can change the subtitles to English, it was very helpful to us!
 
So we did it! Well my husband and our neighbor did it- retrofitted Solar on our GC600. We spent 420 Euros- as we ended up going with the Sunbeam Solution Maxa 109W panel Vs. the original Soliban. So far so good- getting nice charge from the panel...and we also installed a bluetooth battery monitor to have a good view of our leisure battery charge.
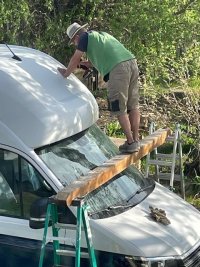
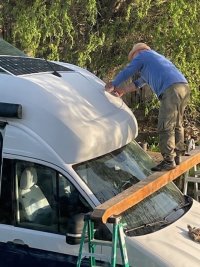
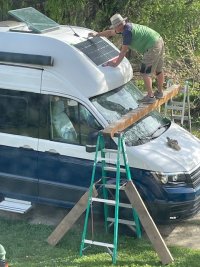
The retrofit was really easy given that the van is already wired- the hardest part was probably mental when you drill into your roof! After that the hardest part was erecting a way to easily reach the "hump"- we had to get creative as you can see from the photos.

We are very excited to have this in place or our upcoming trip to Norway, Sweden and Finland.
Van Solar 2.jpg Van Solar 3.jpgVan Solar 1.jpgVan Solar 4.JPG
 
So we did it! Well my husband and our neighbor did it- retrofitted Solar on our GC600. We spent 420 Euros- as we ended up going with the Sunbeam Solution Maxa 109W panel Vs. the original Soliban. So far so good- getting nice charge from the panel...and we also installed a bluetooth battery monitor to have a good view of our leisure battery charge.
The retrofit was really easy given that the van is already wired- the hardest part was probably mental when you drill into your roof! After that the hardest part was erecting a way to easily reach the "hump"- we had to get creative as you can see from the photos.

We are very excited to have this in place or our upcoming trip to Norway, Sweden and Finland.
View attachment 121781 View attachment 121782View attachment 121783View attachment 121784
Interesting as we need fit one before our trip to Europe too. Is the Maxa 109W Flush Black the one you ordered ?
 
Interesting as we need fit one before our trip to Europe too. Is the Maxa 109W Flush Black the one you ordered ?
We ordered the white- you can see the grid on it- the Black looks more like the OEM panel. Since we have a white roof we actually like how the white looks on our van.
 
We ordered the white- you can see the grid on it- the Black looks more like the OEM panel. Since we have a white roof we actually like how the white looks on our van.
Thanks for reply.
 
¡Así que lo hicimos! Bueno, mi esposo y nuestro vecino lo hicieron: modernizaron Solar en nuestro GC600. Gastamos 420 euros, ya que terminamos eligiendo el panel Sunbeam Solution Maxa 109W vs. el Solibán original. Hasta ahora todo bien: obtuvimos una buena carga desde el panel... y también instalamos un monitor de batería bluetooth para tener una buena vista de la carga de nuestra batería de ocio.
La modernización fue realmente fácil dado que la camioneta ya está cableada; ¡la parte más difícil probablemente fue mental cuando perforaste el techo! Después de eso, la parte más difícil fue construir una manera de llegar fácilmente a la "joroba". Tuvimos que ser creativos, como se puede ver en las fotos.

Estamos muy emocionados de tener esto implementado o de nuestro próximo viaje a Noruega, Suecia y Finlandia.
View attachment 121781 View attachment 121782View attachment 121783View attachment 121784
Buenos días.
buen trabajo con el panel solar.tengo una pregunta para montar el cableado quitaron el techo interior.
acias
 
Buenos días.
buen trabajo con el panel solar.tengo una pregunta para montar el cableado quitaron el techo interior.
acias
The wiring is already present, so you just sort of pull the headliner down around the front skylight to access the wiring and connect the panel's wiring. We did not have to remove the headliner.
 
El cableado ya está presente, por lo que simplemente tira del techo interior hacia abajo alrededor del tragaluz delantero para acceder al cableado y conectar el cableado del panel. No tuvimos que quitar el techo interior.
De acuerdo.gracias
Por lo que veo es fácil comprar el panel, taladrar, pegarlo y conectar los cables.despues colocar el controlador solar (MTTL) y conectarlo y nada más o se me escapa algo.gracias
 
So we did it! Well my husband and our neighbor did it- retrofitted Solar on our GC600. We spent 420 Euros- as we ended up going with the Sunbeam Solution Maxa 109W panel Vs. the original Soliban. So far so good- getting nice charge from the panel...and we also installed a bluetooth battery monitor to have a good view of our leisure battery charge.
The retrofit was really easy given that the van is already wired- the hardest part was probably mental when you drill into your roof! After that the hardest part was erecting a way to easily reach the "hump"- we had to get creative as you can see from the photos.

We are very excited to have this in place or our upcoming trip to Norway, Sweden and Finland.
View attachment 121781 View attachment 121782View attachment 121783View attachment 121784
Hi,

the solar panel from Sunbeam is self adhesive or need sealant ?
 
¡Así que lo hicimos! Bueno, mi esposo y nuestro vecino lo hicieron: modernizaron Solar en nuestro GC600. Gastamos 420 euros, ya que terminamos eligiendo el panel Sunbeam Solution Maxa 109W vs. el Solibán original. Hasta ahora todo bien: obtuvimos una buena carga desde el panel... y también instalamos un monitor de batería bluetooth para tener una buena vista de la carga de nuestra batería de ocio.
La modernización fue realmente fácil dado que la camioneta ya está cableada; ¡la parte más difícil probablemente fue mental cuando perforaste el techo! Después de eso, la parte más difícil fue construir una manera de llegar fácilmente a la "joroba". Tuvimos que ser creativos, como se puede ver en las fotos.

Estamos muy emocionados de tener esto implementado o de nuestro próximo viaje a Noruega, Suecia y Finlandia.
View attachment 121781 View attachment 121782View attachment 121783View attachment 121784
Muy buen trabajo.
¿El panel solar es adhesivo o lo pegaste con algún sellador?
A parte de conectar el mttp (controlador solar) y la placa solar. No tuviste que conectar nada más verdad? Gracias
 
If you joined as a VIP member you would have access to the resources centre where the full set of photos & instructions from the manufacturers is stored.

I am confused with the references to two ppt in the above posts. The manufacturers suggest connecting all the panels to one.

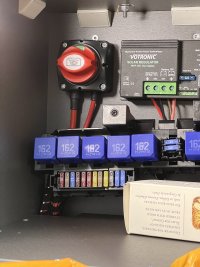
Here's the photo you were looking for.
View attachment 113081

Do you have a picture of how to connect those cables and where ? I would like to install the Mppt in my GC but it has not solar panels at the moment, so I don't have idea of where or how to wiring those 4 cables that comes from the MPPT.

Thanks!
 
Do you have a picture of how to connect those cables and where ? I would like to install the Mppt in my GC but it has not solar panels at the moment, so I don't have idea of where or how to wiring those 4 cables that comes from the MPPT.

Thanks!
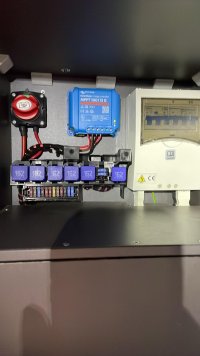
The solar wiring is either behind the fuse array or behind the removable panels. It will likely be wrapped in sponge. The wiring for the solar panel goes to the area where you would find the factory solar panel and will be behind the roof trim. Easy to see on a 600 by pulling the ceiling trim away a little around the skylight and looking towards the front. Likely taped to the roof. Wire per the pic which shows the normal factory fit MPPT on a 600

IMG_1032.jpeg
 

VW California Club

Back
Top