Buy all your VW California Accessories at the Club Shop Visit Shop

New Solar Panels in all of our kits for 2019

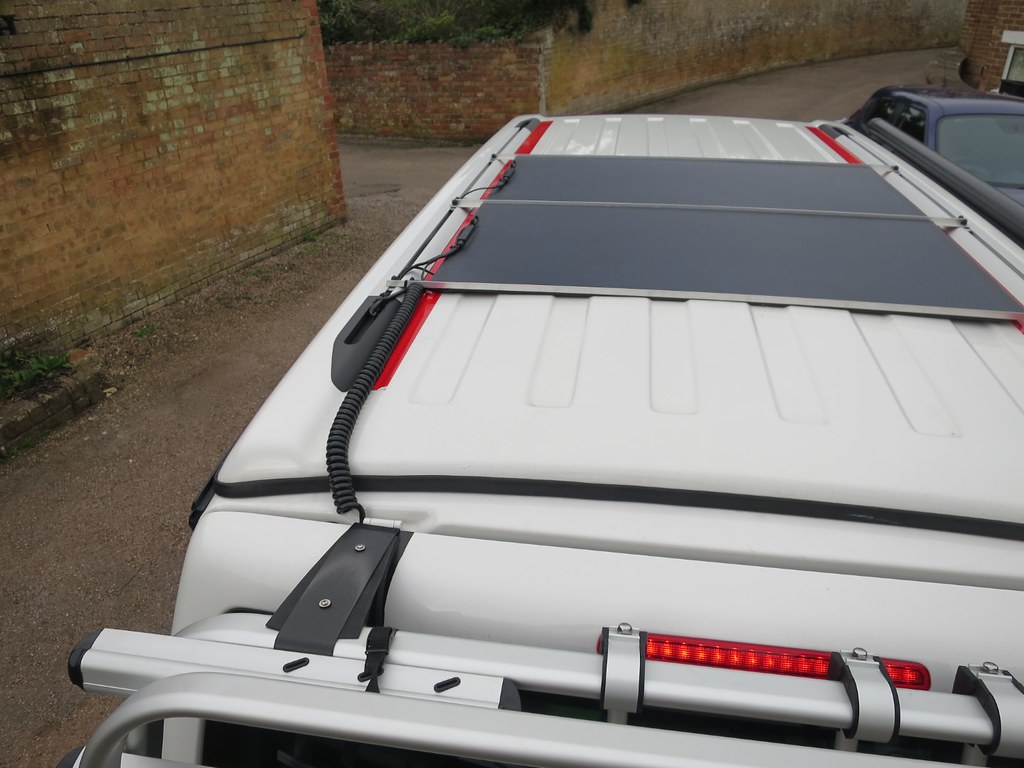
Hi Simon. For most pople, 1 panel (120W) is fine for summer camping - fridge, lights, music, phone charging etc. Particularly if you have 2 batteries (Ocean). 2 panels (240w) helps if you camp in spring/autumn, when there is a lot less solar energy, and it's also great if you have a heavy power using family - charging multiple phones and tablets.

For most people, 1 panel is enough. Even if the weather turns sour, at least you can start the engine to charge up. Two panels is "belt and braces".

Thanks Roger, makes sense


Sent from my iPhone using Tapatalk
 
Ok, curly cord has been tested for fit and I've ordered a batch of cables in, ready to make the conversion kits.

The cost for an upgrade to existing customers is a discounted £22 + postage (£3.45). It will be slightly more on new orders.

If you can contact me via my email (below - in this post footer) rather than a PM on here, then we can arrange payment and delivery if you want one.

46015385274_d6a1289c8b_b.jpg


32864822228_9c4b7e05d5_b.jpg
 
Where does the cable need to connect to once inside in a T6 beach for a nice clean install?

I like the idea of this with the hidden bluetooth charging unit.
 
Where does the cable need to connect to once inside in a T6 beach for a nice clean install?

I like the idea of this with the hidden bluetooth charging unit.

In the beach I normally put the bluetooth charger in the jack compartment - rear left floor. The cable runs down behind the plastic trim, and then the battery cable is tucked behind the side plastic trim and connects under the passenger seat.
 
Ok, curly cord has been tested for fit and I've ordered a batch of cables in, ready to make the conversion kits.

The cost for an upgrade to existing customers is a discounted £22 + postage (£3.45). It will be slightly more on new orders.

If you can contact me via my email (below - in this post footer) rather than a PM on here, then we can arrange payment and delivery if you want one.

46015385274_d6a1289c8b_b.jpg


32864822228_9c4b7e05d5_b.jpg
Email sent
 
New type solar panel with WRM controller arrived yesterday and now fitted and working! :)

Bit of a faff getting the cable to the vehicle battery (connect to starter solenoid under passenger seat) but got there in the end with a little perseverance and luck (and frozen fingers!).

Cheers Roger :thumb
 
Nice one :)

I'll update the WRM15 instructions with my experience (poking the wire along behind the fridge)
 
Nice one :)

I'll update the WRM15 instructions with my experience (poking the wire along behind the fridge)
I luckily had some rods specially designed for this purpose, they screw into each other and can flex. I bought them from a hardware store years ago thinking they would come in handy, and they finally did!

From the cupboard at the rear they slid along behind the water tank at an angle finally appearing at the bottom of the left hand kitchen cupboard. I actually used 3 x 1m sections, so if using stiff wire make sure it’s long enough. I left them there while I routed the wire from under the passenger seat across to the adjacent kitchen cuboard, and the tricky bit then was to poke a piece of stiffish wire behind the plastic trim and locate a small gap which comes out inside the cupboard at the very bottom corner; this corresponds to the top of the aluminium extruded trim on the exterior of the cupboard. I jammed a screwdriver between the grey plastic trim and the side of the cupboard to create a bit of a gap. I then pulled the cable through, then routed it up to the top and behind the trellis member behind the sink, along to the far end of the LH cupboard and down to the rod I had previously inserted, attaching it to the end and pulling it through to the rear cupboard.

The only other tricky bit is attaching the red cable to the live 12v under the passenger seat. I found it best to swivel the seat 90 degrees, then remove the 2 nuts at the front and two bolts at the rear of the seat runners. Once this is done the passenger seat can be lifted sufficiently to access the starter relay. I didn’t unbolt the whole assembly as I found i could just reach the 12v connector and undo the 10mm nut with a socket and small extension with it in place. Put some blue tack in the socket to hold the nut as if it falls out it will disappear into the nether regions under all the gubbins under the seat area (I know because I have previously lost fuses under there!).

If anyone is doing this remember before you touch any electricals under the seat disconnect the vehicle battery by removing the earth lead (under the bonnet). Otherwise the socket extension WILL short out to earth while you’re undoing the 10mm nut, causing a lot of grief! Also remember to be careful with the wiring to the air bags in the seat or you will be faced with a visit to the dealer to reset the air bag light. Check it all over before reconnecting the battery and turning on the ignition.
 
What I do is this:

Whilst the battery is out at the rear - use this compartment to poke the live wire through in the direction of the fridge - a few attempts and it'll come out the other side of the fridge in the cupboard. Then run it along the back of the cupboard. To get out of the cupboard I just push the wire through and prise the plastic trim away from the kitchen unit with alarge flat bladed screwdriver. It flexes plenty enough to get the wire through. Then I pull it downwards, and finally hide it under the trim track that goes to the seat.

I undo all 4 seat bolts, lift it, slide it forwards and rest it on the dash. Gives you loads of room, no need to unplug anything, and you can easily undo the relay bracket with no risk of a socket extension short circuit. I just get the star bolts going, then use a plastic handled socket "scredriver" to remove them fully.
Well, at least I finally got to use my rods doing it my way! :D
 
just wondering, our van has the original leisure batteries(California SE). I think they are getting a bit tired now - the van being nine years old in September. If I fitted a solar panel, as Roger's, could I offset the cost and keep my existing batteries?
 
just wondering, our van has the original leisure batteries(California SE). I think they are getting a bit tired now - the van being nine years old in September. If I fitted a solar panel, as Roger's, could I offset the cost and keep my existing batteries?
It would be like filling a bucket with a hole in it. I think you only be delaying the replacement anyway, you might as well change the batteries now and you will get another 9 years use!
 
Solar will certainly help greatly. Your batteries are responsible for getting you through the night (and grey days), and the solar does the work in the day. If your batteries are getting tired - as long as they will get you through a night, then you'll be fine. 9 years is a long time mind you!
 
The Solar panel can't put any more charge into the batteries than they currently take therefore not really a remedy for your 'old' battery problem.

In addition if you were in a dull and overcast sky situation very little charge would be available to top up your batteries which again would bring you back to the 'old' battery issue.
 
Thanks both - sounds like I might as well give it a go! Worst case I have to get new batteries after fitting the solar panel :)
 
And thanks to you BJG - yes I've a feeling that I'm going to be involved in getting new batteries in any event - this maybe just makes justifying a solar panel a bit easier!
 
And thanks to you BJG - yes I've a feeling that I'm going to be involved in getting new batteries in any event - this maybe just makes justifying a solar panel a bit easier!
I was thinking that's what I'd do if a solar panel was well up in my plans especially as solar panel design has moved forward recently.
 
@Roger Donoghue Hi Roger, I'm ready to get the single panel and the WRM15 so I'm wondering about your availability for fitment. Are you free Monday 15th April? Cheers
 
How much height does the panel add to the van?
 
12.5mm at the highest point - lower than the official VW awning and less than 2m in total (for to!ls, ferries etc)
 
Is it important to have an L profile aluminum holders or can use wider planks that should have pretty decent sturdiness? I don't want to gove over current 1,95.
Also dropped the idea of gluing because of no cooling which might be important for the panels at high heat.
Leaving airflow underneath is a good idea.
How do they tolerate an automatic car wash?
 

Similar threads

OllieCollieCali
Replies
3
Views
374
Californication69
Californication69
Roger Donoghue
Replies
9
Views
1K
Roger Donoghue
Roger Donoghue
zinglefiffy
Replies
3
Views
1K
zinglefiffy
zinglefiffy
Back
Top