Buy all your VW California Accessories at the Club Shop Visit Shop

Roof code 1000

Monty-Wilf bus

Monty-Wilf bus

Monty
VIP Member
Messages
54
Location
Exeter
Vehicle
T5 SE 140
Hi, thanks to triplebee for some advice on roof sensors but does anyone know for certain that the roof code ‘1000‘ within the control panel vw diagnostic section is definitely the ram sensors. It seems likely from my search of posts. I can order a new wiring loom from TPS at £185 + VAT and do the advised sensor swap but I am just a little unsure whether it is definitely the known sensor issue. Hope you can help, it would be nice to have it fixed and ready for the end of lockdown.......whenever that will be. Thanks and stay safe
 
Don't know if it certainly is the sensor(s).
And if it's just the cables that are broken, there is no need for a new loom.
If you can find a fault in the wire near the ram (undoing all the plastic tape around the loom), you might find a broken cable. Then it's surely a fault there, and then you can just put them back together (make them waterproof!!!!), and everything could be just fine after that.
If you find no fault in the wire, it might be something else. But if you have some spare time left (let's say a couple of weeks :rolleyes:) then searching for a broken wire can save you £200?
Hi Triplebee, I unwrapped the tape around the sensor cables to look for any damage, all looks ok. I will probably try replacing the sensors. I am confident at the wiring and will use some heat shrink for the joint. Interestingly the rear sensors are already joined and have a heat shrink. Is this normal or does it indicate these have already been replaced at some point? Do you know how easy is it to actually take the old sensors out /off and replace with the new ones? Does it affect the hydraulic pressures? Thank you
 
They come with shrink around the joints on all 4 sensor cables. At least on mine.

To take the 2 rear sensors (left and right) out, you will need to try to turn the hydraulic lines to the oposite side. And they are not long enough to do so, unless you are able to pull the lines far enough. Watch out for sharp bends when you do so. You will damage them in that case (and you don't want that).
The other possibility is to undo them from the rams, but then you will need to hold your roof up, so the pressure is gone. And you will need new seals for those lines. Don't do it if you are not familiar with hydraulics!
 
Thanks Triplebee, if I manage to move the hydraulic connectors carefully out of the way, do the sensors just lift / pull out? when you pull the sensor out do you lose oil? Thank you
 
You won't spill oil when removing the sensors, but you will if you take the hydraulic lines out of the ram. Then you really need new sealings, or you might create a leakage.
The sensors are hall sensors (they detect metal, they are magnetic), so they just sit on the outside of the rams. They detect the base of the piston. They "close" when the base of the piston reaches the sensor.
 
hall voelers.jpg
They are really in a tough place.
 
Hi, thanks to triplebee for some advice on roof sensors but does anyone know for certain that the roof code ‘1000‘ within the control panel vw diagnostic section is definitely the ram sensors. It seems likely from my search of posts. I can order a new wiring loom from TPS at £185 + VAT and do the advised sensor swap but I am just a little unsure whether it is definitely the known sensor issue. Hope you can help, it would be nice to have it fixed and ready for the end of lockdown.......whenever that will be. Thanks and stay safe
What was the issue when you got the 1000 code? I got it to. My roof sag slowly on one side.
 
What was the issue when you got the 1000 code? I got it to. My roof sag slowly on one side.
The sagging will be a leak somewhere. External or internal.
I changed 1 ram on the sagging side, but that didn't help. In the end I changed the hydraulic pump. This helped.
 
The sagging will be a leak somewhere. External or internal.
I changed 1 ram on the sagging side, but that didn't help. In the end I changed the hydraulic pump. This helped.
Thanks!
 
New to this forum and was looking for advise on how to raise the pop top roof to inspect the loom and switches for the rams. The open roof warning lamp is flashing with no response from the motor.
fault code 1000 is permanent and will not reset with the control knob or battery disconnection.
Don't want to force the roof open and cause any damage.
 
You would need to remove the control panel to access the hydraulic release screw located behind the foam.

There is a thread by @TripleBee that shows this in one of his pictures.
 
New to this forum and was looking for advise on how to raise the pop top roof to inspect the loom and switches for the rams. The open roof warning lamp is flashing with no response from the motor.
fault code 1000 is permanent and will not reset with the control knob or battery disconnection.
Don't want to force the roof open and cause any damage.
Hello @macmyboy , welcome to the forum.

Are you able to tell us which vehicle you have please? your profile says GC600, which afaik, does not have a popup roof.
 
New to this forum and was looking for advise on how to raise the pop top roof to inspect the loom and switches for the rams. The open roof warning lamp is flashing with no response from the motor.
fault code 1000 is permanent and will not reset with the control knob or battery disconnection.
Don't want to force the roof open and cause any damage.
I would hook the van up overnight so that you
have a descent enough charge in the leisure batteries.

Then try doing the reset with the engine running, after its reset,
try opening the roof then, still with engine running.

Then go back in for a coffee and a bacon butty.
 
New to this forum and was looking for advise on how to raise the pop top roof to inspect the loom and switches for the rams. The open roof warning lamp is flashing with no response from the motor.
fault code 1000 is permanent and will not reset with the control knob or battery disconnection.
Don't want to force the roof open and cause any damage.
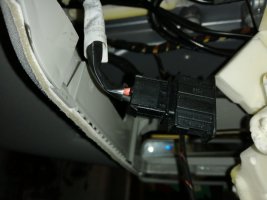
Now I've solved the problem on the roof fault. Firstly I had to manually power up the hydraulic pump through the two pin connector block near the motor. This let me raise the roof safely without damage.
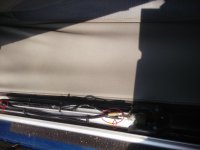
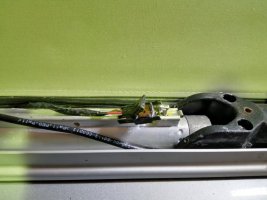
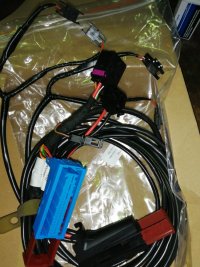
Which then allowed me to insect the four magnetic sensors on the hydraulic rams. Two had shown previous signs of repair so I decided to replace them all. The part was only available as a complete loom from the dealer(not cheap). Decided to cut the 4 four sensors out and connect them the the vehicle loom making good the insulation.
The fault code erased immediately and full function was restored.

IMG_20210201_101244.jpg

IMG_20210201_101203.jpg

IMG_20210201_101150.jpg

IMG_20210201_150947.jpg

IMG_20210201_151004.jpg
 
Now I've solved the problem on the roof fault. Firstly I had to manually power up the hydraulic pump through the two pin connector block near the motor. This let me raise the roof safely without damage.
Which then allowed me to insect the four magnetic sensors on the hydraulic rams. Two had shown previous signs of repair so I decided to replace them all. The part was only available as a complete loom from the dealer(not cheap). Decided to cut the 4 four sensors out and connect them the the vehicle loom making good the insulation.
The fault code erased immediately and full function was restored.

View attachment 72878

View attachment 72879

View attachment 72880

View attachment 72881

View attachment 72882
I have the same issue, having some problems disconnecting the plug, any hints? (Update: there is a latch on the side so I got it open).
Once I have access to the plug, can I just plug in 12V from a spare battery to power the pump? Do I need to remove the roof motor fuse as a precaution? Can the sensor unit remain attached? Its a T5.1
 
Last edited:
I have the same issue, having some problems disconnecting the plug, any hints?
Once I have access to the plug, can I just plug in 12V from a spare battery to power the pump? Do I need to remove the roof motor fuse as a precaution? Can the sensor unit remain attached? Its a T5.1
I've just been going through exactly the same process.

To disconnect the power connector on the cable running into the pump motor, just squeeze the tabs on the sides and wiggle it out.

Once it's out, you'll see that the connector on the wire from the pump has two flat terminals inside it. They fit nicely into regular spade crimp terminals. So I made up a cable that goes to two such crimp terminals and then pushed them onto the terminals inside that connector. I wrapped some electrical tape around each to make sure they wouldn't short if they touched (it's quite close).

I also put a 10A fuse inline in my wire just in case (20A or 30A may have been more suitable but I only had 10 and it was fine - didn't blow when the motor ran).

Then you can simply apply 12V to that cable from a spare battery or I used the 12V socket behind the passenger seat.
Positive to red, negative to black in the wire to the pump opens the roof.
Negative to red, positive to black closes the roof.
Thanks for the quick response! I’d got the plug off shortly after posting (did try to update my post) and figured spade connectors too; thanks for the tip about the internal 12V supply, that would be fused lower than 10A so I discounted it. The under seat fuse for the roof motor is 30A. Now whether to crack on with the work with the current weather ...
 
Hey guys, same issue here, roof open is flashing even though roof is down. I want to open the roof using the method you have used in order to inspect the cables and sensors. I have removed the console but cannot see the wire connector foe the pump. How do you get to it?
Now I've solved the problem on the roof fault. Firstly I had to manually power up the hydraulic pump through the two pin connector block near the motor. This let me raise the roof safely without damage.
Which then allowed me to insect the four magnetic sensors on the hydraulic rams. Two had shown previous signs of repair so I decided to replace them all. The part was only available as a complete loom from the dealer(not cheap). Decided to cut the 4 four sensors out and connect them the the vehicle loom making good the insulation.
The fault code erased immediately and full function was restored.

View attachment 72878

View attachment 72879

View attachment 72880

View attachment 72881

View attachment 72882
Hello there, attempting the same job with my T5.1 2013. The roof is flashing open even though roof is down and locked. I want to manually open the roof in order to inspect the wires and sensors. I have removed the console but cannot see the 2 wire connector near the motor... do I need to remove more panels to get access? Thank you so much for sharing your resolution btw. We are driving to France on Thursday and you have given me hope to fix it by then!

20210425_153705.jpg
 
Hey guys, same issue here, roof open is flashing even though roof is down. I want to open the roof using the method you have used in order to inspect the cables and sensors. I have removed the console but cannot see the wire connector foe the pump. How do you get to it?

Hello there, attempting the same job with my T5.1 2013. The roof is flashing open even though roof is down and locked. I want to manually open the roof in order to inspect the wires and sensors. I have removed the console but cannot see the 2 wire connector near the motor... do I need to remove more panels to get access? Thank you so much for sharing your resolution btw. We are driving to France on Thursday and you have given me hope to fix it by then!

View attachment 77310
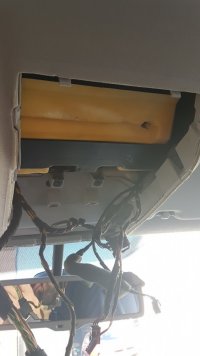
Above the passenger (left) seat side slightly; under all that yellow sponge. Unless you remove more panelling, you have to pull out (damaging) some of the sponge. Even then the connector is a little fiddly to reach. Someone posted a photo of the connector on this thread, it should help.
 
I replaced a faulty sensor today ( 54 34 7 190 735 ) Its a BMW part.
The roof would go into fault when about 50% on the opening mode.
What I found with a multimeter is that the sensors measure 1.2M ohm one way then change polarity and I think this is the crucial one 420K ohms.
The one that didn't was the faulty one.
Not that easy to test each sensor has a soldered common on the alternate leg.
So I just stripped the insulation back and cut the wires about 50cm from the sensor then replaced with automotive bullet crimps.
Anyhow saves changing all the sensors,seeing you have to destroy the rear ones to get them out.
Yes it was a rear one and I was convinced it was a front one as it was on the opening cycle.
Sensor £27 ebay
Interesting - were those readings measured with the sensors still connected to the wiring loom, or after you had cut the wires as I wonder if part of that reading is from the control panel circuitry. I have a couple of the sensors here that Lambeth_cali sent me and I can't get measurements anywhere near that when they are disconnected (I get something like 23M ohms one way and infinite the other) - so was trying to work out how to tell if one was bad or not. I can test them in a circuit but that is not so simple to do and I was hoping for a near idiot-proof test that could be done by anyone with a multimeter.

From what I can gather, the rear sensors trigger when the roof is fully closed - so I guess if you open the roof and then one side says "open" but the other is stuck at "closed" that is when you get the fault. The front sensors would not expect to read until the roof is fully open, so any problem between opening and before the roof is fully open I am guessing is likely to be the rear sensors.

-Steve
 
The readings are with the wires cut about 5cm from the sensor not 50cm (typo)
I tested a new sensor first,they have a magnet in the end the reading did not change when applying a solid metal object near the sensor or another magnet.
The faulty sensor read 120k ohms .
I suppose 1.2 M ohms is infinity also tested with the meter on diode test but no change and capacitance to boot which was for the record 11nf one way and 44nf the other.
 
Do you still have the ones that you cut out - the only way I could "test" them was with a power supply (anything between 5v and 12v seemed to work - +ve to red lead) and a resistor in series with the sensor - then measure the voltage across either the sensor or the resistor. There was a definite on/off point where the voltage changed when I put metal near it (I used a hammer head , that only seemed to change the reading when close enough to be attracted by the magnet on the sensor) - and I could affect it by using a magnet (back of a small speaker) at a short distance like 1cm. I would like to try with a bigger magnet to see how far away I could operate the sensor from but I don't have one.

I couldn't find a way of actually checking the operation of the sensor without powering it and measuring the voltage drop , I guess your failed one may have failed in a way that it is actually broken as opposed to not operating at the correct sensitivity but if you had a power supply and resistor you could check this. I can't currently find my notes as to what resistor I used though, i think it was a few hundred ohms , the value is probably not that important.
 
I think your right the only way to test them is with a voltage applied.
I suppose you could test the Hall sensor in circuit pare back the insulation and use your meter Vdc between the output and earth whilst using a magnet, seem to have read somewhere a north pole but that might be just rubbish.
your assumption of which sensors are in use on what point of the cycle would have been handy to know it almost certainly narrows it down to the rear sensors for the opening procedure.
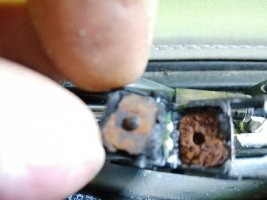
I stripped the Hall sensor down I will send a picture if you want.
 
Back
Top