Buy all your VW California Accessories at the Club Shop Visit Shop

Spare safe fitting Cali T6.1

Campervanpup21

Campervanpup21

VIP Member
Messages
70
Location
Leicester
Vehicle
T6.1 Ocean 150
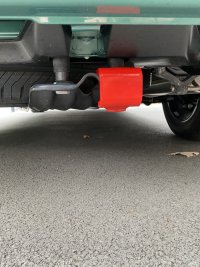
After reading various threads, thought we would get a spare safe from the Club shop for some additional protection.

Found it straightforward to fit - around 10 minutes. It took me longer to get the toolkit back in its place in the rear of the Cali!

Wheel brace from the toolkit used to undo the left hand wheel carrier nut about 1/4-1/2”, undo and remove the right hand bolt completely.

Slide the spare safe bracket over the right hand side of the wheel carrier that houses the bolt. It aligned perfectly.

Insert spare safe locking wheel nut & bolt through the bracket / wheel carrier, tighten, bit of grease and place the cap supplied over the head of the bolt.

Tighten left hand bolt.

Hopefully now a safe spare wheel!
18628926-01E3-4B34-85B6-1A354582E16D.jpeg
 
After reading various threads, thought we would get a spare safe from the Club shop for some additional protection.

Found it straightforward to fit - around 10 minutes. It took me longer to get the toolkit back in its place in the rear of the Cali!

Wheel brace from the toolkit used to undo the left hand wheel carrier nut about 1/4-1/2”, undo and remove the right hand bolt completely.

Slide the spare safe bracket over the right hand side of the wheel carrier that houses the bolt. It aligned perfectly.

Insert spare safe locking wheel nut & bolt through the bracket / wheel carrier, tighten, bit of grease and place the cap supplied over the head of the bolt.

Tighten left hand bolt.

Hopefully now a safe spare wheel!

View attachment 98921
Nice work. Now you can visit legoland tension free. :thumb

Three things that have helped me:
a) a dab of copper grease on the bolt threads - ensures that the bolt is easy to undo when needed
b) the bolt head with the three pins, fill that with copper grease as well. Copper Grease is easy to remove compared to when the holes get filled with dirt and grime
c) plan to repaint after your first winter - that red paint from the factory does not stay on.
 
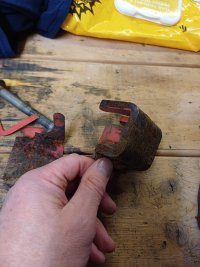
Anyone else's spare safe gone like this?thinking a quick wire brush and hammerite spray? I reckon I'm going to turn it black

20240116_132736.jpg
 
Anyone else's spare safe gone like this?thinking a quick wire brush and hammerite spray? I reckon I'm going to turn it black

View attachment 118232
Mines the same. It looks like something recovered from the sea bed. I gave mine a couple of coats of ascot grey too thinking I was being clever but it’s rusted through and peeled off back to the bare metal.
 
Mines the same. It looks like something recovered from the sea bed. I gave mine a couple of coats of ascot grey too thinking I was being clever but it’s rusted through and peeled off back to the bare metal.
Probably needs a fresh etch and prime before adding the colour coats.
 
i've got some black hammerite metal paint in a tin, was just going to slap that on it with a brush,rather than spray it ?
 
i've got some black hammerite metal paint in a tin, was just going to slap that on it with a brush,rather than spray it ?
I’ll keep an eye on this tread to get some ideas as to what works best. I did think after I’d painted it the same colour as my van that it was better off red/orange so it looks as much like a deterrent as it is. I won’t be doing anything until the works warms up a bit. Phil
 
I’ll keep an eye on this tread to get some ideas as to what works best. I did think after I’d painted it the same colour as my van that it was better off red/orange so it looks as much like a deterrent as it is. I won’t be doing anything until the works warms up a bit. Phil
I've gone black. But I'll get a new spare safe sticker made up at work on the sticker machine
 
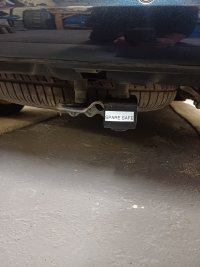
Mines now looking a bit better. Also spare wheel needed some air in it.

20240118_153013.jpg
 
Nice work. Now you can visit legoland tension free. :thumb

Three things that have helped me:
a) a dab of copper grease on the bolt threads - ensures that the bolt is easy to undo when needed
b) the bolt head with the three pins, fill that with copper grease as well. Copper Grease is easy to remove compared to when the holes get filled with dirt and grime
c) plan to repaint after your first winter - that red paint from the factory does not stay on.
The bolt head with three poins comes with a steel protective cover/cap - but I found this a pain to get off and imagine over time it might become very difficult to remove. At the same time - as you say -uncovered holes could become filled with dirt and grime.

This work well for me instead (along with a thin coat of grease as you suggest):

https://www.amazon.co.uk/gp/product/B07TCW931R/?tag=eliteelect-21

The also fit water filler cap - if vented (or drilled to vent) to stop dribble when the tank is full.
 
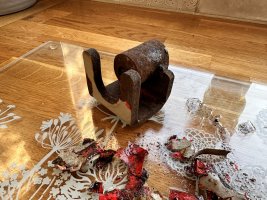
An exciting morning ahead for me. I’ve started scraping off the paint that’s peeled. It’s really rusty under there for 18 months old ! Next job is to get the wire brush out. My wife will be delighted to know I’ve done this job in the kitchen when she gets in.
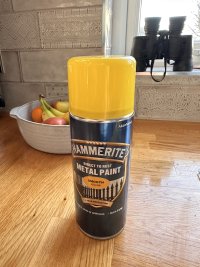
I’ve gone for a Hammerite smooth in a fetching yellow.

IMG_4378.jpeg

IMG_4379.jpeg
 
i've got some black hammerite metal paint in a tin, was just going to slap that on it with a brush,rather than spray it ?
Definitely lasts longer than original paint which obviously lacked any primer coating.
 
An exciting morning ahead for me. I’ve started scraping off the paint that’s peeled. It’s really rusty under there for 18 months old ! Next job is to get the wire brush out. My wife will be delighted to know I’ve done this job in the kitchen when she gets in.
I’ve gone for a Hammerite smooth in a fetching yellow.

View attachment 118289

View attachment 118290
have you got the binoculors out to spot her coming ?
 
Back
Top