You are using an out of date browser. It may not display this or other websites correctly.
You should upgrade or use an alternative browser.
You should upgrade or use an alternative browser.
V
Vagophile
Top Poster
Lifetime VIP Member
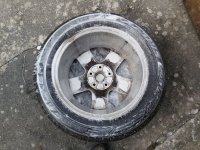
I can't go too long without lifting a vehicle bonnet or having a look at something underneath, so today I decided to see how easy it was to drop and remove the spare wheel. First requirement is a boiler suit for protection. After I had laid down flat on my back I decided that in real life it would be a job for the breakdown services. But.... I still wanted to see how it worked. Deciding the van needed to be lifted, I was about to deploy my ramps when I realised that the mud flaps would catch . Even making the ramp slope shallower was not workable. In the end I put two scaffold planks on top of each other on each side and reversed onto them. All of two feet, I would say. The cradle fixing bolts came undone O.K. and the wheel cradle swung out O.K. releasing the wheel, which is a steel as I expected. What I didn't expect was the tyre, a HiFly HF805 Challenger DSAT 103W XL, date code 2918. It also has a directional fitting. My handbook says that my Cali left the factory with a steel spare wheel with original equipment tyre and those tyres were all weather 103H.
I'm now curious as to why the spare was changed, was the original considered time expired or taken for some other purpose?
Incidentally I noted that the mud flaps are only a one bolt fixing, so if I seriously need the ramps I know what to do.
I'm now curious as to why the spare was changed, was the original considered time expired or taken for some other purpose?
Incidentally I noted that the mud flaps are only a one bolt fixing, so if I seriously need the ramps I know what to do.
Wesel
By placing the ramps in front of the tires, and not behind, I do not have this problem.I can't go too long without lifting a vehicle bonnet or having a look at something underneath, so today I decided to see how easy it was to drop and remove the spare wheel. First requirement is a boiler suit for protection. After I had laid down flat on my back I decided that in real life it would be a job for the breakdown services. But.... I still wanted to see how it worked. Deciding the van needed to be lifted, I was about to deploy my ramps when I realised that the mud flaps would catch . Even making the ramp slope shallower was not workable. In the end I put two scaffold planks on top of each other on each side and reversed onto them. All of two feet, I would say. The cradle fixing bolts came undone O.K. and the wheel cradle swung out O.K. releasing the wheel, which is a steel as I expected. What I didn't expect was the tyre, a HiFly HF805 Challenger DSAT 103W XL, date code 2918. It also has a directional fitting. My handbook says that my Cali left the factory with a steel spare wheel with original equipment tyre and those tyres were all weather 103H.
I'm now curious as to why the spare was changed, was the original considered time expired or taken for some other purpose?
Incidentally I noted that the mud flaps are only a one bolt fixing, so if I seriously need the ramps I know what to do.
Borris
Super Poster
VIP Member
It's a bit easier if you can park with one side up on the curb.I can't go too long without lifting a vehicle bonnet or having a look at something underneath, so today I decided to see how easy it was to drop and remove the spare wheel. First requirement is a boiler suit for protection. After I had laid down flat on my back I decided that in real life it would be a job for the breakdown services. But.... I still wanted to see how it worked. Deciding the van needed to be lifted, I was about to deploy my ramps when I realised that the mud flaps would catch . Even making the ramp slope shallower was not workable. In the end I put two scaffold planks on top of each other on each side and reversed onto them. All of two feet, I would say. The cradle fixing bolts came undone O.K. and the wheel cradle swung out O.K. releasing the wheel, which is a steel as I expected. What I didn't expect was the tyre, a HiFly HF805 Challenger DSAT 103W XL, date code 2918. It also has a directional fitting. My handbook says that my Cali left the factory with a steel spare wheel with original equipment tyre and those tyres were all weather 103H.
I'm now curious as to why the spare was changed, was the original considered time expired or taken for some other purpose?
Incidentally I noted that the mud flaps are only a one bolt fixing, so if I seriously need the ramps I know what to do.
V
Vagophile
Top Poster
Lifetime VIP Member
I thought of that also, but the height of ramps is 32cm. The ground clearance on the van is about 30cm. just not enough to put them in front of the wheels. I can place the ramps behind the van and make a shallower slope with my planks but the mud flaps get in the way. The solution would be lower ramps, but the whole idea is to be able to get reasonable lift and for the times they are used, not worth it.By placing the ramps in front of the tires, and not behind, I do not have this problem.
andyinluton
Super Poster
VIP Member
- Messages
- 7,733
- Vehicle
- T6.1 Ocean 204 4 motion
Don’t forget that if you have a flat tyre you will have even less clearance under the spare.I thought of that also, but the height of ramps is 32cm. The ground clearance on the van is about 30cm. just not enough to put them in front of the wheels. I can place the ramps behind the van and make a shallower slope with my planks but the mud flaps get in the way. The solution would be lower ramps, but the whole idea is to be able to get reasonable lift and for the times they are used, not worth it.
campandfly
.....
VIP Member
soulstyledevon
Kennycalifornia
Super Poster
VIP Member
- Messages
- 6,519
- Vehicle
- Cali now sold
Had a go at building some storage next to the sliding seat - inspired by Calisolar.ch but dumbstruck by their prices.
Made from 3mm ACM in Silver from wholesalepos on fleebay. Enough left over from a 100x50cm sheet to do another part too.
Struggled to get it looking as good as I had in mind - found the ACM easy to work with, but after trying with epoxy ended up using clear Gorilla tape (similar to helicopter tape) and will see how it lasts. May re-stick a couple of parts to make it look a bit slicker at some point
View attachment 57312
Ive been meaning to do this myself.
When I find the time...
kurienp
Super Poster
VIP Member
wanted to do some maintenance on the wheels after taking them off ... and found the wheel nut lock key missing #headbang. New one ordered. Well, need to have something to do next weekend as well so task postponed to next weekend.
V
Vagophile
Top Poster
Lifetime VIP Member
Lucky that you didn't find that out when you had a flat on the motorway! Presume that you had the code for the cap nut? I found mine in the glove box, but can't find any record of it's code.wanted to do some maintenance on the wheels after taking them off ... and found the wheel nut lock key missing #headbang. New one ordered. Well, need to have something to do next weekend as well so task postponed to next weekend.
campandfly
.....
VIP Member
I struggled yesterday with the security lock nut. The key kept slipping off. I decided to leave it for the moment as I did not want to strip the thread.
V
Vagophile
Top Poster
Lifetime VIP Member
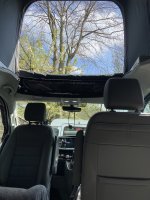
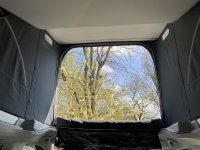
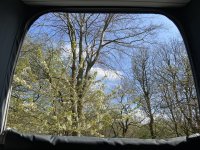
Only three to go. On a serious note, having experienced a blowout on a tyre on each of three previous motor homes (Don't ask why, but not overloading), wheel and tyre maintenance can often be neglected, and nobody is going to thank you if they have to take a lump hammer to your wheel to remove it. I do a wheel removal and inspection routine at the same time as the oil change.Just removed one wheel to give it a good clean. Quite a bit of work. Lucky I had a lump hammer to give the tyre a wack to loosen the wheel.View attachment 57431View attachment 57432View attachment 57433all shiny now. Not bad for 5 years old with lots of muddy country lanes and living near the coast. My torque wrench only went up to 140nm handbook says 180nm.
T6 CFO
Mike
Top Poster
I struggled yesterday with the security lock nut. The key kept slipping off. I decided to leave it for the moment as I did not want to strip the thread.
There was a thread on this recently and I along with some others took the view that removing the locking nuts was a good option.
I did do because having had a blow out it was very one less thing to worry about and any they would not be a challenge to any self respecting thief anyway.
Mike
Karlos
I was only thinking the other day, are there still thieves going around with a load of bricks in the back of a van to nick wheels from motors especially with the alarms fitted today.There was a thread on this recently and I along with some others took the view that removing the locking nuts was a good option.
I did do because having had a blow out it was very one less thing to worry about and any they would not be a challenge to any self respecting thief anyway.
Mike
kurienp
Super Poster
VIP Member
Lucky that you didn't find that out when you had a flat on the motorway! Presume that you had the code for the cap nut? I found mine in the glove box, but can't find any record of it's code.
I agree. Classic case of dealer - "yeah it is there, 100% sure ... don't worry, we check all that before delivery"
 and being a very rainy day, I did not bother to check.
I took a picture, went to eBay and ordered one where the pattern matched. I think I am very good at pattern matching and so was able to determine the correct one and order. Will see when it comes if my pattern matching skills is as good as I think it is

TripleBee
Have you checked in the toolbox behind the rear seat? (Sorry for questioning if you looked there)wanted to do some maintenance on the wheels after taking them off ... and found the wheel nut lock key missing #headbang. New one ordered. Well, need to have something to do next weekend as well so task postponed to next weekend.
kurienp
Super Poster
VIP Member
Have you checked in the toolbox behind the rear seat? (Sorry for questioning if you looked there)
Yes @TripleBee . I checked twice, just being paranoid that I would've missed the obvious (and now you've made me paranoid again - so off to check it
 )
)Brownbetty
I can't go too long without lifting a vehicle bonnet or having a look at something underneath, so today I decided to see how easy it was to drop and remove the spare wheel. First requirement is a boiler suit for protection. After I had laid down flat on my back I decided that in real life it would be a job for the breakdown services. But.... I still wanted to see how it worked. Deciding the van needed to be lifted, I was about to deploy my ramps when I realised that the mud flaps would catch . Even making the ramp slope shallower was not workable. In the end I put two scaffold planks on top of each other on each side and reversed onto them. All of two feet, I would say. The cradle fixing bolts came undone O.K. and the wheel cradle swung out O.K. releasing the wheel, which is a steel as I expected. What I didn't expect was the tyre, a HiFly HF805 Challenger DSAT 103W XL, date code 2918. It also has a directional fitting. My handbook says that my Cali left the factory with a steel spare wheel with original equipment tyre and those tyres were all weather 103H.
I'm now curious as to why the spare was changed, was the original considered time expired or taken for some other purpose?
Incidentally I noted that the mud flaps are only a one bolt fixing, so if I seriously need the ramps I know what to do.
I done exactly the same thing last wk, I had to Google how to get it loosen it, found that out then found I couldn't remove the tyre without raising the back end up, in the end I used a scissor jack placed underneath the towbar, eventually after a lot of manoeuvring out it came.I can't go too long without lifting a vehicle bonnet or having a look at something underneath, so today I decided to see how easy it was to drop and remove the spare wheel. First requirement is a boiler suit for protection. After I had laid down flat on my back I decided that in real life it would be a job for the breakdown services. But.... I still wanted to see how it worked. Deciding the van needed to be lifted, I was about to deploy my ramps when I realised that the mud flaps would catch . Even making the ramp slope shallower was not workable. In the end I put two scaffold planks on top of each other on each side and reversed onto them. All of two feet, I would say. The cradle fixing bolts came undone O.K. and the wheel cradle swung out O.K. releasing the wheel, which is a steel as I expected. What I didn't expect was the tyre, a HiFly HF805 Challenger DSAT 103W XL, date code 2918. It also has a directional fitting. My handbook says that my Cali left the factory with a steel spare wheel with original equipment tyre and those tyres were all weather 103H.
I'm now curious as to why the spare was changed, was the original considered time expired or taken for some other purpose?
Incidentally I noted that the mud flaps are only a one bolt fixing, so if I seriously need the ramps I know what to do.

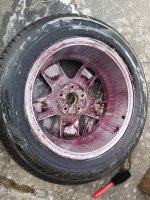
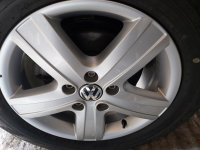
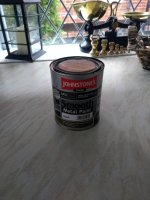
While it was out I decided to clean & paint it.

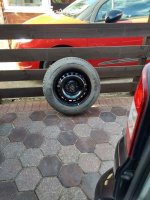
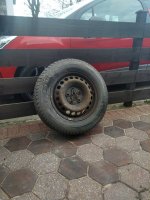
kurienp
Super Poster
VIP Member
That's really neatly paintedI done exactly the same thing last wk, I had to Google how to get it loosen it, found that out then found I couldn't remove the tyre without raising the back end up, in the end I used a scissor jack placed underneath the towbar, eventually after a lot of manoeuvring out it came.
While it was out I decided to clean & paint it.View attachment 57493View attachment 57494
westfalia
Just found the other 2 spares that i made.I have done nothing with my California today, as I didn't for the last few weeks apart from giving it a good clean.
I had taken off my awning and awning brackets, changed my right hydraulic roof cylinder and came to some conclusions:
The right ram had some rust on the piece that holds the arm for the roof (will take some pictures later), so I changed it for the left ram (that I changed before to try to solve the sagging roof).
And also the nuts, for holding the awning brackets on the awning rail, are quite rusty. One of them was kind of falling apart, so I made some new ones from RVS.
View attachment 57262
View attachment 57263
View attachment 57264
View attachment 57265
Now, go on son, tell me which ones look better.
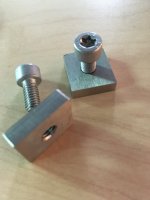
TripleBee
You just can't stop arguing with me, can't you?Just found the other 2 spares that i made.
Now, go on son, tell me which ones look better.
View attachment 57512
Well, let's both install them with the awning on, and I'll let you know which ones are better!
But everything is better than the ones I got off, isn't it?
Similar threads
A
- Replies
- 8
- Views
- 4K
- Replies
- 133
- Views
- 33K
- Replies
- 0
- Views
- 338

About us
The VW California Club is the worlds largest resource for all owners and enthusiasts of VW California campervans.


