Buy all your VW California Accessories at the Club Shop Visit Shop

Hob ignition upgrade

VincentVan

VincentVan

VIP Member
Messages
39
Location
Manchester
Vehicle
T6 Ocean 204 4Motion
I don’t like the noise and harshness of the hob igniter button. It feels agricultural and clunky. I changed it to battery powered. It’s now a pleasure to light the gas. It uses a single AA battery to supply the spark. Total cost £16. An easy fix, if a little fiddly.


Here is how I did it for anyone who’d like to do the same:


Tools you will need: flat blade screwdriver, crosshead screwdriver, cable connectors, pliers, insulating tape, needle file, drill, cable clip


1) Buy this: Onlyfire barbecue electronic igniter kit replacement fits Weber Spirit 210/310 series gas grills


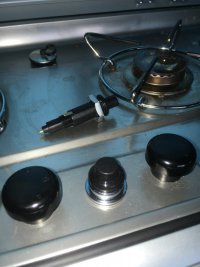
2) Remove the original igniter button. Working from underneath the hob, pull off the 2 wires from the original igniter and then undo the nut that holds it in place. A flat blade screwdriver is enough to ease the nut loose.
139A3853-66BE-4996-8A41-52A35410ED2F.jpeg
The vw spark generator removed and the new button installed

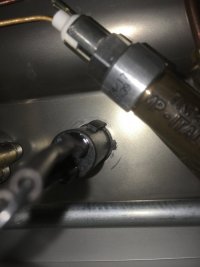
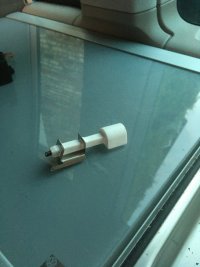
3) Connect the 2 wires you have just pulled off to the ends of the 2 new ignition wires. One of the new wires has a porcelain fitting which you need to cut off and replace with a connector.
DCE53244-BDE0-4EE8-BDE3-6152B4114F68.jpeg
Cut this porcelain fitting off

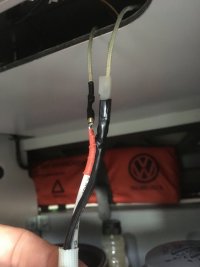
The other wire has a spade connector which fits ok straight onto the original one. Wrap the joins carefully with insulation tape, otherwise the pesky spark will try to jump early before it gets to the burner.
09CAC1CC-49FF-477D-A83E-7EB7130FD6F1.jpeg
Both wires need wrapping with insulating tape

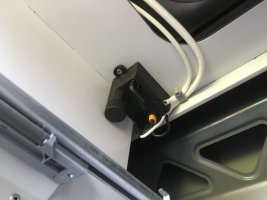
3) Screw the generator unit into place.
B1AFAF42-2647-40F6-9200-8123C3452342.jpeg
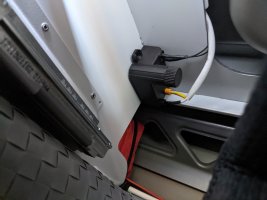
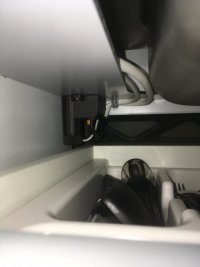
I put it at the back in the corner above the drawer because it fits nicely here, doesn’t interfere with the drawer and gives easy access to change the battery.
327E406A-525A-45EA-87FF-73A4344259D4.jpeg
Generator fits nicely above the drawer

First remove the drawer and the shelf. Before screwing it up, grind the plastic lugs off the back of the unit so that it sits flush. Drill a pilot hole and use small wood screws or self-tappers.


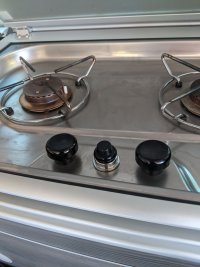
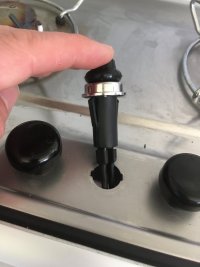
4) Install the new ignition button. It fits in the same hole as the original but needs 2 little slots cutting each side to allow the moulded locking arms to pass through. I used a needle file, which worked well (despite the nails on blackboard squeal) because the stainless top is very thin.
4ADA0878-AB63-418E-86CF-9D510000AA21.jpeg
Slots shown from the top

55243157-C1BC-46E1-971D-7188B4D2F319.jpeg
And from underneath

5) Pass the wires under the sink through to the ignition unit. Use a cable clip next to the generator to keep them tidy


6) Connect the wires to the generator unit

Hope this sparks your interest :)
 
That is very clever ... and now gathering all bits and bobs for the upgrade next week.

Awesome and a big Thank you.
 
Great! I look forward to hearing how you get on…..
 
You little genius!


Sent from my iPhone using Tapatalk
 
I don’t like the noise and harshness of the hob igniter button. It feels agricultural and clunky. I changed it to battery powered. It’s now a pleasure to light the gas. It uses a single AA battery to supply the spark. Total cost £16. An easy fix, if a little fiddly.


Here is how I did it for anyone who’d like to do the same:


Tools you will need: flat blade screwdriver, crosshead screwdriver, cable connectors, pliers, insulating tape, needle file, drill, cable clip


1) Buy this: Onlyfire barbecue electronic igniter kit replacement fits Weber Spirit 210/310 series gas grills


2) Remove the original igniter button. Working from underneath the hob, pull off the 2 wires from the original igniter and then undo the nut that holds it in place. A flat blade screwdriver is enough to ease the nut loose.

View attachment 82388
The vw spark generator removed and the new button installed

3) Connect the 2 wires you have just pulled off to the ends of the 2 new ignition wires. One of the new wires has a porcelain fitting which you need to cut off and replace with a connector.
View attachment 82389
Cut this porcelain fitting off

The other wire has a spade connector which fits ok straight onto the original one. Wrap the joins carefully with insulation tape, otherwise the pesky spark will try to jump early before it gets to the burner.
View attachment 82393
Both wires need wrapping with insulating tape

3) Screw the generator unit into place.
View attachment 82390
I put it at the back in the corner above the drawer because it fits nicely here, doesn’t interfere with the drawer and gives easy access to change the battery.

View attachment 82392
Generator fits nicely above the drawer

First remove the drawer and the shelf. Before screwing it up, grind the plastic lugs off the back of the unit so that it sits flush. Drill a pilot hole and use small wood screws or self-tappers.


4) Install the new ignition button. It fits in the same hole as the original but needs 2 little slots cutting each side to allow the moulded locking arms to pass through. I used a needle file, which worked well (despite the nails on blackboard squeal) because the stainless top is very thin.
View attachment 82391
Slots shown from the top

View attachment 82394
And from underneath

5) Pass the wires under the sink through to the ignition unit. Use a cable clip next to the generator to keep them tidy


6) Connect the wires to the generator unit

Hope this sparks your interest :)
Thanks for the information. I wonder whether this ignites both burners or do I need two of the battery igniter? Your advice would be appreciated.
 
That’s a great mod.
I always thought the Cali igniter was a bit ‘cheap’ for A £50k+ vehicle and why VW never put a hard wired version in.

I’ll be making the upgrade following your example. Thanks
 
I don’t like the noise and harshness of the hob igniter button. It feels agricultural and clunky. I changed it to battery powered. It’s now a pleasure to light the gas. It uses a single AA battery to supply the spark. Total cost £16. An easy fix, if a little fiddly.


Here is how I did it for anyone who’d like to do the same:


Tools you will need: flat blade screwdriver, crosshead screwdriver, cable connectors, pliers, insulating tape, needle file, drill, cable clip


1) Buy this: Onlyfire barbecue electronic igniter kit replacement fits Weber Spirit 210/310 series gas grills


2) Remove the original igniter button. Working from underneath the hob, pull off the 2 wires from the original igniter and then undo the nut that holds it in place. A flat blade screwdriver is enough to ease the nut loose.

View attachment 82388
The vw spark generator removed and the new button installed

3) Connect the 2 wires you have just pulled off to the ends of the 2 new ignition wires. One of the new wires has a porcelain fitting which you need to cut off and replace with a connector.
View attachment 82389
Cut this porcelain fitting off

The other wire has a spade connector which fits ok straight onto the original one. Wrap the joins carefully with insulation tape, otherwise the pesky spark will try to jump early before it gets to the burner.
View attachment 82393
Both wires need wrapping with insulating tape

3) Screw the generator unit into place.
View attachment 82390
I put it at the back in the corner above the drawer because it fits nicely here, doesn’t interfere with the drawer and gives easy access to change the battery.

View attachment 82392
Generator fits nicely above the drawer

First remove the drawer and the shelf. Before screwing it up, grind the plastic lugs off the back of the unit so that it sits flush. Drill a pilot hole and use small wood screws or self-tappers.


4) Install the new ignition button. It fits in the same hole as the original but needs 2 little slots cutting each side to allow the moulded locking arms to pass through. I used a needle file, which worked well (despite the nails on blackboard squeal) because the stainless top is very thin.
View attachment 82391
Slots shown from the top

View attachment 82394
And from underneath

5) Pass the wires under the sink through to the ignition unit. Use a cable clip next to the generator to keep them tidy


6) Connect the wires to the generator unit

Hope this sparks your interest :)
Great mod and set of pictures /instructions. Thanks Marcus
 
Quite agree the original is horrible and inconsistent. Good mod!
 
Thanks for the information. I wonder whether this ignites both burners or do I need two of the battery igniter? Your advice would be appreciated.
Ignites both and a great mod. I've done this upgrade and will post some pics after tidying it up later today

Sent from my Pixel 2 XL using Tapatalk
 
After having just been away for the last 2 weeks, the ignition is total pants - very inconsistent.

Thank you so much for sharing this mod, genuinely appreciated. Just ordered one. :thumb
 
Ok, an update ... rather not much to update - other than, fixed!

PXL_20210808_164006536.jpg

put the mechanism exactly where @VincentVan mentioned, but used Velcro rather than screws (will help to just pull out easily if needed). Also aligned it to enable reaching the battery compartment a bit more easier for me.

PXL_20210808_163932227.jpg


Used some plate type metal cable clips to hold the wires in place.

PXL_20210808_110841113.jpg
 
Ok, an update ... rather not much to update - other than, fixed!

View attachment 82774

put the mechanism exactly where @VincentVan mentioned, but used Velcro rather than screws (will help to just pull out easily if needed). Also aligned it to enable reaching the battery compartment a bit more easier for me.

View attachment 82775


Used some plate type metal cable clips to hold the wires in place.

View attachment 82776
Thank you for the photos, very helpful. Ordered mine today. Are you happy with it???
 
Thank you for the photos, very helpful. Ordered mine today. Are you happy with it???
@subthree , yes, very happy with it. Very easy to use and blends in well with the overall aesthetics/look and feel.

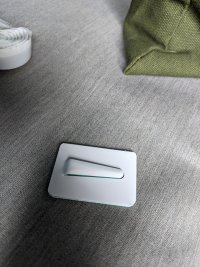
If I were to be very picky, the silver cover on the ignition switch is plastic. Would have preferred metal, but then did look around and all of them seem to be made of plastic. However, it is well made and fits in well.
 
Just installed this excellent fix. It will make our future trips much more harmonious; the old one was a real pain each time. Thanks VincentVan.

One difference I did find was that on our T6.1 Cali (Dec 2020 build) the connection in VincentVan's photo 3 (the one showing the red sheathed cable) with the OnlyFire cables had incompatible connectors so I found it easier just to cut off the ends of all of the cables EXCEPT the plastic moulded one and replace with small-size spade connectors. (The plastic one already had a small female spade embedded).

I fixed the generator unit at the back of the drawer as per other comments in this thread and used "3M Command: picture hanging strips rather than velcro. Seems nice and secure.

Thanks again.
Good update, thank you. My ignition arrived today, I also have a 6.1.

Do you have a link to the small spade connectors you used please?
 
Sorry, but I had a small stock bought from Maplin before they closed down so used those.

I've just quickly browsed eBay and, although you have to look quite hard for them, the miniature size spade connectors are there. My quick look suggests that they seem most often sold as part of a set of various sizes rather than by their own size; can still be pretty cheap, though.
Hope this helps.
 
Nice mod. I tend to use a cigarette lighter in the cutlery drawer as this also works for the cadac which refuses to light on the button also
 
Good update, thank you. My ignition arrived today, I also have a 6.1.

Do you have a link to the small spade connectors you used please?
Hello subthree

I didn’t have any bullet connectors so I used a spade connector and mashed it with a pair of pliers to form a shape that slid into the original. If you get an assortment of spade and bullet connectors, likely one of them will fit. Let us know if you find the perfect one!
 
+1 for this upgrade - quick and easy. We can now light the hob again (original ignition broke), plus it’s not so loud that the dog turns himself inside out every time we try to use it. :thumb
 
I have just installed this ignition kit, more or less following the excellent instructions and photos.

It only took 1.5 hours and has made a real difference.

Like the author, we were frustrated by the loud clicking and repeated attempts to light the gas. So easy now.

Thank you
 

Similar threads

Back
Top