Solar panels - anyone tried the Victron controller with bluetooth and phone app

for the last 6 months my 100w panel and Victron controller has kept my batterys fully charged will no problems as long as it keeps the two batteries fully charged at 100% I have not had any need to plug into the 240v
 
Your battery is probably always at a high capacity?
No it's not. Well, maybe in the summer it was, but now in the winter the solar cannot keep the battery topped up with the quadruple whammy of:
-Shorter days
-Lower sun
-More frequent cloud cover
-More lighting required
The only benefit in winter is that the fridge, which is always on and set st 6 degrees, doesn't need to work as hard so uses less power.

Solar has provided us with about 60 KWh over the last 220 nights or so. That's about 4 or 5 days use for the average UK household.


Follow my blog: www.au-revoir.eu
 
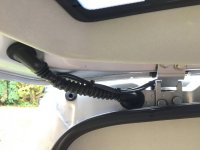
Also here is my way of getting the cable inside. I do not recommend running the cables through the canvas pocket that has the anti fold out device inside as I have done. It is very neat but it bends the cable 180 deg each time the roof is opened AND closed so will break in no time if you use the roof a lot. (sorry for the duplicate post on another thread)

Nice solution! Did you have any problems with overheating due to poor airflow?
 
I am about to get my kit together:

2 x flexible Sunpower + 100w
1 x Victron SmartSolar MPPT 75V/15A Bluetooth
1 x Victron Energy Direct Bluetooth Smart dongle


Not sure what connectors and cables to get …? I guess a set of battery cable (with battery shoes) and som 4mm wire – am I right?

AND I am also in search of a guide for installation. If someone should have a description to spare, I would be really grateful ;-)
The victron 75/15 that i had fitted last month has a bluetooth dongle built in, do not need for separate dongal.
Just download the app onto smart phone and away you go
 
Nice solution! Did you have any problems with overheating due to poor airflow?
Not had any problems so far and have spent months in Southern Europe. Still has some ventilation because of the roof ribs. Did research gap or no gap and if fitted with no gap on insulating material like caravan GRP roof it’s hotter and a few % less efficient. On a light colour aluminium roof of my Cali I’d expect it to make little odds with it stuck down. Only time you loose efficiency is when it’s very hot and that’s normally when one has an abundance of solar energy anyway.

System has been faultless. Fit and forget. My only regret is not fitting 3 panels (300w) as would allow me to charge the eMTB battery for more of the year.
 
I am about to get my kit together:

2 x flexible Sunpower + 100w
1 x Victron SmartSolar MPPT 75V/15A Bluetooth
1 x Victron Energy Direct Bluetooth Smart dongle


Not sure what connectors and cables to get …? I guess a set of battery cable (with battery shoes) and som 4mm wire – am I right?

AND I am also in search of a guide for installation. If someone should have a description to spare, I would be really grateful ;-)

Hi @Kmann

I set up Solar on my Cali last summer - I removed the whole set up which is super easy and will install it on another Cali this year. I bought my panel with the cable set included from a UK specialist.

I have a 100w high spec flexible panel, Victron 15 amp MPPT control unit (can handle 2 x 100w panels if you want to upgrade), all cable harnesses and the bluetooth dongle for iPhone connectivity - came in at £314 delivered in the UK. Your solar supplier should have the correct cables. If you PM I will send you a link.

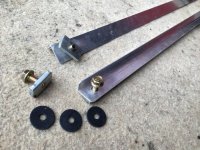
All you need is two pieces of aluminium angle 125cm wide that you PU adhesive the panel to, four bolts/nuts a few washers and some M8 captive nuts to go in the roof rail channels - all picked up at Wickes and my local hardware store for another £16.

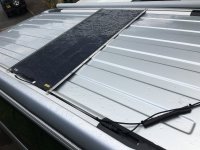
The length of the panel is 1200mm - exactly the same as the centre to centre measurement of the roof rails.

I got a 2.5m length of aluminium angle (15mm x 30mm) from Wickes (£14) and for the captive threaded 'nut' incredibly my local old fashioned hardware store has some fixings (not sure what for) but they are zinc plated steel rectangles 20mm wide, about 40mm long and about 6mm thick with an M8 thread (30p each) - these are the perfect size to slot into the rails.

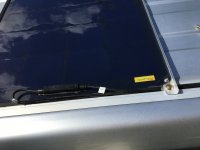
So I cut the angle in half, rounded the corners and then it was scored and abraded as a key - I attached the panel with PU adhesive and also riveted it for good measure.

This was mounted with holes in the corners of the angle/panel to the slotted fixings - all you need in between is M8 rubber penny washers - 99p for 10 on eBay.

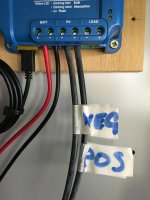
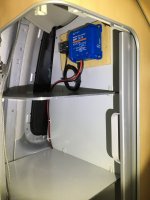
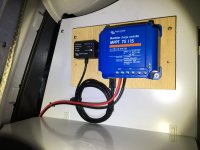
I made up a small ply board for the electrics and as the small connectors are quite delicate I made sure to support everything carefully to avoid movement - some sticky foam behind the small connectors.

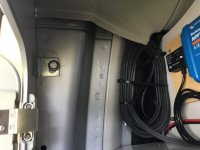
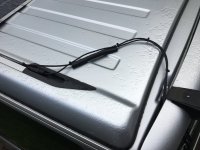
I rounded off the corners of the Dibond shelves so the cables could run there - see pics, my cables are left long as I want the option to run this in a Beach. It's just a case of running cables as neatly as possible and leave some room for the extra length of the open roof.
IMG_0062.jpg

IMG_0088.jpg

IMG_1866.jpg

IMG_1865.jpg

IMG_1867.jpg IMG_0060.jpg

IMG_0059.jpg

IMG_1870.jpg

IMG_1383.jpg

IMG_0109.jpg
 
Last edited:
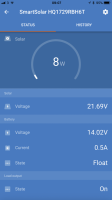
Sorry for what may be a dumb question. But could someone clarify what the figures show on the app represent. Should have asked Roger on Friday but had to rush off once confirmed the panels work.

Here’s my current values...

CC73C9ED-6C98-4F79-B8E5-359F11A024F9.png
 
8w = the power the panel is producing.
21.69V = Voltage of panel output.
14.02V = voltage of battery/s
0.5A = Current (in Amps) going into battery
Float = battery is fully charged and being kept full on a Float charge.
 
I’ve just installed one of Roger’s panel kits (and very good it is too!) - I’m a little concerned that it’s relatively easy to remove - can anyone recommend anti tamper nuts to fit please?
 
We don't have tall thieves round here so I just used standard lock nuts. Those ones that are domed on top.
 
The Victron 75/15 is an excellent charger. Great app too - very slick. To be fair, the EPever chargers have never failed on me, but the Victron is great if you don't want to / have the space for a display panel.

The 75/15 (15amp max solar) is fine for 220w of panels. 110W panel will give around 6.5 -7 amp max - so peak = 14amps, and that would be in ideal conditions - cold and full high sun, so rare in the UK.
 
For what it’s worth. Talked to Victron and they said ok to connect 300w+ (<75V) to the 75/15. Will always be limited to 15A but as it’s rare to get max out of the panels you will get more charge more of the time with extra solar input.
 
Roger could you send me the link for your website so I can view the solar kits please.
 
Could I ask a few beginner's questions?

Am I correct in thinking…

That a simple solar installation starts with a solar panel (e.g. of 100 watts) which is connected to a controller (e.g. a Victron 75/15) which is in turn connected to the leisure battery. So there are 2 wires (+ve and –ve) from the solar panel to the controller and 2 wires (+ve and –ve) from the controller to the battery.

That the controller takes care of making sure the battery receives the “correct” amount of charge from the variable output from the solar panel.

That the three modes (bulk, absorption and float) available with the Victron 75/15 ensure that the leisure battery receives the appropriate charge to ensure that the battery enjoys a long and happy life and is not overcharged.

That consequently, the risk of battery overcharge is negated. So that the risk of an overheating or explosive battery is eliminated (or just minimised?)

That you leave your solar panels connected full-time without either disconnecting them or switching them off.

That when the Victron controller installation manual states that the controller should be situated “as close to the battery as possible” the top of the back cupboard is considered to be close enough.

Also…

What gauge of cable is appropriate to such an installation?

Finally…

Caravaners typically locate their leisure batteries in battery boxes with venting to the outside. How does a Cali cope with this? The leisure battery in the luggage space appears to be behind a simple hatch. The other leisure battery (in an Ocean) is under the front seat (?) Is this arrangement OK because of the design of the Cali or because of the type of the leisure batteries concerned?

I'm sorry if these questions are stupid / naive / have obvious answers. I'm just trying to get my head around the topic.
 
It's a yes to answer all your questions before "Also..."! The correct cables will come with the panel and for the battery in the kit you buy from a decent supplier, I used midsummerenergy.

Cali uses gel batteries so no venting or gases given off and no worries there.
 
If you are prepared to rewire the panel then 2mm squ cable is plenty. The losses over 1.5metres are less than 0.2 volts. When you take into account that the 4mm squ cable that the panels come with is usually aluminium not copper - it loses 0.19 volts. So the difference is 0.01v over 1.5 metres.

It means you can use much less unweidly twin core 2mm square cable.

Voltage loss becomes more of an issue with long cable runs.

Victron recommend putting the charger as close to the battery as possible because the charger has a thermometer built in, and it adjust the charging paramters based on termperature (Lead acid batteries take more voltage when cold). In a Cali the temperature in the battery compartment will normally be pretty much identical to the temperature in the cupboard so it makes no odds.
 
Back
Top