Buy all your VW California Accessories at the Club Shop Visit Shop

Updated Bolt-on Cali and T5/6 Solar Panels for 2017

Exactly. Putting the Van on EHU is allowing a proper conditioning/trickle charge to happen which is good for your batteries, as alternator charging is a bit rough and ready - high amps brute force charging.

The solar regulators do this anyhow, just the same as a mains charger, so no need for the monthly EHU.

Hi Roger

Had a look through this thread and your website and couldn't find any information about cleaning. Unfortunately our Cali lives on the road and is frequently subjected to a messy pounding from our feathered friends sitting up high on the cables. What are your thoughts on the potential damage to solar panels and what kind of specials cleaning considerations are there? e.g. would jet washing be a no-no. This is the only thing that puts me off a solar install.

Thank you.
 
Regarding cleaning You clean them just as you would clean your car, not through a car wash mind you!

They are plastic coated and I can't see bird droppings doing any significant damage. The plastic coating is quite thick and it won't burn through it.

I'd not advise clode up jet washing. You run the risk of blowing the junction box off, or getting between the layers. On the Cali kit that's quite unlikely in reality. If you jet washed from afar it would be ok, i.e. reducing the pressure significantly. I'd still much prefer to use a wet sponge and do it manually.

If it were me, parked near trees/cables with frequent bird crap, I'd make plastic covers on bungees, and clip them on when parke dup for any reasonable time. Save a lot of cleaning!
 
If it were me, parked near trees/cables with frequent bird crap, I'd make plastic covers on bungees, and clip them on when parke dup for any reasonable time. Save a lot of cleaning!

Nice idea, thanks!
 
I've updated our packaging now. It's been sufficient to re-use the original panel packaging up until recently - recyclying and all that! (it's hard work disposing of 100's of 1.2m cardboard boxes!).

Had a recent issue with an EU order where French couriers basically kicked the hell out of one of my kits so now all non-UK orders are pacakged in a wooden frame (there is an automatic handling fee added on for this).

2017-04-27%2011.09.09_zpsyneicn6c.jpg


..and the custom made boxes that fit all kits - up to the biggest T5/T6 kit. (below is a double kit - 200w - 2 boxes taped together)

2017-04-27%2011.40.35_zps1gro5un7.jpg
 
An important update:

One member has found that after 2 years, the rubber washers under the brackets had perished and disintegrated, leaving a small gap, and consequently, the brackets loose, allowing the panel to move.

Please check your brackets for tightness, and remove the supplied rubber washers if used.
 
Hi Roger,

May I ask you two questions?

- Does the bolts have any anti-theft option?

- I've got a Cali Beach with OEM hook up, do I need to route a cable to the leisure battery or just to the tools compartiment.

Thanks!
 
Hi Roger,

May I ask you two questions?

- Does the bolts have any anti-theft option?

- I've got a Cali Beach with OEM hook up, do I need to route a cable to the leisure battery or just to the tools compartiment.

Thanks!
In answer, No and Yes a cable goes to the Solar Control unit and then onto the Leisure Battery.

I have never heard of any Solar Panel, however fitted, being stolen, except of course for Portable panels ( maybe ). Not a 5 minute job to remove.
 
Welshgas is spot on. There are no lockable nuts. I've not heard of a theft yet and I'm sure customers would be in touch with me if it had happened, and I've been selling bolt on kits for other types of vans for around 4 years now.

The Beach cable run to the battery is actually dead easy. Once in the jack compartment you can poke the wire out the bottom gap, then lay it all the way to the front then simply push it under the plastic side panels. The cable goes under and then tucks up in place behind. You just push it with a finger / blunt screwdriver.
 
I certainly like the idea of getting a solar system for extended periods off grid.

Are you able to detail a little more about how the panel connects to the leisure battery? I get that the panel will screw into the rails on the roof but what do you do with the cable that comes out of it?

I'm not clear on how the cable enters the van. Is it via the tail gate? Do you have to cut/drill anything to get the cable inside?

Could you share some pictures of how this is done? Where does the cable connect once inside? (I've got a T6 beach if that makes any difference)

If I were to provide some feedback (as a potential purchaser) - the aluminium frame does appear to have rather sharp edges. One slip and I can see that causing a fairly painful gouge/scratch. It might be a nice touch if these were rounded off a bit and maybe fit plastic trim/covers to the edges?

I'm not knocking the quality as I'm sure the product is very good - that was my initial impression though.

I really like the idea of the app display and the MPPT charger.

Has anyone on here got one and care to share any pictures? (I have had a look at solarcampersolutions.co.uk)

Cheers
 
Thanks WelshGas - I had seen that post.

I'm not clear on what happens to the output from the solar panel. There aren't many photos of the final termination. Is the output cable connecting to the circuit from the EHU at the rear of the van, or is the cable run all the way to the leisure battery and connected directly to it?

I suppose I'd like to know how much butchering am I going to have to do?

Are there any potential warranty issues?

Thanks
The cable runs to the Leisure Battery. Roger details how this is done in Post 34, above.
There is NO " butchering " involved other than a small hole in the rubber gator that covers the electrical wiring loom to the tailgate.
 
Fitted my solar panel this afternoon, took about two hours, but taking a bit of time to try and make a neat job, and I'm sure it can be done quicker. In addition to the cut in the rubber gator I did also mount the MPPT high up in the rear cupboard with two self tapping screws just to add to the butchery count. The MPPT needs to be high up to stop the self tappers fouling the timbre door when opened and to give the wires adequate clearance from the upper shelf. You will need to empty the rear compartment and shelf to make access to the rear battery easy and a socket set, rather than a spanner, to remove the battery retaining bolt. Add another spanner to tighten the roof bolts, and small flat head screwdriver, to secure the wires into the MPPT, and its all easy to do. I didn't go for any remote MPPT controller but that can be added later if the need arrises (ÂŁ28 form Amazon).
 
Has anyone on here got one and care to share any pictures?
I have a 150 T6 Beach with three seat bench. I class myself at one grade below a DIY novice - a DIY incompetent, meaning that whenever I start a DIY project there is a greater than 50% chance I will make things worse.

You will need:
  1. solar panel(s)
  2. MPPT charger
  3. solar panel to MPPT wire
  4. MPPT to battery wire
  5. cable ties
  6. appropriate tools
Glossary:
trivial - a five year old could do it
easy - possibility of mistakes e.g. crossed bolt threads, chipped trim
tricky - takes patience and time, but not much likelihood of damage
very tricky - takes more patience and more time than above, but no more likelihood of damage​
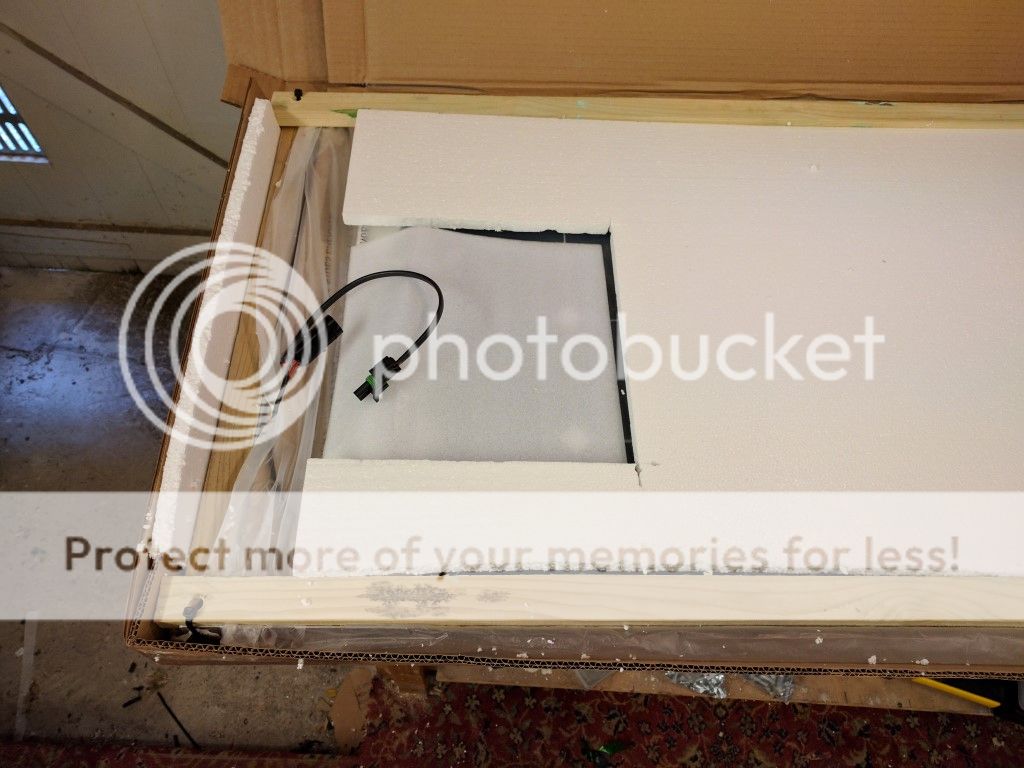
  • Bolt panels onto the roof - easy
The next stage is easiest if the inside of your van is empty save the bench, i.e. no additional seats, no multiflex.

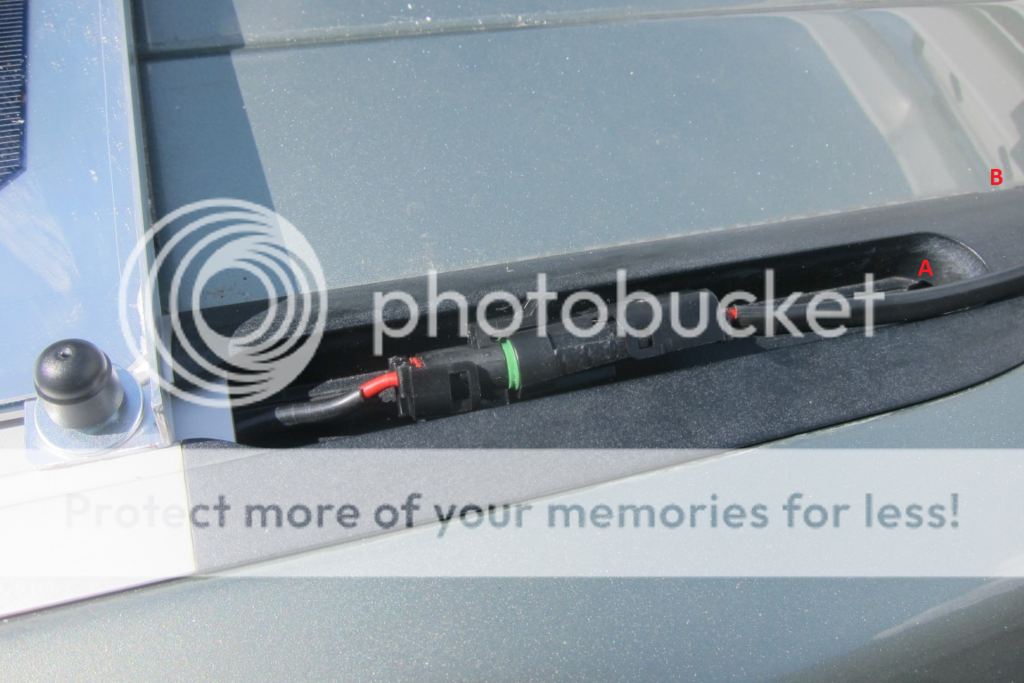
The wire enters the van via the tailgate to van cable tube that feeds power and water to the rear windscreen washers.

  • Make a small incision in the cable tube and feed the panel wire through - very tricky

  • Pull out sufficient rear roof trim to see the wire, and feed it down through the left rear corner trim to the jack cavity - tricky (easy if trim below is removed)

  • Some corner trim might need pulling off and replacing - easy

  • Remove sufficient tools from the jack cavity to install the MPPT charger, place removed tools in the cavity under the driver's seat - trivial.

  • Connect the panel wire to the MPPT charger - trivial.

  • Remove the front passenger chair to move it further forward than it will usually go, four bolts only, but beware it is connected by cables to the van so do not remove the chair from the van, just push forward towards the passenger footwell to fully expose the leisure battery - easy.

  • Remove the battery cover and connect the battery wire to the battery - trivial.

  • From front to back, poke the battery wire under the left side floor trim, moving the 3 seat bench forward or back to allow access to the floor trim. I used a stiff VW leather keyring fob for this - easy

  • connect the battery wire to the MPPT charger - trivial

  • cable tie the panel wire so it is all neat and tidy on the roof. IMPORTANT, make sure there is sufficient excess panel wire for the rear of the roof to pop up. Hint, I loosely cabled tied an additional loop of wire under the panels so that if for any reason there is a strain on the wire when the roof is popped up, the wire loop gives way and the wire won't snap - easy

  • Get someone you trust to watch the panel wire as you slowly raise the roof to check there is sufficient wire - easy
When the roof is lowered, the excess cable can be tucked into the cavity near the tailgate hinge.

You can wrap black electrical tape around the small incision you made in the tailgate to van cable tube.

I hope this is all pretty comprehensive and makes sense.

I should also add that as a DIY incompetent I sought the expert help of my brother who is considerably better skilled at such tasks than I am, but having worked together on the process, I am confident that I could have managed alone.
 
Last edited:
Thanks Tom, that's really helpful.

It doesn't sound like it should cause any warranty issues.
 
Word of warning if you do decide to disconnect the wires to the passenger seat. Don't then turn the ignition on until they are reconnected , if you do then an airbag warning light will be shown in the dashboard and can only be turned off by VW or someone with a code reader.


Sent from my iPhone using Tapatalk
 
Thanks Tom, that's really helpful.
Here's a photo of our panels, easy to see with the bike rack removed.
IMG_2557 (2).JPG
Excess wire for popping up the roof can simply be tucked into the tailgate void.

You can also see the extra loop of wire loosely cable tied and tucked under the panels. This is to mitigate any risk, however small, of the excess wire becoming snagged in the tailgate, and the wire snapping when the roof is popped up.
 
Last edited:
Here's a photo of our panels, easy to see with the bike rack removed.
View attachment 21460
Excess wire for popping up the roof can simply be tucked into the tailgate void.

You can also see the extra loop of wire loosely cable tied and tucked under the panels. This is to mitigate any risk, however small, of the excess wire becoming snagged in the tailgate, and the wire snapping when the roof is popped up.
Hi - how much was the total kit - thanks
 
Hi - how much was the total kit - thanks
The dual 200w panel kit, including MPPT charger, was about ÂŁ850.

Cheaper 100w kits start from about ÂŁ350, but I think it's worth buying a good charger to convert excess volts to amps.

Don't think that you will save money with panels, campsite hookups are about ÂŁ2 per night. It is about the convenience of independent off-grid electricity.
 
Wow Tom - your write up is superb! - I'd have contributed but i only get a few notifications when these threads are updated, no consistency on the notifications for some reason!

As for the cable on the roof, I run the cable down the T channel, with the plug resting in the final black plastic section of the slot (it's measured & cut that way). I then cable tie the lead down by the plug under the plastic trim - there is a hole in it you can feed a supplied cable tie through.. with some patience!

When I run the cable in the van, I do it with the roof fully up. Put the grommet/boot back in the hole and pull tight on the cable from inside the van. That way I know the lenght is optimal.

The aluminium angle bar has rounded corners - you can't see it well in the photos but trust me, they are rounded enough not to catch/cause injury. I've been doing that for a while not so that people using covers don't have them ripped.
 
When I run the cable in the van, I do it with the roof fully up.
Put like that, it sounds blindingly obvious that it should be done that way! But I didn't do it that way because the last thing I did was tidy up the wire on the roof, and I couldn't do that easily with the roof up.

I will look into routing the panel wire and connector in the T channel, I hadn't noticed the drainage hole which will take a cable tie.
 
Last edited:
Wow Tom - your write up is superb! - I'd have contributed but i only get a few notifications when these threads are updated, no consistency on the notifications for some reason!

As for the cable on the roof, I run the cable down the T channel, with the plug resting in the final black plastic section of the slot (it's measured & cut that way). I then cable tie the lead down by the plug under the plastic trim - there is a hole in it you can feed a supplied cable tie through.. with some patience!

When I run the cable in the van, I do it with the roof fully up. Put the grommet/boot back in the hole and pull tight on the cable from inside the van. That way I know the lenght is optimal.

The aluminium angle bar has rounded corners - you can't see it well in the photos but trust me, they are rounded enough not to catch/cause injury. I've been doing that for a while not so that people using covers don't have them ripped.

Do you have any pics Roger...???
 
The cable tie goes under a small gap at "B" and comes out of the drainage hole at "A". You then trap the solar cable in the cable tie.

cable_zpsjaxsrdm6.png
 
Back
Top