How to Replace Roof Sensors

Well done, even if it has been a while. Very comprehensive report. I just got the price from my Norwegian dealership. They are asking for 750 GBP for the sensors, labor comes on top. I think I want to order the BMW sensors, like you did. They cost 19 GBP per sensor. Anything else I should consider?
No, it’s all written there. I would get the tools. I am no mechanic but this wasn’t too difficult to do. A couple of people seem to have connected them the wrong way around but for me it was clear red to red, brown to brown.

It’s important to have time and good weather. Once you disconnect the batteries you can’t put the roof down until you have finished and reconnected. Good luck
 
A massive thank you to Lambeth Cali. I had the same fault and could not raise the roof. Took it to Vw, diagnosis was a faulty sensor, cost to repair £3700, that was to replace the full roof harness and labour. Thought no way - read your post on how to change the senors but didn’t feel confident enough to attempt it myself. Went to a local garage explained the issue to the auto electrician, I sourced the sensor part from BMW ( hall sensor part number 54347190735). Also left him a copy of your process. Van all fixed and working cost was £26 for sensor including post. £380 from garage to carry out the work. Saving on Vw approx £3300.

Once again thanks for the post and thanks all for this site, been a member for a while and don’t usually post anything. I’ll try harder in future to pass on any helpful tips

cheers all.
 
For an auto electrician it should be a very straightforward job. They do exist if you search on Google maps.
If the roof is stuck down then that obviously causes additional problems.
 
Thanks for everyone who posted all the interesting stuff on the faulty sensors.
I try to keep my father-in-laws cali up and running (and for it he Lets me use it). After finding this post I started on replacing all four after not being able to raise or lower the roof.
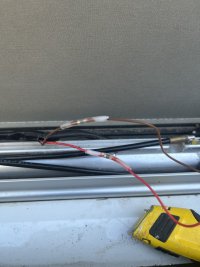
I ordered the sensors from a BMW specialist and started the replacement. To prevent soldering I used these :
https://www.+amazon+amazon+amazon+a...IQA&ref_=pe_28126711_487767311_302_E_DDE_dt_1
And a small heat gun
https://www.+amazon+amazon+amazon+a...P4A&ref_=pe_28126711_487767311_302_E_DDE_dt_1

The shrink sleeve include a soldering ring and also creates a watertight seal.
Video (regretfully on aliexpress)

I used it and loved it. Tested it on some excess wires before and the wire, when pulled on, broke next to the connection.
When you see the solder flow into the wire, connection is

Overall time used was 2.5 hours for all 4 sensors including overruling the roof to go up, removing and building the control box back etc. Overall a very rewarding job to do. Two sensors where corroded.

Regards,
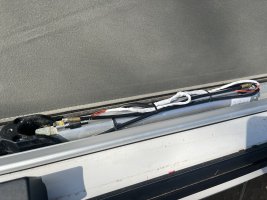
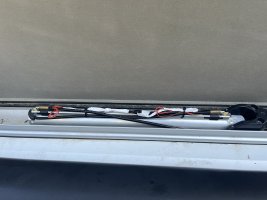
PaulIMG_8673.jpegIMG_8683.jpegIMG_8682.jpeg
 
Below is a picture of the rear sensor before I touched it.
View attachment 78720The blue arrow shows the front hose that is looped around the back of the hydraulic ram. This can be unclipped which makes it easy to twist the hose to replace the front sensors. You can see the rear hose directly above the rear sensor with “2” on it. Even removing this is difficult. You will probably destroy it getting it out. It was suggested to me that I didn’t want that hose to pop out or bad things would happen. The good news is they seem to be securely fitted.
When I got it out and started to remove the electrical tape I found that this wiring was more complicated. There were still two wires going to the sensor but there were connectors under the tape with two wires joining into one before going to the sensor. This meant a little care was needed about where I was going to make my join.
View attachment 78724

I cut the wire and put some tape around the first 10cm of the new sensor and cut and stripped the wires ready to connect.

It became clear that the only way I was going to be able to get the new sensor in, was to snap off the bits of plastic you can see above either side of the “2” and slide it in from the back. After these plastic clips were snapped I also needed to use a sharp pen knife to really remove all the remaining tiny bits of plastic where I had snapped them off. This might not seem great but I assure you when these sensors are in place there is no way they’re ever coming out. Here you can see I tried to get it in with one piece of the clip removed but it would not work.
View attachment 78721
With both bits removed and trimmed with a sharp knife, it was possible to push it through from the back.
View attachment 78722
You can see that with the rear clips remaining and the plastic bit where the wires are, in the central channel it’s not going anywhere. I then connected the wires and covered in tape as before.

After doing the two rear sensors I finished with the front one. Here you can see how much easier it is to move the hose out of the way.
View attachment 78725

This sensor wasn’t rusted but was covered with a white crystalline dust that suggested some corrosion or reaction. I cleaned this all away.
View attachment 78726

The final job before the plastic cover goes back on. Reasonably tidy and not that dissimilar to how it was.
View attachment 78727

I now made sure I hadn’t left any screwdrivers etc on the roof and reconnected the batteries.

(When I reconnected everything after replacing the first sensor, at the end of day one, there was a few worrying electrical shenanigans. The engine wouldn’t start first time; the control unit was flashing and wouldn’t give me the main menu until I set the clock; error 7001 came up which means loss of power. I think my ignition often doesn’t like starting until I’ve jiggled the steering wheel and engaged the steering lock. Eventually it started, but, as I said before, replacing the one sensor didn’t work. I plugged the van in overnight which cleared 7001.)

So after replacing the other 3 sensors and reconnecting the batteries I plugged in to the mains to make sure all was charged. I then went for a walk for an hour, contemplating success and failure. With it looking like it was about to rain I was forced into seeing if it had all worked. I think I had to set the clock again. I checked diagnostics but no errors this time. I turned the key and lowered the roof. The van made the usual 3 noises and the final locking one suddenly stopped. Like it should! The first time in months, it was back to normal. Success!! The roof down symbol was there.
View attachment 78728
I went for a drive to make sure the chimes wouldn’t reappear. They didn’t.
One odd quirk of the roof thinking it’s up, is that you can’t turn off the control module. I checked this and it turned off, so again, everything was back to normal.

So the 4 sensors cost me €100 on eBay and I spent about £30 on some tools. The sensors are now £58.67 for 4 from bmwsupply.co.uk. I’ve just ordered another 4 as my van is a 2008 T5 and I can I imagine having to do this again sometime, ten years from now.
It took me 6 hours to replace the first sensor but an hour was lost borrowing a spline socket to remove the seat, it rained for an hour and several people wandered past and engaged me in conversation. The first attempt was quite fiddly and without the wire stripper, which was an absolute life-saver. The number 2 slot was great for stripping the very fine wire. The second day I replaced the other 3 sensors in 4 hours.

View attachment 78729
I’ve heard it suggested a VW roof loom costs £150-£250 just as a part. The labour charges could send this upto £3000, depending on the dealer.
If there was a great dealer near me, I would have ‘happily’ have paid them maybe £600-£1000 to fix this. I love our van and will always pay whatever to have it maintained properly. I wouldn’t however, want to pay a dealer £3000 to pull out the roof lining for no good reason and generally fumble about.
In all honesty I am still amazed I fixed it!
Well done thanks for your reply, but it’s all beyond my capabilities
 
Hi all!

Long time avid reader of this thread, first time commenter. I just wanted to add my thanks to this, as without it I think my time as a VW Cali owner would have come to a bitter end before it had even properly started. I purchased my 08 Cali late last year with the knowledge that there were a few issues I would need to sort before hitting the road in anger. What I didn't plan for was the roof giving up the ghost approximately 2 months into ownership (I should add, it was working perfectly before this, so no suspicion of foul play, just poor timing).

First evidence of an issue was control panel lighting up during driving and the occasional bonging. This then lead to the total inability to raise the roof. After a brief Google of the symptoms, it became apparent that I had a sensor issue. More googling and I had resigned myself to an expensive repair bill with at a dealership or perhaps a bypass mod through a third party. Then, I stumbled across this thread! A few hours later I had 4 sensors on order from eBay through a chap who had ordered more than required for (ironically) his own sensor replacement job... following this exact guidance! After some encouraging words from him and with the knowledge from Lambeth Cali to hand, I went the whole hog and replaced all 4 sensors (even though it became instantly obvious which sensor was to blame) in order to future proof.

A good few hours later and everything is sorted! I've gone from almost conceding that neither my willpower, technical knowledge or wallet can sustain California ownership, to accepting that with the help of this forum and the knowledgeable individuals within it, it appears most Cali issues can be solved. So thank you once again for all of the excellent guidance and encouragement! Now to attack the faulty fridge control module...

Elliott
 
Hi @Lambeth Cali I have ordered all the parts to do the sensor replacement but I don't know how to get the roof up, do you have any advice on how to open it?
You will need to have access to the hydraulic pump, behind the roof console (behind the display and lights). Then you have to feed the hydraulic pump with 12V or -12V (reverse polarity). This is done by a lead to a 12V source (starter or aux battery). Fuse it with 30A and take 2,5mm² leads. Then you directly operate the pump without having to worry about broken sensors.
 
Yes, I never had to do this as I was lucky enough that the roof still worked for me.

There are various threads with more detail about how to do the above. I always thought there was also a slot that with a screw driver you could turn to manually raise it.
 
You will need to have access to the hydraulic pump, behind the roof console (behind the display and lights). Then you have to feed the hydraulic pump with 12V or -12V (reverse polarity). This is done by a lead to a 12V source (starter or aux battery). Fuse it with 30A and take 2,5mm² leads. Then you directly operate the pump without having to worry about broken sensors.
Thank you very much, I assume the pump is behind the foam near the bleed screw?
 
Thank you very much, I assume the pump is behind the foam near the bleed screw?
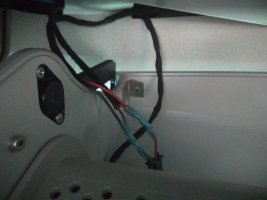
Yes, and on the left side you have a black 2 pin connector. 12V from black to red will turn the pump one way, 12V from red to black will turn the pump the other way. One way will open the roof, the other way will close the roof.
 
Yes, I never had to do this as I was lucky enough that the roof still worked for me.

There are various threads with more detail about how to do the above. I always thought there was also a slot that with a screw driver you could turn to manually raise it.
You can't raise the roof by opening the emergency screw. That is only to drop the roof in case of a failure.
 
Yes, and on the left side you have a black 2 pin connector. 12V from black to red will turn the pump one way, 12V from red to black will turn the pump the other way. One way will open the roof, the other way will close the roof.
Excellent, thank you very much
 
My roof has over the years occasionally said it was up when it was down. I‘ve owned it from 2009 and know the sound it makes when closing so have ignored this. I think last summer this finally became worse. Coincidentally after last summer I decided I wanted to replace the control unit as the screen was now useless. The new replacement was a newer model and now chimed when I was driving with the “Roof Open”. This was annoying. Also at Easter the sound of the roof closing changed. I would say my roof makes 3 different sounds when closing. Now the final noise didn’t stop but just kept repeating as if it was trying to lock but something wasn’t finishing. Where the noise used to stop by itself and then I’d take my finger off the button, it just kept going.
I started to read the dozens of roof posts and decided the 4 hall sensors might be the problem. When I read that these were available to buy for £15 (BMW part number 54347190735) I decided to give it a go and swap them. My van is serviced at Peter Norris a VW specialist in South London. They wouldn’t do anything non mechanical and I don’t trust any of my local dealers. It seems likely they would have replaced everything in the roof leaving me with a bill between £1000 to £3,500, mainly for labour.

You will need
I bought 4 sensors off eBay which came from Lithuania although I see you can get them from bmwsupply.co.uk (I’ve just ordered 4 more as parts). Part 54347190735
View attachment 78675

A torx screwdriver TT25

A basic socket set (I found one in our garage that apparently belongs to my wife)

A spline socket set
https://www.+++amazon+amazon+amazon+amazon+amazon+amazon++amazon+amazon+amazon+amazon+amazon+amazon++amazon+amazon+amazon+amazon+amazon+amazon++amazon+amazon+amazon+amazon+amazon+amazon++amazon+amazon+amazon+amazon+amazon+amazon++amazon+amazon+amazon+amazon+amazon+amazon+++amazon+amazon+amazon+amazon+amazon+amazon++amazon+amazon+amazon+amazon+amazon+amazon++amazon+amazon+amazon+amazon+amazon+amazon++amazon+amazon+amazon+amazon+amazon+amazon++amazon+amazon+amazon+amazon+amazon+amazon++amazon+amazon+amazon+amazon+amazon+amazon+++amazon+amazon+amazon+amazon+amazon+amazon++amazon+amazon+amazon+amazon+amazon+amazon++amazon+amazon+amazon+amazon+amazon+amazon++amazon+amazon+amazon+amazon+amazon+amazon++amazon+amazon+amazon+amazon+amazon+amazon++amazon+amazon+amazon+amazon+amazon+amazon+++amazon+amazon+amazon+amazon+amazon+amazon++amazon+amazon+amazon+amazon+amazon+amazon++amazon+amazon+amazon+amazon+amazon+amazon++amazon+amazon+amazon+amazon+amazon+amazon++amazon+amazon+amazon+amazon+amazon+amazon++amazon+amazon+amazon+amazon+amazon+amazon+++amazon+amazon+amazon+amazon+amazon+amazon++amazon+amazon+amazon+amazon+amazon+amazon++amazon+amazon+amazon+amazon+amazon+amazon++amazon+amazon+amazon+amazon+amazon+amazon++amazon+amazon+amazon+amazon+amazon+amazon++amazon+amazon+amazon+amazon+amazon+amazon+++amazon+amazon+amazon+amazon+amazon+amazon++amazon+amazon+amazon+amazon+amazon+amazon++amazon+amazon+amazon+amazon+amazon+amazon++amazon+amazon+amazon+amazon+amazon+amazon++amazon+amazon+amazon+amazon+amazon+amazon++amazon+amazon+amazon+amazon+amazon+amazon.co.uk/dp/B010K5A5PO/?tag=unique09f-21

Wire trimmer
https://www.+++amazon+amazon+amazon+amazon+amazon+amazon++amazon+amazon+amazon+amazon+amazon+amazon++amazon+amazon+amazon+amazon+amazon+amazon++amazon+amazon+amazon+amazon+amazon+amazon++amazon+amazon+amazon+amazon+amazon+amazon++amazon+amazon+amazon+amazon+amazon+amazon+++amazon+amazon+amazon+amazon+amazon+amazon++amazon+amazon+amazon+amazon+amazon+amazon++amazon+amazon+amazon+amazon+amazon+amazon++amazon+amazon+amazon+amazon+amazon+amazon++amazon+amazon+amazon+amazon+amazon+amazon++amazon+amazon+amazon+amazon+amazon+amazon+++amazon+amazon+amazon+amazon+amazon+amazon++amazon+amazon+amazon+amazon+amazon+amazon++amazon+amazon+amazon+amazon+amazon+amazon++amazon+amazon+amazon+amazon+amazon+amazon++amazon+amazon+amazon+amazon+amazon+amazon++amazon+amazon+amazon+amazon+amazon+amazon+++amazon+amazon+amazon+amazon+amazon+amazon++amazon+amazon+amazon+amazon+amazon+amazon++amazon+amazon+amazon+amazon+amazon+amazon++amazon+amazon+amazon+amazon+amazon+amazon++amazon+amazon+amazon+amazon+amazon+amazon++amazon+amazon+amazon+amazon+amazon+amazon+++amazon+amazon+amazon+amazon+amazon+amazon++amazon+amazon+amazon+amazon+amazon+amazon++amazon+amazon+amazon+amazon+amazon+amazon++amazon+amazon+amazon+amazon+amazon+amazon++amazon+amazon+amazon+amazon+amazon+amazon++amazon+amazon+amazon+amazon+amazon+amazon+++amazon+amazon+amazon+amazon+amazon+amazon++amazon+amazon+amazon+amazon+amazon+amazon++amazon+amazon+amazon+amazon+amazon+amazon++amazon+amazon+amazon+amazon+amazon+amazon++amazon+amazon+amazon+amazon+amazon+amazon++amazon+amazon+amazon+amazon+amazon+amazon.co.uk/dp/B083LKTZXT/?tag=unique09f-21

Electrical tape
https://www.+++amazon+amazon+amazon+amazon+amazon+amazon++amazon+amazon+amazon+amazon+amazon+amazon++amazon+amazon+amazon+amazon+amazon+amazon++amazon+amazon+amazon+amazon+amazon+amazon++amazon+amazon+amazon+amazon+amazon+amazon++amazon+amazon+amazon+amazon+amazon+amazon+++amazon+amazon+amazon+amazon+amazon+amazon++amazon+amazon+amazon+amazon+amazon+amazon++amazon+amazon+amazon+amazon+amazon+amazon++amazon+amazon+amazon+amazon+amazon+amazon++amazon+amazon+amazon+amazon+amazon+amazon++amazon+amazon+amazon+amazon+amazon+amazon+++amazon+amazon+amazon+amazon+amazon+amazon++amazon+amazon+amazon+amazon+amazon+amazon++amazon+amazon+amazon+amazon+amazon+amazon++amazon+amazon+amazon+amazon+amazon+amazon++amazon+amazon+amazon+amazon+amazon+amazon++amazon+amazon+amazon+amazon+amazon+amazon+++amazon+amazon+amazon+amazon+amazon+amazon++amazon+amazon+amazon+amazon+amazon+amazon++amazon+amazon+amazon+amazon+amazon+amazon++amazon+amazon+amazon+amazon+amazon+amazon++amazon+amazon+amazon+amazon+amazon+amazon++amazon+amazon+amazon+amazon+amazon+amazon+++amazon+amazon+amazon+amazon+amazon+amazon++amazon+amazon+amazon+amazon+amazon+amazon++amazon+amazon+amazon+amazon+amazon+amazon++amazon+amazon+amazon+amazon+amazon+amazon++amazon+amazon+amazon+amazon+amazon+amazon++amazon+amazon+amazon+amazon+amazon+amazon+++amazon+amazon+amazon+amazon+amazon+amazon++amazon+amazon+amazon+amazon+amazon+amazon++amazon+amazon+amazon+amazon+amazon+amazon++amazon+amazon+amazon+amazon+amazon+amazon++amazon+amazon+amazon+amazon+amazon+amazon++amazon+amazon+amazon+amazon+amazon+amazon.co.uk/dp/B08QHTZ2NR/?tag=unique09f-21

Thin cable ties

Perhaps a pen knife and flat head screwdriver

First Raise the Roof

Second, Disconnect the 3 Batteries


I used part of Loz’s great instructions on how to disconnect the 2 leisure batteries and starter battery from his

HOW-TO INSTALL DC-DC CHARGER TO REPLACE VW SPLIT CHARGE RELAY​

so I will skim through this bit. You just need to disconnect the negative terminal of each. I wore a rubber glove when touching terminals.
View attachment 78669
The battery exhaust tube came off whilst doing this, so I reconnected.
View attachment 78670
You need the socket set and spline socket to remove passenger seat. 2 splines bolts at the rear and 2 normal 13’ bolts at the front.
View attachment 78671

View attachment 78672
And finally the starter battery
View attachment 78673

Now You Can Remove the Sensors
Remove plastic cover using TT25 torx screwdriver. It’s a torx screw at the front and it’s a kind of clip at the back. Very easy.

View attachment 78668

Remove the Front Sensor
You are going to remove each sensor and cut the 2 wires and then insert your new sensors and connect the wires together and then wrap around with electric tape.

The front ones are easier so I would start with them. You need to twist the hydraulic hose out of the way and jiggle with the clips to get the sensor out. I used a flat head screwdriver and a pen knife to loosen the clips and push it up from below. It’s very likely that the clips might break but it’s a good idea to get an idea of how this fits as it will make it easier to put the new one in.
View attachment 78674
Cut the wire to remove it, leaving enough wire on the loom to connect to new sensors. I got better at this as I went along and by sensor 4 I think it was a tidy job.
View attachment 78676
I learnt to prep the new sensor wiring before inserting it. I wrapped some electrical tape around the wires leaving the new sensor, probably 10cm and cut the wire at 20cm and trimmed off the plastic, ready to connect.
View attachment 78677
Connect the wires together (I watched various YouTube videos about how best to do this, I didn’t solder anything just twisted wires together and then squeezed with pliers)

TBC, please don’t comment so I can put posts together
Hi @Lambeth Cali what is the socket size for the spline bolt, if the other 2 are a 13 I am guessing these will be too but just want to make sure. Cheers
 

Similar threads

A
Replies
3
Views
445
DavidofHook
DavidofHook
Frankyworthy
Replies
52
Views
12K
Lambeth Cali
Lambeth Cali
Back
Top